Location Overview
This document describes the parameters available for a Ceres Location. A Location in Ceres 5 generally represents a physical structure or place where inventory is received, stored, and shipped. A Location can be a warehouse, a cold storage facility, a trailer, or even in some instances a specific area of a warehouse.
Ceres Object release 5.00.00 is required for the functionality described in this document.
Setting Up Locations
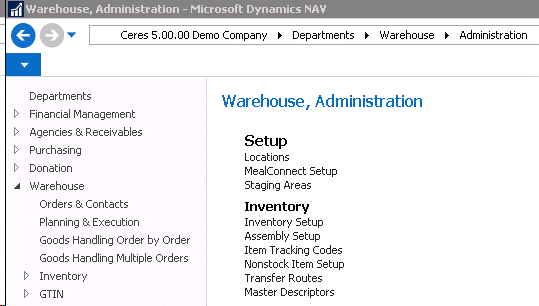
Locations can be accessed from Departments ⯈ Warehouse ⯈ Administration Setup ⯈ Locations. You will see a listing of the Locations that exist within Ceres.
-
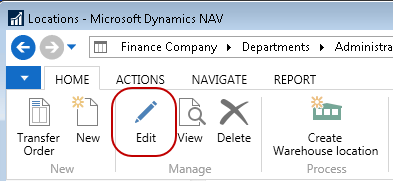
Select a Location from the list that displays. Select Home ⯈ Edit to edit the Location.
-
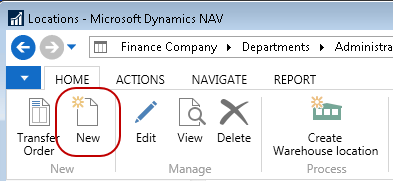
Select Home ⯈ New to create a new Location. Update the fields on the Location Card based on how your warehouse is configured and how you would like the warehouse functionality to work in Ceres.
General FastTab
The General FastTab describes the basic setup of a Location.

Code: This is the main identifier for the Location, which can be entered as any combination of text and numbers and must be unique.
Branch Code: If you are using Branches, specify the branch associated with this location. The branch can be selected from the list or can be entered manually. The branches that can be entered are limited to the values in the list.
Agency Order Location Override: This field, if used, allows the ability to have an agency assigned to one location for appointments, yet have the inventory fulfilled from a different location. This is most useful when a smaller location services the agency’s requirements but does not stock inventory to fulfill their order; the inventory would come from another larger or main location. If this field is entered, it will override the Web Location specified on the Agency & Receivables Setup page.
Name: Enter the name of the Location.
Name 2: An extension of the Name field.
Use As In-Transit: A checkmark in this field allows the Location to be used as an in-transit location. At least one Location must be designated as In-Transit to transfer product using Transfer Orders.
Exclude from Tax Calculation: Check this box if inventory distributed from this location is not subject to taxes.
Special Instructions: Specify special instructions for the Location. The information specified here will be defaulted to Transfer Orders when this location is used as the “transfer-to location.”
Roadnet Location Type: If you are using Roadnet to manage routing of your transfer orders for this location, specify the type of Roadnet location as applicable. The Export Orders to Roadnet process can then provide filtering for location types.
Address & Contact FastTab
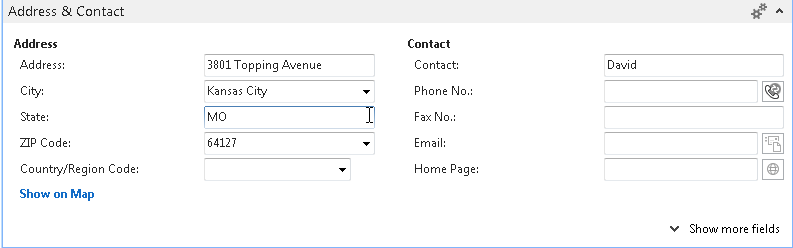
Address: Enter the physical address of the Location.
City: Enter the city for this Location. The city can be selected from the list or entered manually. If the city is selected from the list, the zip code and state will be populated if they have been specified on the zip codes table.
State: Enter the state for the Location.
ZIP Code: Enter the zip code for the Location.
If you fill in the zip code field with a zip code that is linked to a single city in the zip code table, Ceres will fill in the city field automatically. If there is more than one city linked to the zip code, Ceres displays a list of the relevant cities for you to choose from. If the zip code is not set up in the zip code table, you must enter the city manually.
Country/Region Code: Enter the country/region for the Location. The county/region can be selected from the list or can be entered manually. The country/regions that can be entered are limited to the values in the list.
Contact: Specify the contact name for this Location.
Phone No.: Enter the phone number for the Location.
Fax No.: Enter the fax number for the Location.
Email: Enter the email address for the Location. You can click the button to the right of the field to create and send an email message to the email address entered in the field.
Home Page: Enter the home page address for the Location. You can click the button to the right of the field to access the Location’s home page.
Warehouse FastTab
The Warehouse Fast Tab provides the parameters available for a warehouse location.
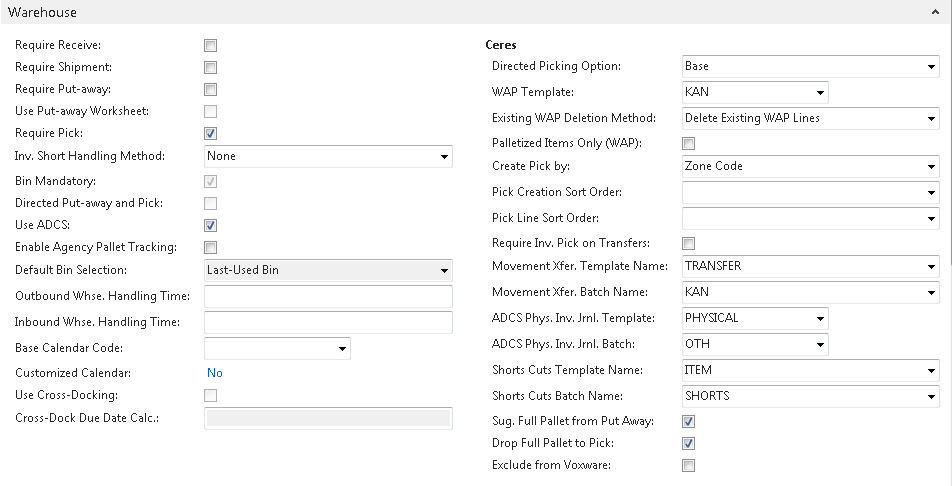
Require Receive: A checkmark in this field requires the Location to use the Receive function on the Warehouse Management menu.
Require Shipment: A checkmark in this field requires the Location to use the Shipment function on the Warehouse Management menu.
Require Put-away: A checkmark in this field requires the Location to use the Put-away activity.
Use Put-away Worksheet: If the Require Put-away option is selected, a checkmark in this field indicates that Ceres will utilize the put-away worksheet for put-away instead of Ceres creating a put-away when a warehouse receipt is posted.
Require Pick: A checkmark in this field requires the Location to use the pick activity.
Inv. Short Handling Method: Select how to handle inventory shorts when posting Agency Orders, pick documents, and shipment documents. This functionality also automatically clears any back orders that were a result of the inventory shorts.
-
None: When the quantity shipped is less (short) than the original order quantity; no updates are made to the order quantity during posting. This method applies to the Agency Order with Shipping Option 1, the Agency Order and/or Inventory Pick with Shipping Option 2, and to the Agency Order and Warehouse Shipment with Shipping Option 3. No backorder is created since the documents will still be there with a pending Qty to Ship that will need to be cleared manually for some Ship Options. Once the Qty to Ship is deleted, then the available inventory will increase for the item for the shorted amount.
-
Clear to Avail. Inventory: When the quantity shipped is less (short) than the original order quantity; the order quantity is set to the quantity handled/shipping during posting to reflect what was actually shipped. This method applies to the Agency Order with Shipping Option 1, to the Agency Order and/or Inventory Pick with Ship Option 2, and to the Agency Order and Warehouse Shipment with Shipping Option 3. In this instance, the fact the order was shorted is not tracked. The inventory that was shorted will flow back to Available Quantity for the Item.
-
Clear to Item Journal: This option means you are actually using Inventory Shorts as described above. When the quantity shipped is less (short) than the original order quantity, the order quantity is set to the quantity handled/shipped during posting to reflect what was actually shipped. Plus, a negative adjustment is automatically created in the Item Journal Shorts Cuts Batch for the short amount. Since the negative adjustments are not posted automatically, the entries will need to be reviewed and posted manually in coordination with a cycle count. This method applies to the Agency Order with Shipping Option 1, to the Agency Order and Inventory Pick with Shipping Option 2, and to the Agency Order and/or Warehouse Shipment with Shipping Option 3.
An “Inv. Short Handling Method” other than None requires that “Exclude from Voxware” be yes.
Bin Mandatory: A checkmark in this field requires the Location to use bins in all item transactions. At least one bin must be set up for each Location that is not designated as In-Transit. An In-Transit Location does not require bins.
Directed Put-away and Pick: A checkmark in this field requires the Location to use advanced warehouse functionality such as calculated bin suggestion.
Use ADCS: A checkmark in this field indicates that the warehouse has established an automated data capture system (ADCS) that must be used to keep track of items within the warehouse.
Enable Agency Pallet Tracking: A checkmark in this field indicates that the warehouse will utilize the Agency Pallet Tracking feature. Pallets for picked orders that have not been picked up or delivered can be tracked in the Location until picked up by or delivered to agencies.
Outbound Whse. Handling Time: This field contains the date formula used to calculate the outbound warehouse handling time.
Inbound Whse. Handling Time: This field contains the date formula used to calculate the inbound warehouse handling time.
Use Cross-Docking: A checkmark in this field requires the Location to use cross-docking functionality. Cross-docking functionality is only available if the Location requires put-away and receive processing.
Cross-Docking Due Date Calc.: This field contains the cross-dock due date calculation. The time period in this field indicates how far ahead from the work date Ceres will look for cross-doc opportunities in this location.
Directed Picking Option: Select the level of picking direction desired when you are using ADCS Handhelds or manually processing picks.
-
Base: This option pertains to ADCS and manual picking. With this option, Ceres will make fully qualified inventory suggestions: Location, Zone, Bin, Pallet (for palletized items), and Lot on pick documents as well as on ADCS miniforms. Note that fully qualified inventory suggestions can differ depending on other locations settings, as described in this document. It is always possible that Ceres will not be able to make fully qualified inventory suggestions when sufficient inventory does not exist.
-
Drop on Demand (ADCS): This option pertains to ADCS Handhelds only. With this option, Ceres will not display fully qualified suggestions on the pick document or the handheld miniform. Instead, a single line (per item) will be created, which represents the pick document’s overall requirement per item. The miniform displayed on handheld allows the user to scan a particular pallet, input the quantity to pick, and submit an update to Ceres. Ceres will then “explode” the single line to a new line complete with fully qualified inventory information. This process is repeated until each original pick document line’s demand has been fully qualified. Review the ADCS Procedure and Warehouse Activity Plan Procedure for more information on this process.
-
Drop on Demand (Manual): This option pertains to manual handling of pick documents only. As with the Base option, this option will direct Ceres to make fully qualified inventory suggestions on the pick document. However, the suggested pallet (for Palletized items) and Lot information will be suppressed on the Picking List report. Users will pick using the Pick List report to annotate the inventory and then update the pick document within Ceres if there are differences. Review the ADCS Procedure and Warehouse Activity Plan Procedure for more information on this process.
WAP Template: This field indicates the template used for the WAP (see Warehouse Activity Plan Procedure). The WAP template will determine the order of logic used to determine which To Zone and To Bin will be used to place/drop an item for picking.
Existing WAP Deletion Method: This setting provides options for how Ceres should handle existing WAP lines when the Create WAP process is run subsequently. Choose from the following options:
-
Delete Existing WAP Lines: With this option, Ceres will clear existing WAP lines prior to suggesting new movements.
-
Keep Existing WAP Lines if Picks Exist: With this option, Ceres will clear existing WAP lines prior to suggesting new movements only if the existing WAP line does not have an associated pick document. It the WAP line has a related pick document, the WAP line will not be deleted.
-
Keep all Existing WAP Lines: With this option, Ceres will not clear existing WAP lines regardless of whether a related pick document exists or not.
Palletized Items Only (WAP): Place a checkmark in this field to only include palletized items in the WAP suggestions.
Create Pick By: Select the manner in which you would like Ceres to create inventory pick documents. This option applies to Shipping Option 2 only. See Inventory Workflows Procedure for descriptions of the Shipping Options.
-
Blank: With this option, Ceres will create a single pick document per Agency Order for inventory having a quantity. Additional pick documents can be created if new items are added to the Agency Order, and the create pick process is run again.
-
Zone Code: With this option selected, Ceres will create a new pick document per Agency Order and per zone based on the fully qualified inventory suggestions. Additional setup is required to use this option. See related topics for more information.
-
FBC Storage Requirement: With this option selected, Ceres will create a new pick document per Agency Order and per FBC Storage Requirement based on the fully qualified inventory suggestions. Additional setup is required to use this option. See related topics for more information.
Pick Creation Sort Order: Select the default sort order for pick document creation when running the Create Invt. Put-away/Pick process.
The selection here is defaulted to the Create Invt. Put-away/Pick request page but can be overridden if desired. Select a sort order if desired from the options below. This option applies to Shipping Option 2 only. See the Inventory Workflows Procedure for descriptions of the Shipping Options.
-
Blank: Agency Order Number Sequence
-
Route-Leg-Stop-Appointment Time: requires Appian
-
Appointment Time-Route-Leg-Stop: requires Appian
-
Appointment Time-Order Handling Group-Order Routing Group:
noteThe setting of the Pick Creation Sort Order on the Location Card requires a Create Picks By setting other than Blank. Ceres will present an error message when a user attempts to set the Pick Creation Sort Order to other than blank if this is the case.
noteThe use of the Pick Creation Sort Order on the Location Card as the default setting on the Create Invt. Put-away/Pick process is dependent on the “Use Pick Creation Sort Order” being enabled on the Location FastTab of the Inventory Setup page. See Related Topics for additional information.
Pick Line Sort Order: Defines the sort order of the lines on picks.
-
Blank: The order lines will be sorted by bin code.
-
Item Gross Weight: The order lines on the pick will be sorted by the gross weight of the individual items, listing the heaviest items first followed by the lighter items. This will facilitate placing heavier items on the pallet first and building the pallet with lighter items on top.
Require Invt. Pick on Transfers: This option pertains to Shipping Option 2 only. With this option selected, Ceres will require a pick document to be created and handled prior to posting the transfer order with the Ship option. If you would like to bypass the creation and handling of the pick document, do not place a checkmark here. Not requiring a pick document can provide for better efficiency when processing transfer orders, especially where ADCS Handhelds are concerned.
Movement Xfer. Template Name: This field indicates the Item Journal Template used for movement transactions.
Movement Xfer. Batch Name: This field indicates the Item Journal Batch used for movement transactions.
ADCS Phys. Inv. Jrnl. Template: This field indicates the Physical Inventory Journal Template used for ADCS.
ADCS Phys. Inv. Jrnl. Batch: This field indicates the Physical Inventory Journal Batch used for ADCS.
Short Cuts Template Name: This field indicates the Inventory Journal Template used for inventory shorts/cuts. A Template must be setup when Clear to Item Journal is selected as the Inv. Short Handling method.
Short Cuts Batch Name: This field indicates the Inventory Journal Batch used for inventory shorts/cuts. A Batch must be set up when Clear to Item Journal is selected as the Inv. Short Handling method.
Sug. Full Pallet from Put Away: This setup option pertains to Shipping Option 2 only. With this option selected, Ceres will first attempt to make fully qualified inventory suggestions from put away (storage) bins during the pick creation process. This setup option is dependent upon other Location settings as described in this document. Additionally, certain criteria must be met in order for Ceres to suggest a full pallet. Refer to the Full Pallet Procedure for additional information.
Drop Full Pallet to Pick: This setup option pertains to Shipping Option 2 only. This option is used in conjunction with the Sug Full Pallet from Put-Away option. When the latter is enabled, the Drop Full Pallet to (pick) bins will dictate whether Ceres will create a WAP suggestion line for full pallets. If selected, a WAP suggestion will be created and will be available for handling either via ADCS Handhelds or manually. If not selected, the full pallet suggestions will be translated to the appropriate pick documents during the pick creation process. Refer to the Full Pallet Procedure for additional information.
Exclude from Voxware: This setup option allows Ceres to be configured to exclude a Location from the Voxware export file process.
The Exclude from Voxware option applies only to pick documents at the header level, not to individual pick document lines. Thus, the option at the Location level applies to an entire pick document (based on the Pick Document header’s Location Code) and for all Zones in the Location.
Bins FastTab
The Bins FastTab provides the ability to specify the default bin code that is used for Receipt, Shipment, Production, Adjustment, Cross-Doc, and Bill of Materials warehouse transactions.
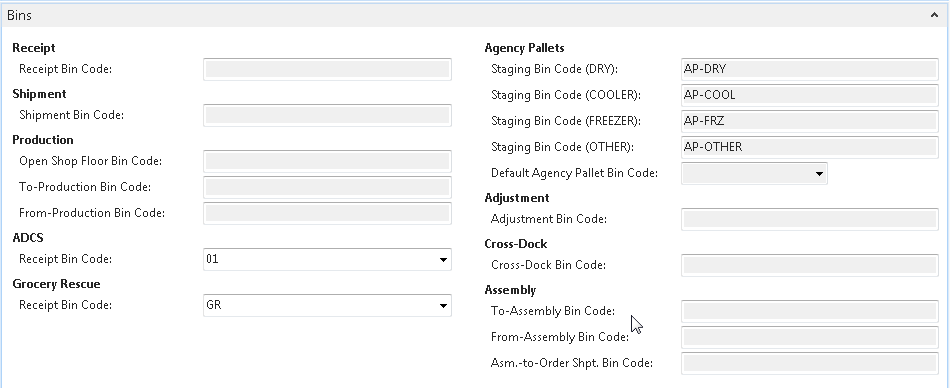
Receipt Bin Code: This field contains the default receipt bin code. You can fill in this code only if the Location is set up to require receiving. When you create a warehouse receipt, Ceres fills in the header with this bin code.
Shipment Bin Code: This field contains the default shipment bin code. You can fill in this code only if the Location is set up to require shipping with warehouse documents. When you create a warehouse shipment, Ceres fills in the header with this bin code.
ADCS Receipt Bin Code: If this Location will be used for rocessing Donation Orders via ADCS Handhelds, specify the bin code that will be used for receiving the inbound inventory.
Grocery Rescue Receipt Bin Code: If this Location will be used for Grocery Rescue (Excel or Web-based), specify the bin code that will be used for the inbound and outbound inventory transactions. It is necessary that the bin specified here be of type PICKPUT and that it is the only bin within its zone. See related topics for additional information.
Agency Pallets: The following five fields are all related to the agency pallet tracking feature.
Staging Bin Code (DRY): Specifies the staging bin for agency pallets for pallets containing DRY zone product. This is only used when creating picks by zone.
Staging Bin Code (COOLER): Specifies the staging bin for agency pallets for pallets containing COOLER zone product. This is only used when creating picks by zone.
Staging Bin Code (FREEZER): Specifies the staging bin for agency pallets for pallets containing FREEZER zone product. This is only used when creating picks by zone.
Staging Bin Code (OTHER): Specifies the staging bin for agency pallets for pallets containing product where the zone was not able to be determined. This is only used when creating picks by zone.
Default Agency Pallet Bin Code: Specifies the staging bin for agency pallets when picks are NOT created by zone. All Agency Pallets will be staged in this bin.
Adjustment Bin Code: This field contains the bin code that will be used to record observed differences in inventory quantities. This bin cannot contain real items. This field is only available if you are using directed put-away and pick at this Location. Ceres also posts to this bin when you post an item journal, purchase invoice, purchase credit memo, sales invoice, or sales credit memo.
Cross-Dock Bin Code: This field contains the bin code that is used as the default for the receipt of items to be cross-docked. You must enter a default bin code here if you want to use cross-docking in this Location. This bin is used as the default bin for the receipt once you accept the cross-dock suggestion. You can fill in this field only if the Location is set up to require receive and put-away processing as well as cross-docking.
Bin Policies FastTab
The Bin Policies FastTab provides the ability to specify bin policies related to put-aways and inventory picks.
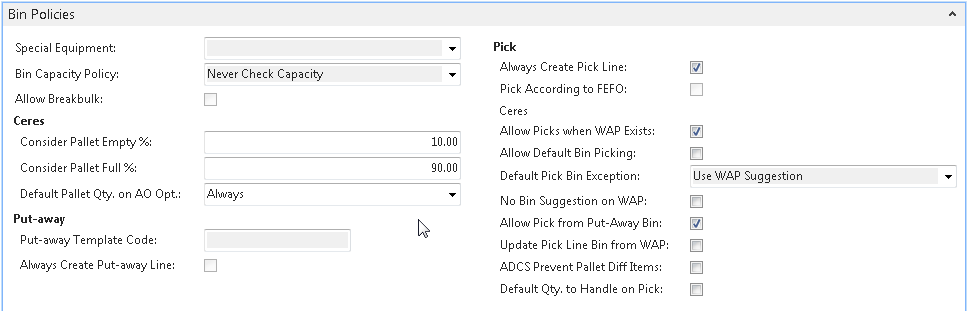
Special Equipment: This field indicates where Ceres will first look for special equipment designation for warehouse activities.
Bin Capacity Policy: This field indicates the bin capacity policy. The options are: Never Check Capacity, Allow More Than Max. Capacity, Prohibit More Than Max Cap.
Consider Pallet Empty %: A bin will be considered Empty if all the pallets have less than the Consider Pallet Empty % remaining. Quantity on hand less the pallet’s quantity in shipment bins divided by the Original Quantity is equal to or less than the Consider Pallet Empty %.
The usage of the Consider Pallet Empty % setup option is complemented by the “Max. Pallets” setup option for the Bin’s related Location. For example, a value of 10% in the Consider Pallet Empty % setup option dictates that a pallet with 10% or less of its original quantity should be considered as empty and thus does not occupy space within the Bin. A configuration such as this allows Ceres to suggest placement of a pallet (up to the Bin’s Max. Pallets) at the “empty” pallet’s Bin during put away and WAP operations.
Consider Pallet Full %: This option applies to palletized inventory and Shipping Option 2 only and is related to the Sug Full Pallet from Put Away option. When the latter is enabled, the Consider Pallet Full % can be specified to provide a deviation percentage. For example, if the pallet’s original quantity was 100 and the “Consider Pallet Full %” is set to 10, any Pallet having a quantity of 90 or more is considered as being “Full.”
Default Pallet Qty. on AO Opt.: This option allows you to select how Ceres will default (flow) the quantity on a pallet when a pallet is selected on the Agency Order Line. The options are:
-
Blank: The quantity on a pallet will not default, requiring the user to input the quantity manually.
-
Always: The quantity on a pallet will always default regardless of the type of bin (Pick, Put-away, or Pick/Put-away) the product resides in.
-
Bin Marked as Pick:- The quantity on a pallet will only default when the product resides in a bin type of pick.
-
Bin Market as Put Away: The quantity on a pallet will only default when the product resides in a bin type of put-away.
Put-away Template Code: This field contains the code of the put-away template Ceres will use for the Location.
Always Create Put-away Line: A checkmark in this field indicates that Ceres will create a put-away line even if it cannot find an appropriate Zone and Bin in which to place the item.
Always Create Pick Line: A checkmark in this field indicates that Ceres will create a pick line even if it cannot find an appropriate Zone and Bin in which to pick the item.
Allow Picks when WAP Exists: This option applies to Shipping Option 2 only and must be enabled when the Location allows default bin picking; otherwise, it is optional. Place a checkmark here to allow an Agency Order to be reopened (for the purposes of adding or modifying lines) when it is represented on the WAP and to allow pick documents to be created with WAP lines exists.
Allow Default Bin Picking: This option applies to Shipping Option 2 only. Place a checkmark in this option if the Location processes picks using Default Bin Picking. Default Bin Picking provides for improved efficiency during the fulfillment process. With this methodology, Ceres will provide for the creation of pick documents against inventory that is recorded in the WAP but has not yet been physically dropped to a pick bin (e.g. WAP lines still exist). This allows for a reduction in warehouse movements as the inventory can move directly from put away (storage) bins to staging or delivery. Additional setup is required to configure Ceres for Default Bin Picking. See related topics for additional information.
If “Allow Default Bin Picking” is checked, then the “Existing WAP Deletion Method” on the Warehouse FastTab will be set to “Keep all Existing WAP Lines” and no longer editable. If the “Allow Default Bin Picking” is unchecked, then the “Existing WAP Deletion Method” on the Warehouse FastTab will be set to “Delete Existing WAP Lines” and will be able to be changed to another option.
Default Pick Bin Exception: This option applies to Shipping Option 2 only, and only when Allow Default Bin Picking has been enabled. Select an option for how Ceres should handle the suggestion of the To-Zone Code and To-Bin Code when creating WAP entries for an item that does not have a Default Bin configured (e.g., no Item Location Default Bin record exists, or an Item Location Default Bin exists but no Bin Code has been specified).
-
Use WAP Suggestion: Select this option of have Ceres automatically suggest the “To” Zone and Bin based on the WAP Template suggestion.
-
Use WAP Suggestion with Confirmation: Select this option of have Ceres provide a confirmation dialog before suggesting the “To” Zone and Bin based on the WAP Template suggestion. Select ‘Yes’ on the dialog to have Ceres create the WAP entry or ‘No’ to halt the processing with an error (see Halt with Error below for sample of error message).

-
Make no Suggestion: Select this option to have Ceres automatically suggest blank values for the “To” Zone and Bin. The “To” Zone and Bin can be manually updated after the Create WAP process concludes.
-
Make no Suggestion with Confirmation: Select this option of have Ceres provide a confirmation dialog before suggesting blank values for the “To” Zone and Bin. Select ‘Yes’ on the dialog to have Ceres create the WAP entry or ‘No’ to halt the processing with an error (see Halt with Error below for sample of error message).

-
Halt with Error: Select this option of have Ceres halt the Create WAP process with error.

-
Prompt for Suggestion Handling: Select this option of have Ceres provide a menu option of how to handle missing Default Bins on a WAP line by WAP line basis.

-
Use WAP Suggestion for To-Bin: Click the OK button with this menu choice selected for Ceres to continue the WAP processing by suggesting the “To” Zone and Bin based on the WAP Template suggestion.
-
Make no Suggestion for To-Bin: Click the OK button with this menu choice selected for Ceres to continue the WAP processing by suggesting blank values for the “To” Zone and Bin.
-
Cancel: Click the Cancel button to halt WAP processing with error (see Halt with Error above for sample of error message).
No Bin Suggestion on WAP: This option will bypass the suggestion of a drop-to Bin for the Warehouse Movements - WAP and will require that the user specify the To Bin Code before continuing with the WAP.
Allow Pick from Put-Away Bin: This option applies to palletized inventory for Shipping Options 2 and 3 only. Placing a checkmark here allows for the specification of put-away (storage) inventory directly on the Agency Order line. Ceres will carry the put-away inventory specifications on the Agency Order through to the pick document (inventory pick or shipment). Once the pick document has been created, the put-away inventory on the pick document can be manually overridden with other inventory in either put-away or pick bins.
Update Pick Line Bin from WAP: Place a checkmark here if you would like Ceres to update the inventory pick document line’s Bin Code with the suggested To-Bin Code on the WAP line during the Create Inventory Picks process. With this setting not enabled, Ceres will update the Bin Code on the inventory pick with the Default Bin if specified and represented on the WAP.
This setting requires the configuration and use of Default Bin Picking.
ADCS Prevent Pallet Diff Items: Place a checkmark here if you would like Ceres to prevent the ADCS user from moving a pallet of one item number into a pick bin that already contains a pallet with a different item number. Ceres will only prevent the movement if the quantity of the pallet currently residing in the bin has a quantity greater than zero.
Default Qty. to Handle on Pick: Place a checkmark here if you would like Ceres to automatically fill in the quantity to handle on the pick with the ordered quantity. Leaving this unchecked will set the quantity to handle on the pick lines to zero. The user will then need to enter the pick quantity for each line manually or use the function “Autofill Qty. to Handle.”
CMobile FastTab
The CMobile FastTab provides the ability to specify the bins and movement templates that will be used for CMobile transactions.

Default CMobile Return Bin: If this Location is used for CMobile related transactions, specify the bin code to be used when receiving holdover inventory into Ceres. Holdover inventory can exist when it was picked up on a daily route but was not deliverable to the intended Agency.
CMobile Movement Template: If this Location is used for CMobile related transactions, specify the Movement Worksheet Template Name to be used when receiving holdover inventory into Ceres. Holdover inventory can exist when it was picked up on a daily route but was not deliverable to the intended Agency.
CMobile Movement Name: If this Location is used for CMobile related transactions, specify the Movement Worksheet Batch Name to be used when receiving holdover inventory into Ceres. Holdover inventory can exist when it was picked up on a daily route but was not deliverable to the intended Agency.
Related Topics
- Appian Overview and Integration
- Agency Order Overview
- Bin Overview
- Branch Overview
- Enhanced Grocery Rescue Excel Import
- Inventory Short Handling
- Item Overview
- Item Purchase Replenishment
- Roadnet Transfer Order Exports
- Warehouse Activity Plan - WAP
- Warehouse Activity Plan and Default Bin Picking
- Warehouse ADCS Barcode Processing
- Zone Overview