MealConnect Setup Guide
The purpose of this document is to outline how to perform the initial set up of Ceres 5 for using the MealConnect integration released August 2015.
Purpose
The MealConnect portal (MC) is designed to allow the recording of facilitated pickup from Donors by Agency/ Program volunteers or staff. CERES has been updated to allow the food bank to pull the details entered in MC and create/ post both the donation order and the agency order in CERES. In order to use this capability, your food bank will require:
-
Specific Ceres functionality (both Objects and Executables)
-
An MC account and master data setup in MC for the donors, agencies/ programs and product categories/ items
-
One time and master data setup in Ceres to accept information from the MC portal
Please note that the communication path is only one way – from MC to Ceres. All matching information, like Agency/ Program information, must be manually entered into MC, even if it exists in Ceres.
This document covers the CERES required setup for processing, along with some suggested setups and considerations. Separate documentation was created for the User Guide with daily error handling information - and should be referred to as needed for understanding and more details related to the use of the system.
The purpose of this document is to explain how Ceres needs to be set up in order to work correctly with the MealConnect integration. Many of these settings will only need to be once unless process or business changes occur within Food Bank operations that impact MealConnect transactions.
This document applies to Ceres version 5.x. and is intended to be used in partnership with Ceres VAR and the MealConnect team at Feeding America.
If you are interested in more information regarding this capability, please contact Sam Harris, Coordinator of Product Sourcing Innovation at saharris@feedingamerica.org.
General Flow
Once all the objects and executables are in place, the two systems will need to be setup to communicate with each other. This document covers the Ceres setup, but to complete it, the food bank will need assistance from the Feeding America MealConnect team to obtain the specific connection details. Once the connection key is defined, the MC portal can send Order details to Ceres when the food bank triggers the import. The imported orders will have an MC ID to link the donation and agency order within CERES. Ceres will create and post the donation order and then the agency order. If during the creation or posting errors are encountered, a holding table for the error entries is created in CERES for user review and corrective action. The entire batch of errors can be reprocessed, or each transaction can be reviewed and reprocessed individually. A Global log is also provided for global errors such as communication issues with MC and CERES as well as status update messages from the Status method call. The daily use of the system is covered more extensively in the Error Handling Guide.
CERES Preliminary Setups
In CERES, the items, donors and agencies are all setup. The mapping between MC and CERES is setup on the MC website and covered in a separate document that can be requested from the MealConnect team. Below are notes related to considerations and areas of the general CERES setup.
Location
It is strongly recommended that one location be setup for MC to allow a flow through of the inventory between the donation and the Agency Order and to avoid some potential error handling issues.
-
The location used for MC must NOT require picking, shipping or receiving to allow processing directly from both the agency order and the donation orders.
- The zone for the location must also be selected to exclude from whse doc.
-
Note that inventory should net to zero, but may show quantities if there are errors where the donation order has posted and the agency order is not yet posted.
-
Appointments in the location can cause errors
-
One of the other reasons for this suggestion is to not have errors related to appointments on the Agency Orders.
-
As appointments are scheduled at the location level, the use of a separate location will avoid this issue.
-
-
Allocations in the location can cause errors
-
In addition, if allocations are used in the location setup for MC errors may be encountered
-
Especially if the items used in MC are on an allocation journal for the Agency for the MC location
-
Allocations for the agency in a different location than the MC location do not cause errors in the processing
-
Shipment Method
A separate shipment method should be setup for MC. The shipment method should not have a schedule template. The combination of the setup of a unique location and shipment method for MC orders is to ensure errors are not encountered related to the schedule lines for deliveries and pickups.

Items
Items should be setup for the general items used in MC. Items can be lot and or pallet and lot tracked as needed. One item per MC category (Bakery, Beverage, Dairy, Meat, etc) and per storage requirement (Dry, Refrigerated, Frozen) will be needed for the MC setups to map to the CERES item for reporting.
Example, one item for Bakery Dry and one item for Bakery Frozen and a third item for Bakery Refrigerated will need to exist in CERES if these will be selected in MC.
Items and qualifiers should be reviewed (if used) to make sure there are no qualification restrictions that will cause errors that the agency is not qualified for the item.
Inventory Posting Setup
Costing of items should also be reviewed to determine if there is any need for the Inventory Posting Setup for the MC location and item inventory posting group combinations.
-
If items have no cost, this setup is not required
-
If items will have any costing associated, then the setup of the items inventory posting group for the MC location is required
-
In the below example GR was used for the MC location code, it shows a setup of the location, each inventory posting group and the inventory account selection.

Agencies
Although the Agencies that exist can be used in the MC orders, there are areas of potential error messages that may be encountered that would cause orders to error during the attempt to process. For this reason, it may be an area to discuss and consider if separate MC Donors and Agencies should be created.
Some of the areas are based on the CERES version and the errors that are able to be suppressed or shown. Below if there is a CERES version that allows to ignore the error message, that version is noted.
-
Agency Activity Status and blocked
-
Shipment method code
-
if this field is required in the Agencies & Receivables setup, then it must be populated on the Agency
-
If this field is not required, then order any values populated on the Agency will flow to the MC orders
-
-
Dimensions
Donors
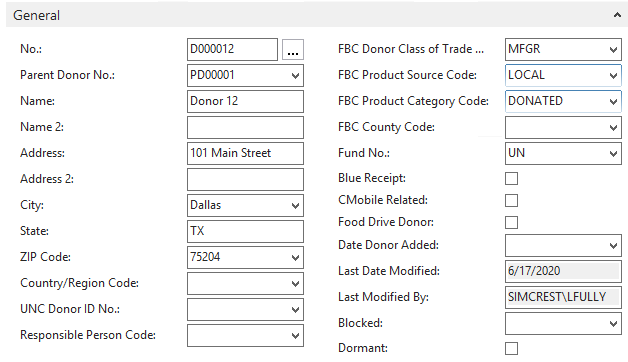
Existing Donors can be used for the MC orders, as long as they are not selected as a Food Drive Donor but should be reviewed and discussed for any require setups for automation of the order process. One requirement on the donor setup is that the FBC Product Source must be entered on the Donor in CERES to allow it to flow to the MC order for processing.
Another area added into the logic is that, even if a donor is marked as blue receipts, the donation orders that are processed from MC are not to be check marked as blue receipts in order to not duplicate reporting.
Also, in order to not receive any errors about the UNC Notice No. required, all orders created from MC will populate the UNC Notice No. as the Donation order # to allow for the donation orders to be created via the MC communication automatically. Once the donor number is updated this field is updated with the existing CERES logic.
Note about Food Drive Donors
As part of CERES 5, Donation Orders cannot be created within CERES for donors marked as “food drive” = yes. This new field is used within CERES for filtering the food drive donors to be used on the food drive orders, and donors not setup as a food drive donor on the normal donation orders. Therefore, when mapping the Donor in the MC website, the CERES donor cannot be setup as a food drive donor or else the order will error when trying to be created in CERES.
If a Donor is linked to a food drive but is not setup as “food drive donor” on the donor card, this donor can be used for MC orders. As part of the MC logic and process, food drives are not supported. All orders are treated as not related to a food drive, regardless of if the donor is linked to food drives or not. The MC orders will not be marked as being linked to a food drive.
User Setup and Posting Dates
The recommended setup (covered in the below job sections) is to have the job queue process setup to automatically run the communication and process orders. For any errors that are received the users then have the option to process them on their screen using their own userid, or to process the error also using the job queue.
It is important to make sure that the userid that is linked to the NAS process which is used for the job processing is setup in the User Setup and has the correct allow to / from posting dates to be used for processing the orders. (Note, see below section for user security and permissions also)
Note that when orders come into CERES from MC, the MC Receipt date is used by default as the posting date. This is to attempt to match the MC reporting date and the CERES reporting date. When attempting to post, CERES looks to the normal GL setup for allowed posting dates, and the user setup for the userid that is processing the order.
If the orders are being processed by
-
The Job, then the user linked to the NAS service is the user that will be used.
-
The user from the error log using their session, then that person’s userid will be used.
This point comes up related mostly to month end cross overs. If the GL allow posting dates is changed to the current month of April, and the MC receipts are being processed from the end of March, the user associated with the job will need to have their allowed posting dates set to both March and April until all March receipts are processed. If this is not done, then the orders will all come into the error log with a posting date error.
If the user who is processing the errors has the ability to post back to the prior month, they can process the exceptions from the error log.
This is an area that should be reviewed and discussed for the proper process and procedure to be used. This area is also noted in the user guide documentation in the error handling section.
You may need to contact your IT department or CERES admin to confirm the userid linked to the NAS service. Access to the developer database is required. From the development database, go to the table “Active Sessions”. You can run this table to view the userid’s that are active to confirm if the NAS user is connected.
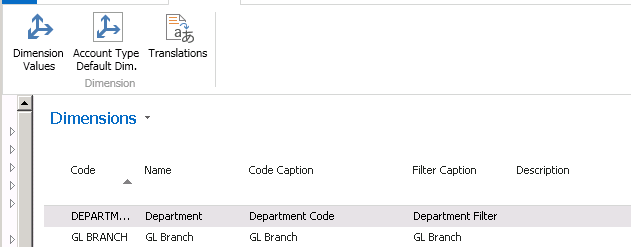
Dimensions Setup
There are multiple places that default dimension values can be setup with CERES. The below is an overview of the various areas for reviews. At the bottom is a section to show the logical flow that CERES looks to for populating the orders based on the setups.
Donor/Agency vs. Item Default Dimensions and Dimension Priorities
Standard functionality allows for setting up the default dimension values on Agencies, Donors, Vendors and Items. The standard logic is that
-
Dimensions selected at the Agency/Donor or Vendor level auto populate to the order header level, and then flow to the line items from the header.
-
Dimensions selected at the item level can only apply to the line level (as items are line items and not an order header level field)
The dimension priority setup dictates if the header or line level dimension is used if defaults exist on both the donor/agency and item. The Default Dimension priority is setup per “source type” for transactions. So, default dimensions can be setup for purchase (purchase and donation) as well as sales (agency) transactions.
For example, for purchase and donations, if the setup is as below, (item 1, Vendor 2) then the item dimension has the priority over the header. Therefore any item dimensions will be used on the line items, but the donor/vendor dimensions are still used at the header level of the transactions.
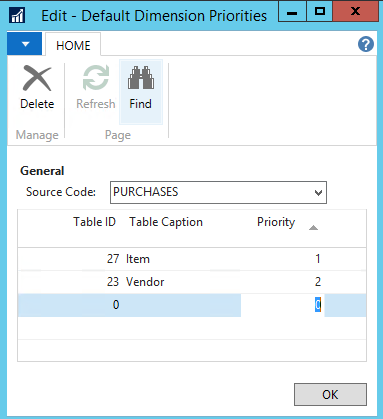
Note the GL entries will populate the dimension based on the posting being from the order level vs the line level.
-
AP is calculated at the header level, so will take the header or donor dimension.
-
Inventory is calculated at each line level, so it will take the line item dimensions.
CERES MC Dimension Setup Notes
The MC setup (covered in the below section) allows for the selection of whether to use default dimensions on the donation orders and agency orders, along with the selection of what value per dimension to use as the default.

For example, in the above, both Donation and Agency Orders are check marked to use the default values, and there is a default value selected for the Department and the Project. Note however that there is no default value selected for the GL Branch. With this setup, only the department and project will be populated from the MC Setup. The GL branch will only be populated at the order header level if a value is setup on the donor or agency. The project can also be setup at the item level but will only populate the value to the lines.
This setup allows flexibly to set one default value to be used on all MC orders for some dimensions, while using the setups at the donor/agency/item level for other dimensions. However, for the dimensions that are required, if the there is no MC default value, and no value on the donor or agency the transactions will not post and will have to be handled in the error list.
If for example, the GL branch is a required dimension, and a GL branch does not exist on the agency, then the order will show up in the error handling log (documented in the user guide in more detail) and the GL branch will have to be entered on that order. To keep the orders from going to the error log in the future, the default GL branch will either need to be added to the agency, or the MC setup can be updated to use on GL branch on all MC orders.
Dimensions and items and MC default
The MC default dimensions populates the data at the order header level. It is used to allow the override of the agency/donor dimensions by the MC default dimensions to the orders. The default priority setting will dictate if the header or line level is used.
For MC orders, when the order header is created, it is populated either by the Agency/Donor or by the MC default values in the MC Setup. Once the order header is created, the line dimensions are populated from the standard NAV/CERES default dimension priority settings. This means if the line overrides the header in the priority level, then the item dimensions will overwrite the Agency/Donor or MC setups on the lines of the orders.
The MC default populates the header level of the order,
-
if the dimension priority is to use the line level over the header (Item 1, Vendor 2)
-
the order header will contain the MC default dimension
-
The item card dimension will override the MC dimension at the line level of the order
-
-
if the dimension priority is to use the header over the line (Vendor 1, Item 2)
-
the order header will be populated from the MC default dimension
-
the header has priority over the line, so the line will also contain the MC default dimension
-
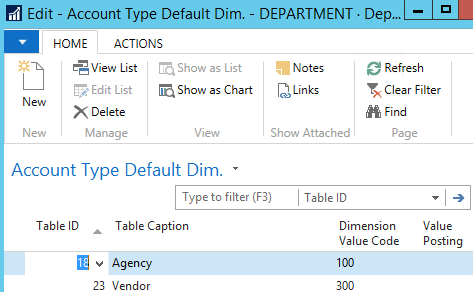
Account Type Default Dimensions
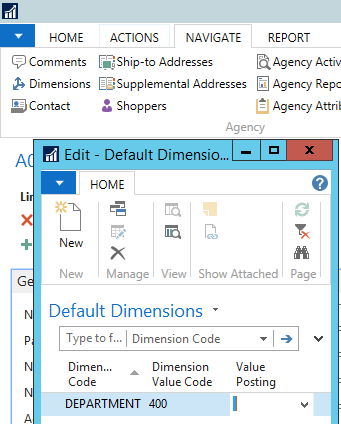
In CERES, when the dimensions are setup, a default value can be selected per account type. For example, the department dimension, click on the “Account type default dim” to setup default dimensions per types of data.
With the below setup, transactions for Agencies will get a default department dimension value of 100, and for donors it will be 300.
Donor/Item Card Dimensions
On each master record, the default dimension value can be added on a per donor or per agency basis. For example, even though the overall default department is setup above for agencies of 100, on a specific agency card, you can set a default dimension value. In the below screen shot, Agency 1 has been setup to use department 400.
Dimension Logic Flow
The flow used by the system for the logic to populate the dimension is:
-
Order Headers
-
If MC Setup, use default dimension checked AND the dimension value is selected
- The MC default dimension values flow to order headers
-
If MC Setup, dimension value NOT selected (blank), OR if use default is not checked
-
Agency/Donor setup on each card for a default dimension
-
Dimension setup for default per account type
-
-
-
Order Lines
-
If no dimensions are setup on items, flows dimension from header to the lines
-
If dimensions are setup on items
-
Looks to default dimension priority
-
If Priority is lines, the line dimension populates from the item card
-
If priority is not setup or is setup as header, the order header dimension flows to the lines
-
-
Dimensions Required Setups Review
Depending on the setups of where the “dimension require” is at, there is the potential the donation or agency order may not be created, or it may be created and stopped in the posting process.
If the orders are created, dimension values can be added to the
-
Order
-
MC Setup
-
Default Dimension value per type
Updating the donor/agency will not update the order itself.
If the order is not created, the only way to process around this error is to either add a default to the Agency or Donor, the Dimension value type default, or to the MC setup.
This is also noted in the user guide for the error handling but is documented here as the setup on the dimension requirements needs to be considered as part of the MC setups.
Dimensions Combination
The normal CERES posting logic is used for donation and agency orders related to the dimensions. If your dimension setups included blocked dimension combinations, and an order tries to post to this combination, the standard CERES error will be encountered that the order cannot post due to the combination being blocked.
A review of the dimensions in the MC setup and if applicable what is used on the Agency and or Donors should be reviewed to ensure setup does not have combinations that are blocked.
Impact on Agencies & Donors
Internal discussions and decisions about whether to setup specific MC Donors and Agencies may be impacted by needs to setup default dimensions at the Agency or Donor level. There is a potential to allow to setup defaults on the Agency and Donor if needed, as long as the MC setup is not also setup with a default value, as the MC default will take precedence.
MealConnect Setup in CERES
Located in Departments/Warehouse/Administration, under Setup is the MealConnect Setup. This is the primary location for the core one-time setup for MealConnect. Some of the information required will need to be provided by the Feeding America MealConnect team, see contact information in the first section.
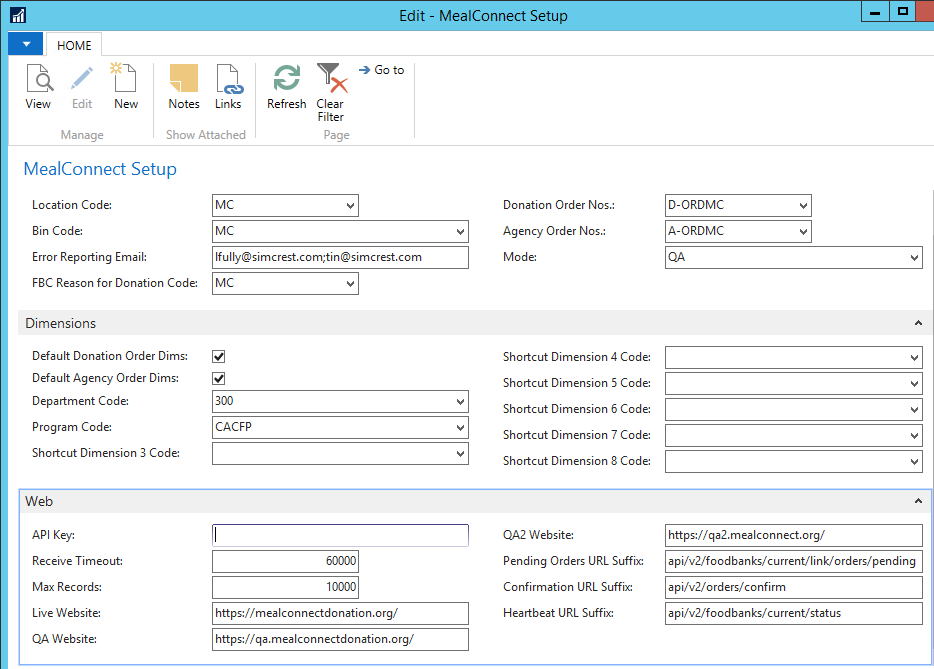
General Tab
-
Location code
-
Select a location for process all MC orders
-
The location must not require pick or receiving in order to allow order creation and postings to happen directly on the donation order and sales orders.
-
One location to be used just for MC is suggested for processing
-
-
Bin code - Select one bin to be used for the population on all orders for processing
-
Error reporting email
-
You can separate multiple emails via a semicolon however the field length itself is 250 characters long
-
a group email address is recommended for sending to multiple users
-
To use the error reporting email you must also setup the SMTP in CERES (see below setup section)
-
-
FBC Reason for donation - Select one reason that will be populated on all donation orders
-
Donation Order Nos and Agency Order Nos
-
select the number series to be used for donation order creation and the agency order creation
-
it is recommended but not mandatory that you setup a number series for MC, this will allow the users an easy way to find the orders by filtering on the number series.
-
-
Mode
-
Select from the list for the MC environment; the Feeding America MC team can guide you to choose the proper selection.
-
QA/QA2 are testing instances and are intended to connect to a test Ceres environment.
-
Live will connect this Ceres instance to the Production MealConnect site.
-
Dimensions
See Dimension Setup section above as well.

-
Default Donation Orders Dims
-
If yes, the dimensions selected below will be used as the default dimensions on the donation orders
-
If no, none of the selected dimensions will be defaults, they must all be entered in CERES on the Donor or Items for population on the donation orders
-
-
Default Agency Orders Dims
-
If yes,
-
For any dimensions selected in the MC setup, it will be used as the default dimensions on the Agency orders
-
If any dimension is left blank, then the dimensions will populate from the donor/agency
-
See section below for more detailed processing notes
-
-
If no, none of the selected dimensions will be defaults, they must all be entered in CERES on the Agency or Items for population on the agency orders
-
-
The rest of the fields are the various dimensions if applicable and setup.
-
The values are populated based on your GL Setup of the dimensions and short cut dimensions
-
Select the default value for each dimension to be used
-
Web

-
API Key
- The API key should be received from the Feeding America MC for setup in CERES. This is a unique key for each implementing food bank, to enable the data transmission handshake between Ceres and MC site.
-
Receive Timeout
-
How long does it take to process the request and receive a response
-
The larger the max records, the longer the time
-
The default is 60000, (60 seconds, or 1 minute) but can be increased or decreased as needed for the max records allowed to be sent
-
If a repeat “time out error” is received once live, this timeout can be increased
-
-
Max Records
-
Enter the maximum number of records to be sent from MC to CERES at a time
-
Note, if more records exists, once the first set are processed, the next set will be sent automatically. This is a max sent at a time, but the communication will continue to happen as many times as required in order to process or attempt to process all pending records. (see section below on CERES and MC Communication Updates)
-
Example, if set max to 1000 and there are 2500 records
-
The first send from MC to CERES will contain 1000
-
Once that set is processed and sent back to MC, since more records still exist, the next set of 1000 are sent (now 2000 are sent in total)
-
Once that set is processed sent back to MC, since more records still exist, the next set of 1000 are sent
-
Since that set only had 500, the process stops as there are no additional records to be sent
-
-
-
Website addresses & URL Suffixes
- These critical addresses must be obtained from the Feeding America MealConnect team, first for the test environment, then for production. See contact information on cover page. The addresses above are for illustration only, and may not be correct for each site.
Job Setups
MealConnect uses the base Dynamics NAV Job Queue Entries to execute the repeated task of importing and processing Donation & Agency Orders. In order to use the job queue, there are a few setup requirements.
Job Queue Category
The Job Queue in NAV 2018 has the ability to group jobs together into their own bucket. It is encouraged to set up a group specifically for the MC functions. To do so you must first create a Job Queue Category.
Under Job Queue Category List add a new category. It can be any code and description you find appropriate. Below is a screenshot of an example.

Job Queue Entries
The job queue entry is the interface to tell the system which process to run, and how often. Below is more information on each field and use.
The recommended setup is that three separate job queue entries will be created.
-
GETORDERSANDPROCESS
-
Will be setup as a recurring job, either nightly or at least once a week.
-
This is the process that will get the pending MC orders and send them to CERES for processing.
-
-
PROCESSBATCH ORDERS
-
Will be setup as a recurring job, in order to save the job queue entry, but with no set time of occurrence so that it is not automatically processed by the system
-
This is the process that the user can run as needed in order to use the job queue to reprocess all entries sent to CERES that had errors
-
The GETORDERSANDPROCESS will attempt to reprocess any orders it can when it runs as well, as it does both the get new orders and process all orders in the one process
-
-
GETOMSTATUS
-
This is an optional setup to be decided on by the food bank.
-
From CERES on the MealConnect Orders list status can be checked at any time even without a job being setup
-
This job however can be setup to run during the day as often as desired to check the communication between CERES and MC.
-
Part of the setups noted above in the MC setup was to send error messages, so if this job is setup and the MC communication fails, an email would be generated.
-
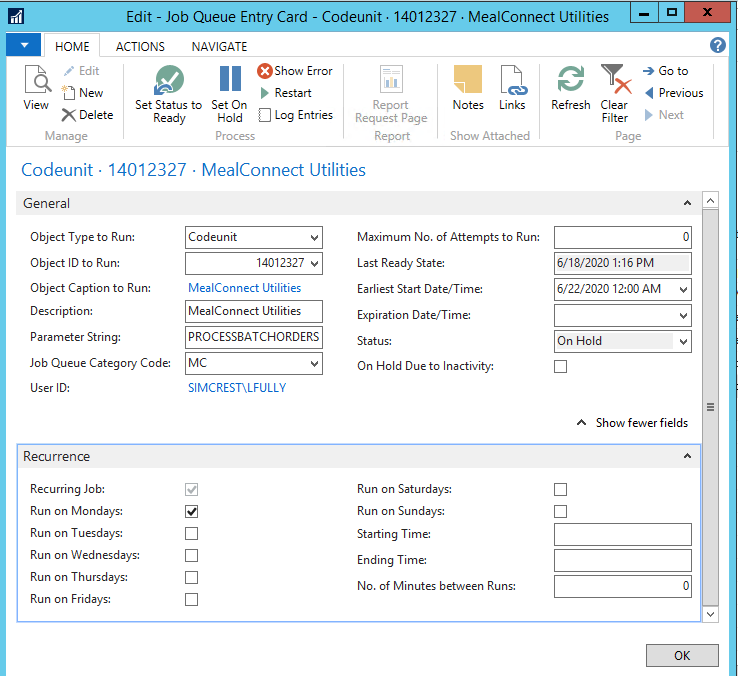
Get Orders and Process
The below screen shot is related to the setup for the main job that will be run for the “GETORDERSANDPROCESS”
MealConnect Utilities General Tab
-
Object type to run, object ID, and object name
-
Object type select codeunit
-
Object ID 14012327
-
The object name is populated by the system once the ID is selected, this is the MealConnect Utilities
-
-
Parameter String
-
Depending on the codeunit or the report to run, various parameter strings or processes can be entered here as to the action to be run
-
The above screen shot is related to the GETORDERSANDPROCESS
-
This is the one that communicates with MC to get the orders and process them
-
This is the required setup for communications with MC
-
The other two options are discussed below.
-
-
Note that some versions of NAV/CERES are case sensitive, while some do not. It is recommended that you setup the parameter string in all upper case, otherwise if you are on a version that is case sensitive it may not work to call the correct parameter string.
-
-
Job Queue Category Code
-
Should be the category code setup above
-
This ties the Job Queue Entry to the Job Category for processing.
-
-
Max No. of Attempts to run
-
User defined setting of how many times to attempt to run the job
-
This can be left at zero which is unlimited
-
-
No. of attempts to run
-
This is a system populate field showing the # of attempts that were made to run the task
-
The number is auto incremented at each attempt
-
An error is generated if this number exceeds the number in the Maximum No of attempts to run field above
-
-
Last time date modified is the last time someone updated the job queue entry
-
Expiration date/time
-
If a job is to be setup to run but needs to have an expiration date and time
-
For MC this should remain blank
-
-
Earliest Start date/time
-
This field should be first entered as the earliest date and time of day to start the first run of the job
-
Example, if it should run tomorrow after 6PM, then set the date to tomorrows date and 6:00 PM.
-
As the job is processed, if it is a recurring job (one that will repeat) the system will set this to the next time the job should be run
-
See below for more details
-
-
Status field
-
This field contains the status of the task and is updated automatically by the system.
-
It can have the following values: Ready, In Process, On Hold.
-
Ready means that the job is ready to be run.
-
The program updates the value In Process while the job is running.
-
On Hold is the default value when a job is created, you must change the status to Ready after it is created. See below for more details.
-
-
Recurrence Tab

If a job queue entry is created, in order for it to be set as “recurring” at least one day of the week must be selected. If this is not done, then the job runs once and is deleted. For this reason, even if the job will not be setup to run automatically, it is required that at least one day of the week is selected for the recurring job be checked, but the Starting and Ending time can be left blank so that the job will not automatically run. This setup will allow you to setup the job once, and run it as needed without the system deleting it. Otherwise each time the job is to be run, it must be created again.
For the GETORDERSANDPROCESS job, days are to be selected for nightly or at a minimum once a week, and a time for the starting and ending should be entered.
-
Recurring job,
-
The system will populate this field as yes once at least one day of the week is check marked
-
if it is not checked, once it runs the first time, the job queue entry is deleted and must be setup again
-
-
Run on days
-
place a check mark in the days that the job should be run automatically by the system
-
can select as many days as desired
-
The recommendation is to run it each day, or at a minimum once a week.
-
-
Starting and ending time
-
This is the window of time that the job queue can attempt to process
-
It is recommended for MC that the time be outside of normal business hours processing, maybe 6 PM to 6 AM so that the job runs and is completed before the beginning of the next day.
-
-
No of minutes between runs
-
In general, this field is used
-
if the job should run more than once per day, the No. of minutes between runs is setup
-
The job will then run multiple times each day it is to run,
-
-
For MC, the process only needs to run once a day, so this can be left at zero as the communication only needs to start once, and it will continue until all records are attempted to be processed.
-
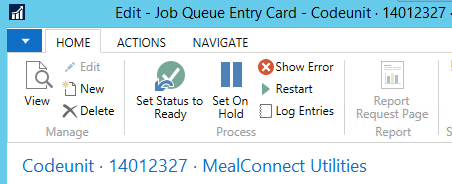
Set initial status to ready
Once the job queue entry is all setup, click on Set Status to Ready in the Process section of Home tab
This will set the status as ready so that it will start to process based on the above setups.
Process Batch Orders
Part of the overall process noted in the below sections is to be able to use the NAS to run a process to only try to re-process the existing exceptions, but not to communicate with MC to get new records. In order to allow this feature, the job queue entry must be setup for the NAS to run the job. The screen shot below shows the needed setups.
Note that the job is setup as recurring, by selecting at least one day of the week to run the job, but with no starting and ending time as it will be processed from the MealConnect Orders list as needed. See processing section below for more details on the process. The parameter string for this is PROCESSBATCHORDERS
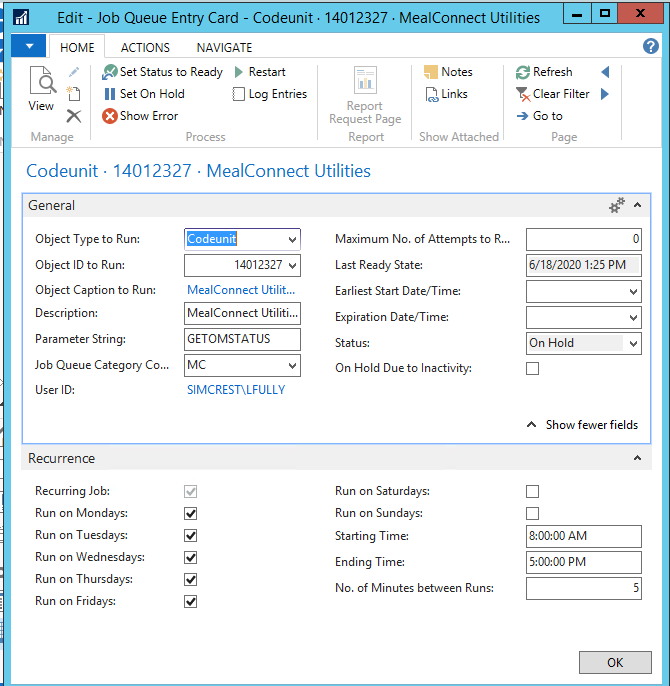
GET MC Status
The job queue does not have to be setup unless you want to setup to automate the process to check the status. The MC Status can be checked manually on the MealConnect Orders list which returns back immediately the status and pending records message to the user as well as entering a record in the Global Log. (See MealConnect Orders List section for an overview and more details.)
Below is a screen shot of an example setup for the job queue entry. The setup of the object type and ID are the same as noted above, however the parameter string is different for this process.
-
Parameter string of GETOMSTATUS
-
This can be setup as a second job queue process if you want to automate to call the heartbeat to confirm communication and the process is running
-
If this is setup, it should be setup to run before the getordersandprocess call to confirm in advance that the communication is up and running
-
It can be setup to run as and when needed but it is not required
-
The recurrence information is to be setup based on how often the process is to be checked. This can be setup to run throughout the day, in advance of the get orders and process, so that in case of a communication issue, there is a notification to someone that the communication is not running. In the below example, it is setup to run every day, Monday - Friday starting at 8am until 5pm, once every 5 minutes.
The MC Status can be checked manually on the MealConnect Orders list which returns back immediately the status and pending records message to the user as well as entering a record in the Global Log.
Email Setups
SMTP Mail Setup
Check with your IT department on how to populate the fields per your email requirements. The setup is located in Departments/Administration/IT Administration/General Setup.
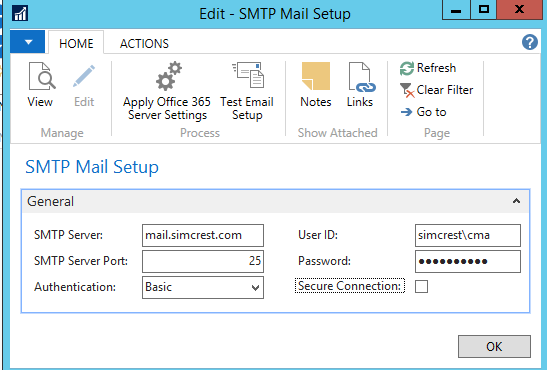
The process will use the E-mail field from the Company Information table as the “from” address. Although the email address will be using the E-mail field from the Company Information table the FRIENDLY name will be “MealConnect Log”. This is to easily separate this email from others that could be moving through your particular NAV instance.
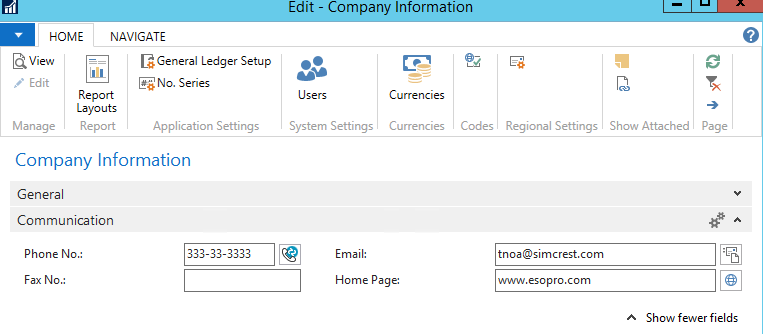
Company Information
As noted above, the emails will use the company information located under Departments/Administration/Application Setup/General, on the Communication tab
Notes on Process Flow to Review Setups
CERES and MC Communication and updates
The setup in CERES on the Job Queue Entry noted above allows for the max number of records to send on each file transmission.
The overall flow is that
-
The MC records are pulled by CERES to attempt processing by the job queue entry setup
-
The communication is closed and CERES then attempts to process the records
-
If both the donation and agency order are successfully posted, they are marked to be sent back to MC as confirmed
-
If either the donation order or the agency order fails to create and or post due to any errors, these are stored in the CERES MealConnect Orders list with the related error
-
-
Once all records have attempted to be processed, CERES sends back to MC to confirm the list that posted
-
Only the records that successfully post both the donation and agency order are sent back to MC as completed
-
This means that in MC, any records not yet sent, as well as any records sent but that have errors, are NOT updated in MC as processed or confirmed.
-
Also as noted above, it is important to understand that if more records exist than the max #,
-
The first batch is sent to CERES for processing,
-
Once that batch is processed, the ID’s that are processed in CERES are sent back to MC as confirmed,
-
Then the next set of records up to the max # of records are sent for processing in CERES.
-
This process repeats as part of the logic until
-
all of the MC records are sent to CERES
-
or when the number of records in the holding table that have errors equals the max # of records that can be pulled from MC.
-
This keeps the process from falling into an endless loop where it is trying to download and process the same records that will only continue to error out.
-
In a perfect scenario, with 2500 records and a max of 1000
-
1000 records are sent and processed
-
MC is sent back 1000 confirmed, so now 1500 remain,
-
The next 1000 are sent and processed
-
MC is sent back 1000 confirmed, so now 500 remain,
-
The next set are sent, which is less than the max, so no further attempts are needed after this batch is sent
However, since any orders that encounter an exception are not updated as processed by MC, the second transmission will have all of the exceptions sent in the second batch. To take our example of 2500 records and a max of 1000
-
1000 records are sent for this example, 100 error and only 900 are processed
-
MC is sent back 900 confirmed, so 1600 remain
-
The next 1000 are sent,
-
but the first 100 have errors,
-
so only 900 new records are sent to CERES
-
Let us say that the first 100 original still have errors, and another 50 of the new have errors, so in total 850 of the 1000 are processed and 150 total had errors
-
-
MC is sent back 850 as confirmed, so now 750 remain
-
The next set are sent, which is less than the max, so no further attempts are needed
-
Still in theory, unless ALL 1000 receive an error, the process will continue until all records have been attempted to process and only the exceptions will remain in the CERES MealConnect Orders list.
-
An additional piece of logic has been added so that if 0 records are returned back to MC as successful, the process will stop trying to resend the records, as they are all stopping in CERES with an error.
-
This is to keep the communication from getting into an eternal loop of 1500 records remain, send 1000 but all 1000 error, so MC will never be able to send all 1500 remaining records
-
Once the entries are handled in CERES for the errors, the next process will pick up the next set of MC records to bring into CERES for attempted processing
-
Max # of Records and Error Handling
As noted above, the MealConnect Setup allows for a “max # of records” to be setup. Also as noted above if there are more records pending in MealConnect than the max # of records, CERES will pull the first set of records, attempt to process, and then continue to try to communicate with MealConnect until either all records are processed or are in the error log.
In the CERES User and Error Handling, there is an option for “Get Order and Process (Show Messages)”. If the user runs this option and there are more order to be processed than the max # of records, there is a potential that by running this option the same orders that are stored in the error log may continue to be prompted to the user on the screen.
From our example, let’s say that the max records are set to 10 and there are 20 orders pending in MealConnect.
If only one order can process and 9 get errors, then the process will be that
-
CERES gets the first 10 records from MC to process
- 1 processes, 9 give errors
-
CERES sees that there are still 19 total orders pending, so it pulls the first 10 records
-
9 are from the original list above that will give errors
-
1 will be new – it may process or it may receive an error
-
If it does not process, the user will see 10 errors (9 repeated and 1 new) and the process will stop since the max is 10 and there are 10 errors
-
If it processes, CERES will see 18 records pending and get the next 10 again and continue
-
-
-
If the new record above processed, as noted, CERES will see 18 records pending and grab the first 10
-
9 are from the original list above that will give errors
-
1 will be new – it may process or it may receive an error
-
This will continue until it either errors at 10 or until all 18 are attempted to be processed
-
-
For this reason, the “continue” option of “no” was added so that the user can stop the process to address the posting issues and not continue to see the repeated errors at each attempt
-
This repeat of the same errors trying to reprocess can also be avoided if the max # records is updated to a higher number.
-
For example, if the max # of records was 20 or higher
-
Therefor the combination of the expected number of transactions and the max # of records should be reviewed if there is the expectation that the Get Order and Process (Show Messages) will be used.
-
CERES Errors
If any errors are encountered in CERES and the orders either cannot be created or posted, a list of the MealConnect Orders is kept in CERES for the users to review the details and any related errors. Depending on the errors, some data can be updated in CERES, and the orders can be reprocessed. This information is covered in detail in the User and Error handling guide, but is noted here for reference of the overall process for documentation.
Once the updates are made in CERES or in MC and the orders are processed, the MCID is then sent back to MC as completed so that the orders are no longer sent from MC to CERES.
When a new file is received from MC to be processed in CERES,
-
lines are created in this list if they do not exist
-
if a line already exists, it is not updated as the theory is that users may already be in process of updates.
-
If a line does not exist, one is created
-
-
Checks are made to see if the orders are already processed or if they will process
-
If both the donation and agency order are or can be posted,
-
the MCID is flagged to be sent back to MC as processed
-
once confirmed back to MC, the line is deleted from this list
-
-
if either the donation or agency order fail to be created or posted, the line is updated with the first error encountered for user reviews
-
Summary of errors and reviews
-
The list of MC transactions that have errors can be viewed, edited and reprocessed from the MealConnect Orders list
-
Options for updating and reprocessing scenarios are covered in the user and error handling guide in details, but a summary of the areas are
-
Donor
-
Marked as food drive donor = yes
-
Blocked
-
Dimension requirements
-
-
Item
-
Blocked
-
Missing basic required setup for posing data, such as FBC Product Source
-
Dimension requirements
-
Qualifiers
-
-
Agency
-
Blocked
-
Activity Status
-
Dimensions
-
Shipment Method Code (if required)
-
Qualifiers
-
-
Update information on the individual MC record(s), such as
-
posting date
-
Dimensions
-
Item
-
Donor
-
Agency
-
-
-
Once the User corrects the data issue, they can attempt to reprocess the Order in one of three ways:
-
Reprocess an individual order from the list page in CERES to allow the user to see the error messages on screen as needed
-
Reprocess from the list page in CERES using the existing connection, which ties up the user screen
-
Reprocess from the list page in CERES using the setup job queue entries to run via the NAS and not tie up the user screen
-
Potential Setups to avoid errors
Documented in the above sections are details of considerations for Agencies, Items and Donors. Also noted above in the CERES errors are the potential errors that may stop orders from being created or processed. Due to the required business processes and postings, and how your CERES setup is completed, it may be an area to consider to create special MC Agencies, Donors or Items to avoid some of the above noted errors.
Security
In the above user section, the notes are provided related to the user setup table. However, in addition the actual user security and permissions needs to be reviewed. It is recommended that 2 permission setups exist, one to allow users the access to the setup areas of MealConnect and the job queues, and one for the users that will need to review and process any MealConnect Errors from the MealConnect Orders List.
Security for Job Queue Entry Setup and Process Areas
The user that creates the job queue categories, job queue entries, and sets up the MealConnect setup areas has to have permission to the run and edit the jobs, run the MealConnect codeunit, as well as create/edit/post Agency and Donation orders. If the users have “super” permissions, all of this is covered, otherwise the permissions need to be reviewed and added for the relevant sections.
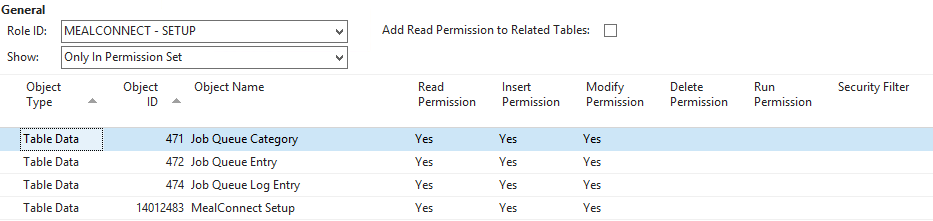
MealConnect - Setup
If the user that will setup the job queue is a superuser, no further permission is needed. If the user is not a superuser, the below permission set for setup is required to setup the job queue areas and for the process to run with no errors. As noted above, this user must also have permissions to create and post the AO and DO areas for the process to create and post the related orders. The user that sets up the Job Queue is the user that will be shown as having created and posted the AO and DO in Ceres.
Once the job starts processing, then the permissions of the user that setup the job queue entry (see the above section on the job queue entries setup) is checked to ensure they have permissions to run the object reference in the job.
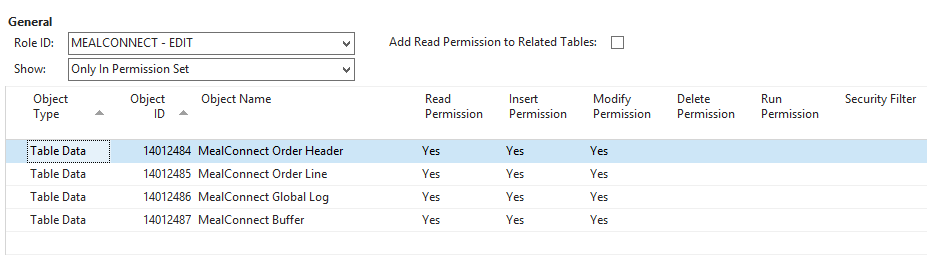
MealConnect Orders List Processing
For users that need to view and or process the MealConnect Orders that have errors, permissions need to be setup and added for the users. As part of base security, the user must have access to the Agency, Donor, or Item if they are to edit fields. They must also have create and post for AO and DO for the agency and donation orders to be manually processed.
The additional permissions required for MealConnect areas are noted below
If a user should only process using their login, and not have access to run the jobs, then the permissions to run the job are not required. This should be discussed as part of the setups to determine who can run the updates via the job and the permissions should be setup accordingly.
Deletion of Posted Agency Invoices and Donation Orders
Deletion of posted agency and donation orders can cause issues with finding the MC history as well as with current processing areas for MC orders that are partially posted but not yet confirmed back to MC. For this reason, it is strongly suggested to review the user security to ensure that users cannot delete the posted agency or donation orders.
See below for the tables that should be reviewed in security to ensure permissions are setup accordingly.
When CERES receives the orders from MC to process, it first looks to the MealConnect Orders list to see if there is a need to create or update the transactions. CERES then looks to the open sales and donation orders, and if not found, it then looks to see if the transactions are already posted. MC relies on the posted agency invoice and posted donation invoice (order) records to exist to know they were posted. If the MC ID it is not found in the open or posted records it then creates the orders and tries to post them.
Issue: Standard NAV and Base CERES do not have any limitations to stop the users from deleting the posted transactions.
-
Sales Shipment, Header table 110, Lines table 111
-
Sales Invoice, Header table 112, Lines table 113
-
Purch. Rcpt., Header table 120, Lines table 121
-
Purch. Inv., Header table 122, Lines table 123
For CERES communication with MC, only the Sales Invoice header and the Purch. Inv. Header tables are used. However for maintaining the history of the line details for reports, and potentially the sales shipments and donation receipts, all 8 tables are listed above.
There are 2 related notes for this.
-
Potential impact to Inventory in CERES, If user deletes posted donation order (invoice) or posted agency invoice
-
If it is BEFORE the MC record is confirm back to MC, then MC will resend
-
The biggest potential impact is if the donation order posted, the agency order did not post, the MC record is open in CERES
-
If the user deletes the donation order and runs the reprocess, then a new donation order would be created and posted, thus duplicating inventory for that donation
-
It the agency order is also posted, the processing of the transaction will update MC as processed, thus the records will not be resent and is not an impact scenario
-
-
If it is AFTER the MC record is confirmed back,
-
MC will not be sending to create the orders
-
So you will not get duplicated postings for this scenario
-
-
-
Reporting in the future
-
Discussions are that a report or reports for showing posted transactions may be wanted or needed.
-
example report where MC date and CERES posting dates are different
-
example, a food bank may want to run reports or create jet reports from the history to view MC details
-
-
The document date and posting date are both on the Item Ledger Entry (ILE), so details can be pulled for this data
-
However, the “your reference” field that is being used in MC does NOT exist in the ILE table, only on the posted orders.
-
Therefore unless the posted orders continue to exist, there is not a way to find the related MC orders to pull item details
-
Customized Filtered View of Posted Orders
As each food bank may setup different number series and or locations to use for MC, there is no filtered lists or page views for showing the posted agency and or posted donation orders related to MC. However, the use of use setups of filtered views and “save view as” can be used, or the food bank and or their VAR can create custom page views filtered to show the lists.
As an example, in our test database, we setup DMC as the beginning of the donation orders for MC, and also setup location code MC. Either or both of these can be used to filter to find the list of posted donation orders.
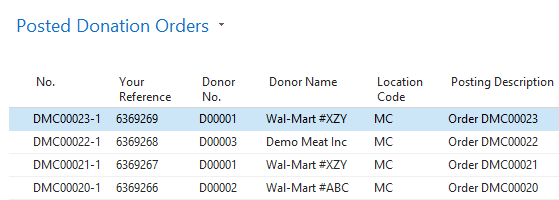
The “Your reference field” is used by the functionality to populate the MCID, and is shown in our view above. This allows you to see and or find the order in CERES based on the MC order id. This field may not be visible on your CERES page, however during implementation this field can be added to be shown.
Once the filters are set, the “save view as” can be selected to save a customized filtered view on the user computer.

The same concept and process can also be used to show the filtered view for the posted agency orders.