Item Reclass Journal Overview
This document describes reclassifying inventory between Locations, Pallets, Lots, Bins and/or Dimensions in Ceres 5. Item Reclassification Journals are used to conduct some transfers and certain types of reclassifications. This document describes reclassifying inventory between Locations, Pallets, Lots, Bins and/or Dimensions. Zone to Zone and Bin to Bin movements in the warehouse are also described in the Movement Worksheet and Warehouse Activity Plan procedures. Transfers between Locations are also discussed in the Transfer Order Procedures. Many transfer types can be facilitated with handheld scanners and are described in the Warehouse ADCS Barcode Processing procedure.
An item reclass journal is a type of item journal, therefore any product on the journal is not included in Quantity Available. If you just want to move producct within a location, you can also use the Movement Worksheet, which will not affect item availability.
Item Reclass (Transfer) Journal Adjustments
-
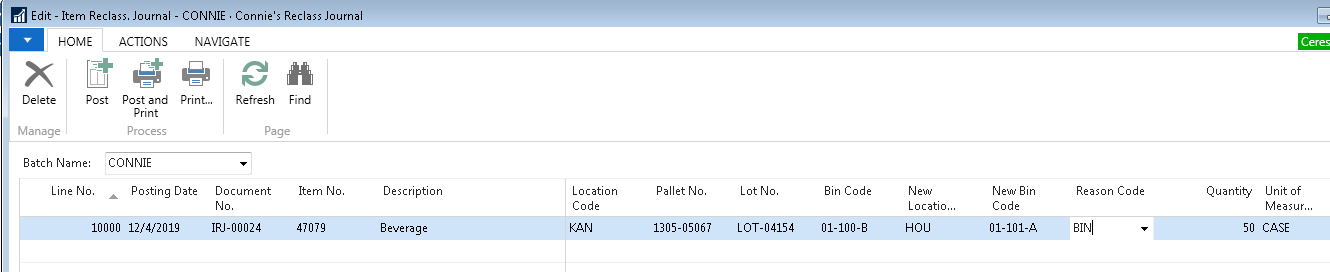
The Item Reclass. Journals can be accessed from Departments ▸ Warehouse ▸ Inventory ▸ Tasks.

-
If using multiple Item Journal Templates, select your template from the Item Journal Template List and click OK.
-
If using Item Journal Batches, select your Batch from the “Batch Name” field at the top of the Item Reclass. Journal form and click OK.
-
Fill in the “Posting Date” field with the date you wish to show the adjustments as being made (it should auto-fill with the current system date).
-
If desired, enter a “Reason Code” to describe why the adjustment is being made. If “Reason Code Mandatory” is set for this template, you will be required to provide a valid reason code. Reason Code may be left blank, however, entering reason codes will allow you to run reports by Reason Code at a later date to help better track your inventory adjustments.
-
Enter the Document No. (if you have assigned a document number series for your journal template or batch, the value will populate for you).
-
Enter the Item No. you wish to adjust.
-
If the item is palletized, you may enter the Pallet No. or use the drop down to select from available pallets. If the item is not palletized you will be required to enter the correct location, lot number and bin code. Once the correct information is entered, the “New” fields will populate with the same values as the current fields.
- Entering the pallet number will auto-fill the New Pallet No., Location Code, New Location Code, Bin Code, New Bin Code, Lot No., New Lot No., Unit Gross Weight, Ext. Gross Weight, Quantity, Unit of Measure, FBC/UNC Product Source and FBC/UNC Product Category Codes and if exists: UNC Notice No. and UNC Donor ID Code.
noteIf using Branches, be sure to show the Branch Code column and select the appropriate Branch (if not already showing).
-
Enter the quantity to be adjusted in the ‘Quantity’ field. If using Pallets, you are required to leave the quantity as calculated (If you are trying to reduce the quantity on a pallet, this should be done as a Negative Adjustment in an Item Journal). Pallets cannot be split into different locations or bins.
-
Update the values in the “NEW” fields as desired to transfer or reclassify the product.
-
Be sure to confirm that all the data has been entered correctly, paying special attention to the Posting Date and Quantity and then Post or Post & Print the journal.
Correcting Lines
If a Lot number already exists on the transaction line and the user needs to change the Item Number, you must clear the “Lot No.” field before changing the Item No. Attempting to change the Item No. when a Lot No. is already assigned results in the following error.
![]()
Related Topics
- Item Journal Adjust Quantities
- Physical Inventory Counts and Inventory Journal
- Reason Codes Mandatory Overview
- Warehouse Activity Plan – WAP
- Warehouse ADCS Barcode Processing
- Inventory Movement Worksheet
- Transfer Order Overview