Warehouse ADCS Barcode Processing
The Ceres 5 ADCS functionality allows users to use handheld barcode scanning devices with the Ceres database. Users are able to perform Inventory Picks, Warehouse Transfers, Bin to Bin Movements, Inventory Counts, WAP Pallet Movements, Lookup warehouse information, Reprint Tags, add Items to existing Donation and Agency Orders. If your food bank is not already a user of the ADCS handheld functionality, this document is designed to supplement the project work. It does not represent all the needed tasks for initial use.
Ceres Object release 5.00.00 is required for the functionality described in this document.
Setup
You must have an ADCS server, a dedicated NAS, as well as a terminal capable of using VT100 communication. Your Ceres license must also contain the supporting license keys. Assistance from your VAR is typically required for the initial setup of the ADCS handheld infrastructure.
Location Setup
-
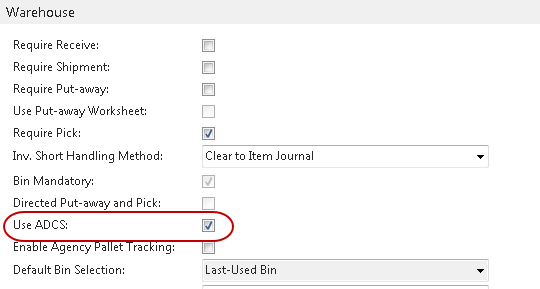
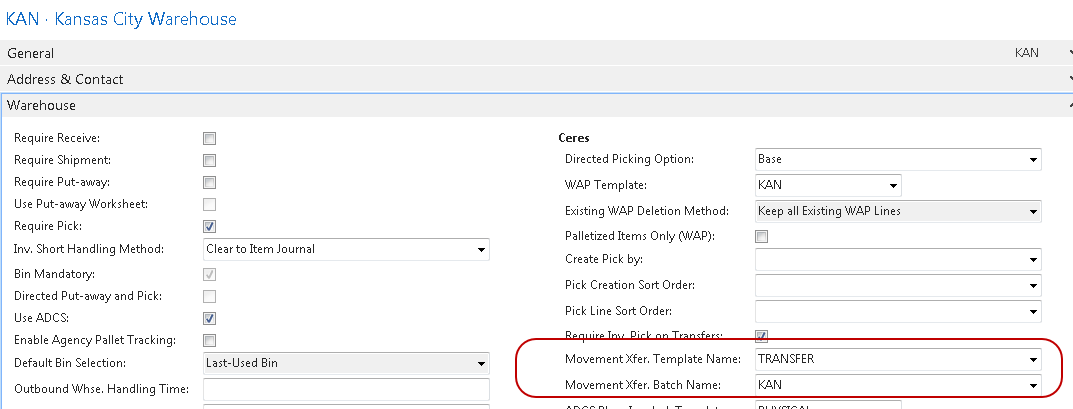
In order to use the ADCS functionality with a Location, the Use ADCS field must be checked on the Warehouse FastTab of the Location Card.
-
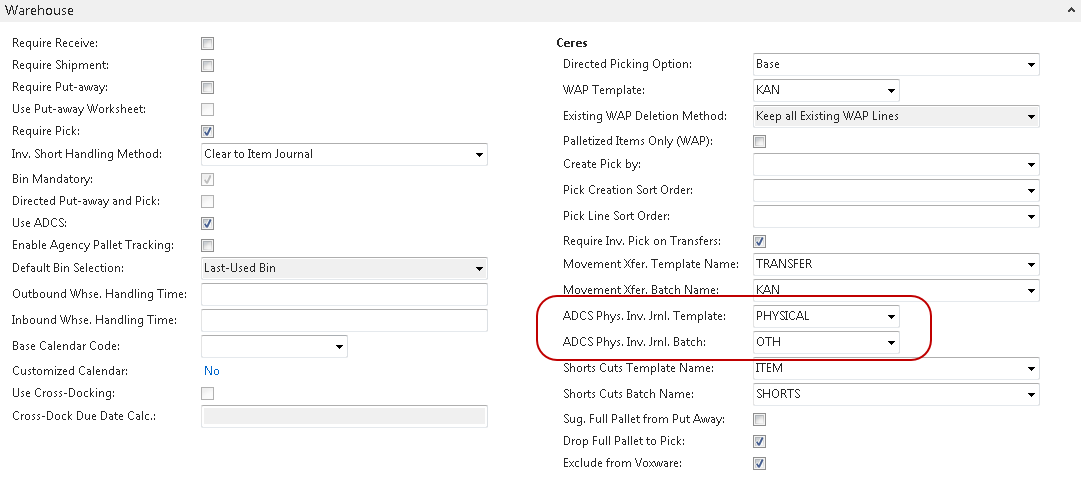
In order to utilize the ADCS Inventory Count functionality for a location, you must specify an ADCS Physical Inventory Journal Template and ADCS Physical Inventory Journal Batch.
-
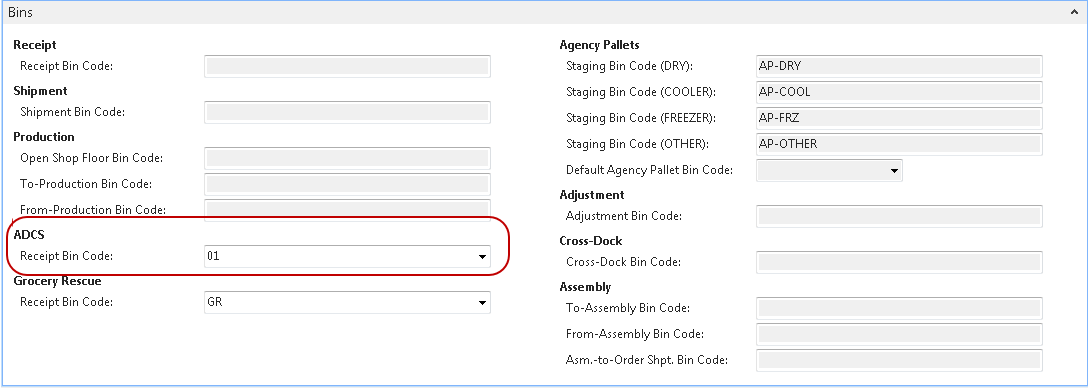
An ADCS Receipt Bin Code on the Bins FastTab of the Location Card can be defined. If specified, this Bin will be used as the receiving bin during the Donation Order building function. If left blank the user will need to enter or scan the receiving bin during the Donation Order building process.
ADCS Users
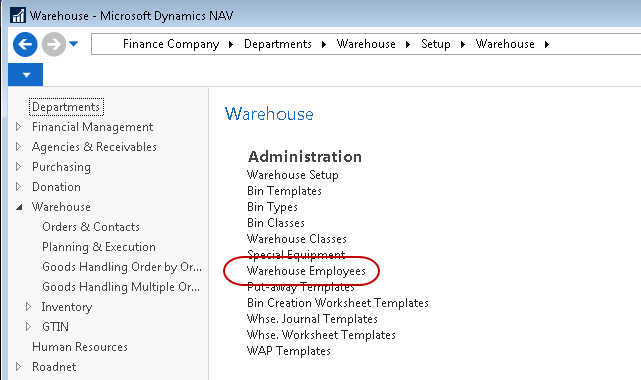
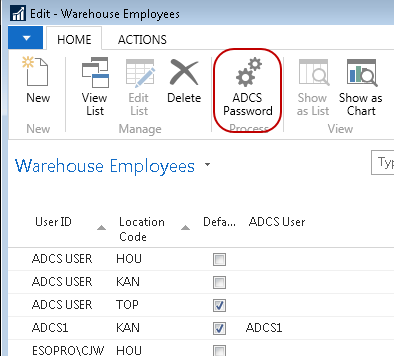
All ADCS users must have a database login. Windows Logins are not accessible from the ADCS terminal. Please contact your system administrator if you need to have your credentials added. To begin using the ADCS functionality, you must set up the ADCS User on the Warehouse Employee record.
-
The Warehouse Employees page can be accessed from Departments ▸ Administration ▸ Application Setup ▸ Warehouse ▸ Warehouse ▸ Lists ▸ Warehouse Employees.
-
To setup a new Warehouse Employee, click Home ▸ New.
-
In the User ID field, enter or select the user’s login.
-
In the Location Code, enter the location where the User may perform ADCS interaction.
-
In the ADCS User field, enter the database login to be used with ADCS.
-
Check the Default box if this is the user’s main location to perform work. Each user must have a default location. If a user works in multiple locations, they will need to select their location at login.
-
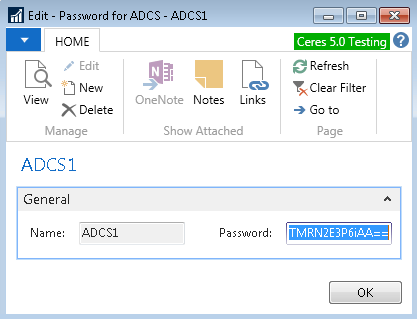
Click Home ▸ ADCS Password.
 note
noteThe ADCS password is not the same as the Ceres login password. In other words, you could make your users log into the Ceres database with one password, and log into ADCS with a separate password.
-
In the Password field, enter the password for use with ADCS.
 note
noteThe ADCS password is visible upon first entry in the Password field, but once you leave the field, the password is obfuscated.
tipSetting your ADCS passwords as numbers only makes it easier to enter into most scanners.
-
Click OK.
Inventory Setup
The ADCS functionality has several parameters that will tailor the features available within ADCS. These can be accessed from Departments ▸ Financial Management ▸ Inventory ▸ Setup ▸ Inventory Setup.
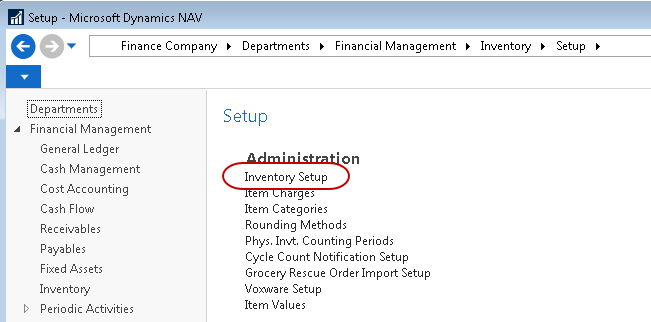
Click on the ADCS FastTab to display the options available.

Auto Transfer Journal Posting: This field indicates whether or not the Transfer Pallet function will automatically post the Movement from the handheld immediately. If checked the movement of the pallet will post, if left unchecked, the transaction will be entered into the Movement Xfer. Template Name and Batch Name specified on the Location card. Then it will be accessible via the Movement Worksheet in Ceres to review/post.
Max. Pick Labels per Item: This field is used to limit the quantity of pick labels generated for any one item. A value of zero indicates no limit.
ADCS Pick Posting Option: This field controls the update and posting option Ceres will perform when utilizing the ADCS Inventory Pick Function. This field has four options as explained below.

- Ship Only – The inventory pick will posted with the “Ship” option. This will occur regardless if the pick has any unfulfilled lines.
- Ship and Invoice Fulfilled Only – The inventory pick will be posted with the “Ship and Invoice” function only if all the lines on the pick have been fulfilled. Otherwise the pick will not post and must be posted manually.
- Ship and Invoice – The inventory pick will be posted with the “Ship and Invoice” function regardless of whether or not all the lines on the pick have been fulfilled.
- Update Only – This pick will be updated with the information collected from the ADCS but the pick will remain un-posted. Manual posting of the pick will be required.
Cycle Count Notification: This field indicates how the handheld code will handle pallet movements when the item is currently involved in a physical inventory cycle count. When attempting a pallet move via ADCS, the Item will be checked to see if it is currently on a physical inventory cycle count journal. If the Item is not on a cycle count the process will proceed. If the Item is on a cycle count, this field will determine the handhelds appropriate action. There are three possible options.
- Blank – The handheld will accept the transfer without any warnings or errors.
- Warning – The handheld will warn the user that the item is involved in a cycle count currently but will still allow the transfer to occur.
- Error – The handheld will warn the user that the item is involved in a cycle count currently and will not allow the transfer to occur.
In-Transit Location: This field should be set to the valid in-transit Location when using the ADCS system to create, ship, and receive Transfer Orders between Locations (buildings). All transfer orders initiated by the ADCS system will utilize this Location as the in-transit location.
Lot Match Required: Pallet consolidation allows 2 pallets of the same Item, in the same Location, to be consolidated into one pallet. This field is used during the ADCS Pallet Consolidation functionality. If this field is checked, then the pallets being consolidated must be from the same lot number in addition to the pallet having the same Item number and Location. Leave this unchecked if you wish to be able to consolidate pallets from different lots.
Consolidating Pallets from different Lots will impact proper FEFO aging tracking.
Consolidation Template: Specify a valid item journal template to be used to post transactions from the pallet consolidation function.
Consolidation Batch: Specify a valid batch name to be used to post transactions from the pallet consolidation function.
As of Ceres 5.1, the validation for Consolidation Template and Batch is not functioning properly. You may need to create the Consolidation Item Journal batch manually, and then type the newly created batch name into the Consolidation Batch field.
ADCS Handheld Printer Selections
In Ceres 5.0 and above, printing from ADCS is no longer supported.
General Handheld Functions
Logging In
-
Access the Welcome screen from the ADCS terminal.

-
Enter your User ID and press enter.
-
Enter your Password and press enter.
-
The Location will automatically flow in the default location for this user. Press enter to accept, or type the desired location and press enter.
 note
noteIf your login is not associated with the desired location, you will receive an error. Please add the information to the Warehouse Employees form as described earlier in this document.
Main Menu
The Main Menu is the central screen where you may access your ADCS activities. From this menu, press the number key of the functional area you want to access, and then press enter.

Logging Off
-
From the Main Menu, press 4.
-
Press Enter.

-
To Log off, press 1. To continue your session, press 2 to return to the Main Menu.
Warehouse Transactions
Warehouse - Pallet Movements
ADCS Pallet Movements are a way for users to perform transfers without needing to access the Item Journal. To compare this process, please reference Transferring Items using the Item Reclass Journal.
-
From the Main Menu, select Warehouse.
-
From the Whse Activities Menu, select Transfer Pallet.
-
Scan or type the pallet number to be moved. The terminal will flow in the Item, Description, Lot, Qty, and Bin where the item is currently stored.

-
Scan or type the To Bin Code, and then press enter. The pallet will be moved from the bin specified on the “From” line to bin specified on the “To” line.
-
Continue processing pallets, or press escape to return to the Whse Activities Menu.
notePallets currently on the WAP (Warehouse Activity Plan) are not allowed to be moved using this ADCS function. Attempting to move a pallet on the WAP will result in an error message directing the user to use the “Move WAP Pallet” ADCS function instead. Transfer Pallet is for manual movements.

Warehouse - Move WAP Pallet
The ADCS terminal allows you to complete a pallet drop as indicated on a Warehouse Activity Plan (WAP).
A WAP needs to be generated before processing this work with the handheld.
-
From the Main Menu, select Warehouse.
-
From the Whse Activities Menu, select Move WAP Pallet.
-
Scan or type the item number to be moved. The terminal will flow in the rest of the fields based on the first entry in the WAP.

-
Verify the “To” field, which signifies the bin the pallet will be placed in. If it is incorrect, scan or type the desired bin.
-
Press enter.
Warehouse - Inventory Counts
The ADCS Inventory Counts functionality allows you to use ADCS with physical inventory counting. Entries made via ADCS are logged in the Physical Inventory Journal where a manager may review and post the entries.
Inventory quantities will not be affected until the Physical Inventory Journal is posted from the Ceres database.
-
From the Main Menu, select Warehouse.
-
From the Whse Activities Menu, select Inventory Count.
-
Scan or type the pallet to count. The terminal will flow in the item, description, lot, and bin.

-
Verify the bin. If it is incorrect, scan or type the correct bin code. Press enter.
-
Type the quantity and press enter.
Lookup – Item
-
From the Main Menu, select Lookup.
-
From the Lookup Menu, select Item.
-
Scan or type the item number. The terminal will flow in the Description, Description 2, and Pack Size.

Lookup – Pallet
-
From the Main Menu, select Lookup.
-
From the Lookup Menu, select Pallet.
-
Scan or type the pallet number. The terminal will flow in the item number, description, the bin where the pallet is being stored, the lot, and the quantity on hand vs. the quantity on warehouse picks.

Lookup – Pallets by Bin
-
From the Main Menu, select Lookup.
-
From the Lookup Menu, select Pallet by Bin.
-
Scan or type the bin number.

-
The terminal will flow in the pallet numbers and a description of the item for each pallet in the bin.

-
Select the pallet to view by typing the number next to the pallet number.

-
The terminal will flow in the item number, description, the bin where the pallet is being stored, the lot, and the quantity on hand vs. the quantity on warehouse picks.

Scan/Print – Barcodes
The Scan Barcode function allows you to test the reliability of your barcode scanner.
-
From the Main Menu, select Scan/Print.
-
From the Scan/Print Menu, select Scan Barcode.
-
Scan a barcode.

-
Press enter. The terminal will return the translated barcode information.

Scan/Print – Pallet Labels
-
From the Main Menu, select Scan/Print.
-
From the Scan/Print Menu, select Reprint Pallet.
-
Scan or type the pallet number, and then press enter. The pallet report will be sent to the printer.
Printing from Ceres 5.0 is not supported at this time.
Scan/Print – Bin Labels
-
From the Main Menu, select Scan/Print.
-
From the Scan/Print Menu, select Reprint Bin.
-
Scan or type the bin number, and then press enter. The bin report will be sent to the printer.
Printing from Ceres 5.0 is not supported at this time.
Transfer Orders
Transfer Order Shipments
Ceres has the ability to create and process Transfer Orders directly from the ADCS handheld device.
-
To begin this process, select the Warehouse menu on the handheld. From this menu select “Transfer Shipment”, option 5.

-
The transfer shipment form will be displayed.

-
Enter the “To Location”, where the product is being transferred to.

-
Scan the Pallet label or enter it on the handheld keypad manually. Once a valid pallet is entered, the system will populate the item number, description, from bin, and quantity automatically.

-
For verification, you must still enter the bin and quantity even though they are displayed. You may scan the bin code label if it’s available otherwise enter manually via the handheld’s keypad. Next, enter the quantity. The quantity must match the pallet quantity or an error will result.

-
Repeat these steps for each pallet being transferred.
-
Once all the pallets for the Transfer Order have been entered, use the “Register” button on the handheld to post the Transfer Order shipment if desired. Otherwise, the Transfer Order will just be entered and you can post the shipment form Ceres when required. Here is an example of the Transfer Order just entered.
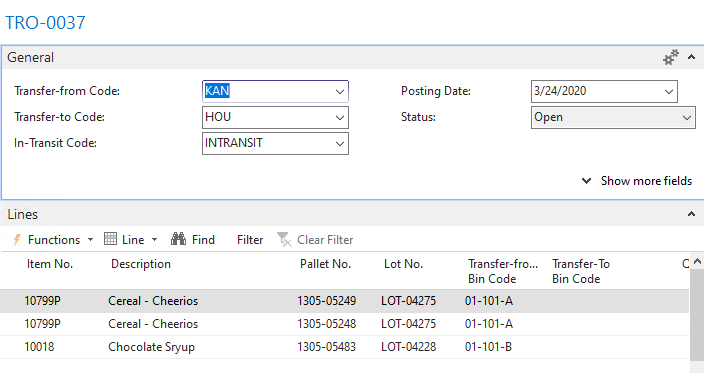
Transfer Order Receipts
-
To begin this process, select the Warehouse menu on the handheld. From this menu select “Transfer Receipts”, option 6.
-
A list of open Transfer Orders will be displayed. Each order will show two lines, the first indicates the Transfer Order number, and the second shows the location the transfer is coming from.

-
Select the Transfer Order number to work with.

-
Next scan the pallet number, or enter it manually via the handheld keypad.

-
The Item No., description and quantity will be displayed. Next you must enter or scan a valid bin number to move the pallet into and enter quantity on the pallet. You must enter the quantity even though it is displayed for verification purposes.

-
Repeat this step for all the pallets on the Transfer Order. Once all pallets have been successfully scanned or entered, you can post the receipt from the handheld if desired via the “Register” button on the handheld. If you prefer to post the orders manually in Ceres skip this step and access the Transfer Order in Ceres to complete the process.
Consolidate Pallets
Ceres has the ability to consolidate pallets of a like item into one pallet. This is used typically when a small amount remains on one pallet and it is desirable to move the quantity from the smaller pallet onto the larger pallet to maintain only one Pallet slot for the Item at time of pick. It is a requirement that the pallets being consolidated are for the same item and in the same warehouse location. Based on a parameter setting (see Setup above for parameter settings). Ceres can also force the lot numbers to match before allowing the consolidate process.
-
To begin this process, select the Warehouse menu on the handheld. From this menu select “Consolidate Pallets”, option 7.

-
The consolidate pallets form will be displayed.

-
Scan or enter the pallet that will be consolidated onto another pallet. This first pallet is normally the smaller quantity but Ceres does not enforce this. Next enter the pallet the first pallet’s quantity will be consolidated onto.

-
The system will check the validity of the consolidation and ensure that both pallets for the identical Item and Warehouse Location. If the Location of the pallet entered is not the same as the handheld’s location or the pallets contain different Item numbers an “Invalid Pallet” message is displayed.
-
If the Item and Location match, next the “Lot Match” parameter is checked. If matching lot numbers is required and the lots from the two pallets do not match, an “Invalid Pallet” message is displayed.
-
If all requirements are met, the system processes a negative adjustment to the first pallet effectively zeroing its quantity and the quantity is then added to the second pallet.

The process of consolidating pallets clears (deletes) all Item Journal Line records within the Consolidation Template and Consolidation Batch as specified on Inventory Setup. This mandates that the pallet consolidation process is a one-user-at-time operation.
Donation Order
This process allows the user to enter information onto an existing Donation Order directly from the handheld. This process requires that the Donation Order is created in Ceres first and that the Items expected are entered as lines on the Donation Order. The lines must exist but the quantity should be left blank. The process will allow updating of the Donation Order for any Item that is specified on the Donation Order.
-
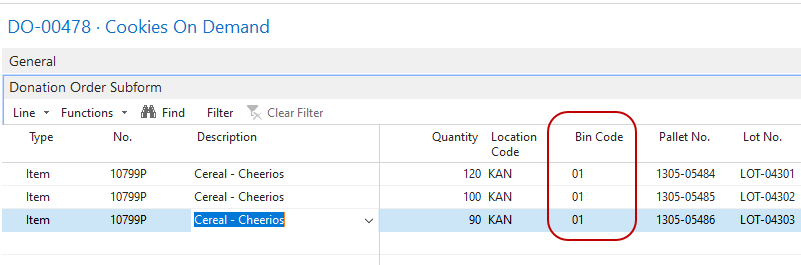
First, we’ll create a Donation Order (See Donation Orders for more information on creating Donation Orders). Add lines to the Donation Order for expected Items to receive. Here is the example order we are using. Notice that we are expecting 2 items on the Donation Order, 6K119 and 10799.
-
On the handheld, choose from the Warehouse menu, option 8 – Donation Order.

-
Next enter or scan the Donation Order number into the handheld.

-
Enter or scan the Item number for the first item received and the description will be displayed.

-
Enter the quantity received.

-
Repeat this process for all pallets received – here we will bring in two more pallets of Cereal.


-
If you enter and item that does not exist on the order, you will receive the following error.

-
At the completion of the scanning, exit the function and the Donation Order is updated with the appropriate information. If the parameters specify a default ADCS Receipt Bin that bin code will be entered on the donation order lines otherwise it will be left blank or default to the last used bin based on warehouse location settings.
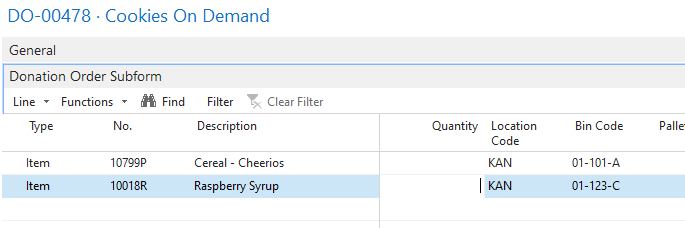
Here is the Donation Order as it now stands.

-
At this point the Donation Order could be updated into the system. However, if your process involves a put-away function as well as the receiving, the handheld or another handheld can be used to perform the update of the destination bin code for the product.
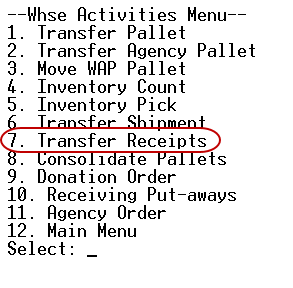
Receiving Put-Aways
This process will update a Donation or Purchase order with a destination bin code prior to posting. This is normally used when the operation involves two or more warehouse workers working together to receive and put-away the product. The first handheld handles the order receiving process and gets the quantities and pallets built on the Donation or Purchase order. The second set of workers will move the pallets to the correct bins and record the bin the pallet was placed in.
-
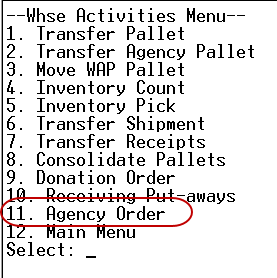
This process is accessed from the Warehouse menu by choosing option 9 – Receiving put-Away.
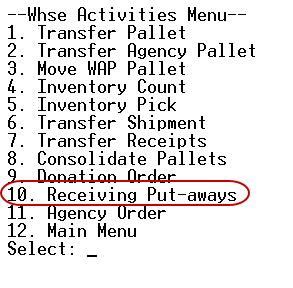
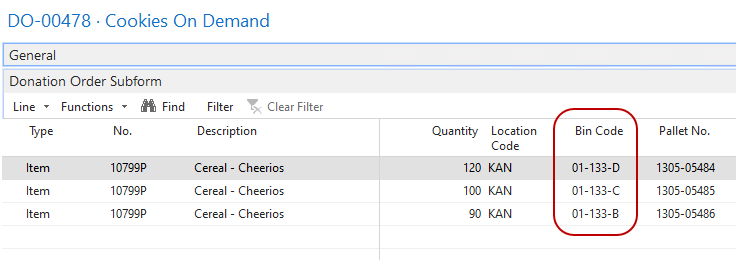
Here is the donation order we will put-away. Notice the bin code is “01” which is the4 default ADCS receiving bin code.
-
Next enter or scan the pallet number.

-
The Order number, Item No and description are displayed. After moving the pallet to the desired bin code, scan or enter the bin code the pallet was placed in.
-
Repeat this process for all the pallets.


-
When done, the Donation or Purchase order is updated to reflect the bin codes entered during the receiving put-away process.
Agency Order
This process allows the user to enter information onto an existing Agency Order directly from the handheld. This process requires that the Agency Order is created in Ceres first. The process will allow product to be added to the Agency Order by scanning the Pallet No for each Item you would like to add to the order.
-
First, we’ll create an Agency Order ensuring that the “ADCS Order” flag is checked (See Agency Orders for more information on creating Agency Orders).

-
On the handheld, choose from Warehouse menu, option 10 – Agency Order.
-
Next, select option 1 – “Scan Pallets” from the Agency Order Menu to select the Agency Order and begin scanning Pallets onto the order.

-
Next enter or scan the Agency Order number into the handheld.

-
Enter or scan the Pallet No. for the first Item to be added to the order. Once entered the Item No., Bin Code, Lot No. and Pallet Quantity available will populate.

-
Confirm or change the quantity to order and press enter.

-
Repeat this process for all Pallets/Items ordered – here we will bring in two more pallets.


-
If the quantity requested is more than what is available on the Pallet you will receive an “Insufficient Qty on Pallet” error message.

-
At the completion of the scanning, exit the function (via Esc key) and the Agency Order is updated with the Items/Pallets selected.
Here is the Agency Order as it now stands.

-
At this point the Agency Order could be processed in Ceres just like any other Agency Order. However, if your process involves posting the shipment of the product on the Agency Order, the handheld or another handheld can be used to perform that function.
-
Select option 2 – Post Shipment from the Agency Order Menu to select the Agency Order, post the Shipment, and print the Shipping Tag (if desired).

-
Next enter or scan the Agency Order number into the handheld.

-
Enter the number of Shipping Pallet Count (one Shipping Pallet = one Shipping Tag) or confirm zero for no Shipping Tags and press enter to post the shipment.
-
Upon Shipment post, if additional input is required to post the shipment, the error will be displayed with a corrective action. In this case, the Shopper was missing on the Agency Order Header which prevented the Order shipment from posting.

-
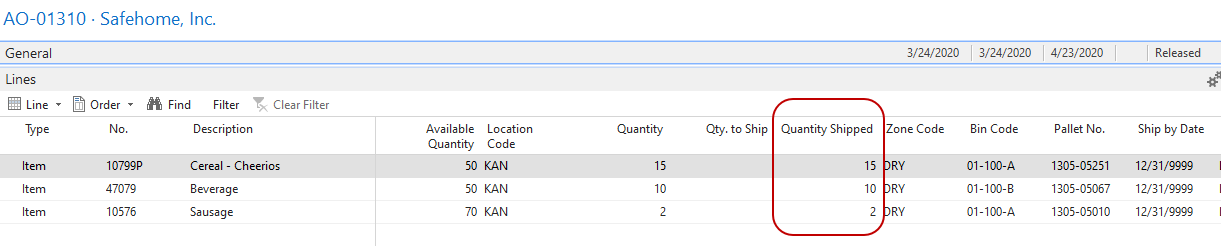
Once shipment has been posted the Agency Order reflects the Quantity Shipped and the Shipping Tags (if requested) will have been printed.
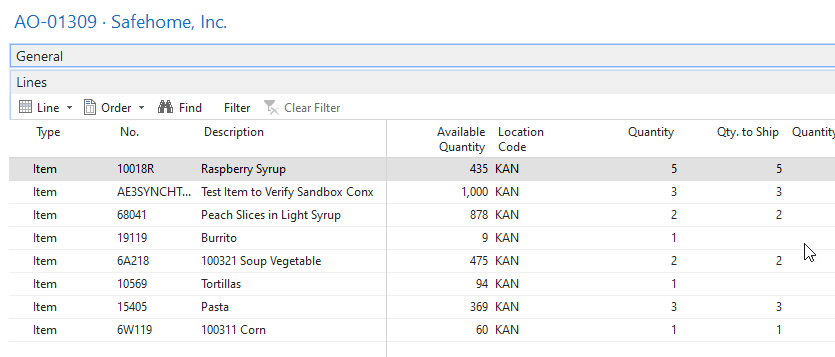
Inventory Picks – Without Line Skips
The Inventory Pick process with ADCS is designed to update picks via the handhelds. The process of creating Agency Orders and creating Inventory Picks is explained in other documents. This section will assume that the Order and subsequent Inventory picks have been created and will concentrate on the actual handheld process. You must use Ship Option 2 in order to manage picks with the Handhelds.
There are several options as to what happens to picks as a result of updating picks via the handheld. Those are explained above in the setup sections. The process of entering picks via the handheld is identical regardless of the back end processing option selected.
For this example, we have entered an Agency Order and created picks for the order. Because of the setup of our pick generation, in this example 3 picks were created for the one order. Here are examples of the order and the picks created.

-
To access the inventory Pick function, select option 4 – Inventory Pick from the Whse Activities Menu on the handheld.
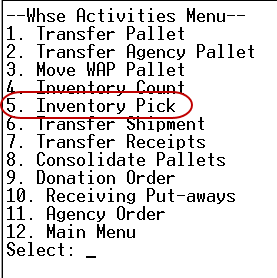
-
The inventory pick form will be displayed.

-
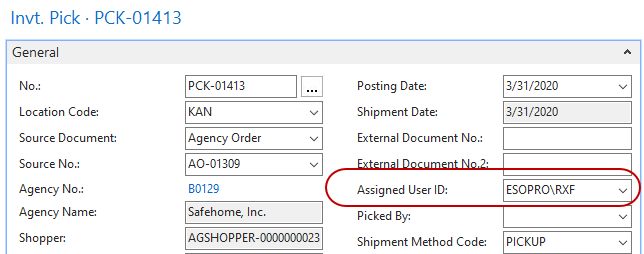
Enter the pick number you wish to being working with. If the pick selected is already assigned to another handheld user, the following error will be displayed. Handheld users will only be able to access picks assigned to their user ID or that have not been previously assigned to any other user ID.

-
If it is necessary to reassign a pick document, this can be accomplished by changing the Assigned User ID field on the General FastTab of the pick. Normally picks would not be assigned to the users prior to the process of picking via handheld, and the handheld pick process will make the user assignment.
-
Once we have a pick assigned to the user, or select a pick that has not been assigned to any user, the user can then process the pick using the inventory pick screen on the handheld. Entering the pick (in yellow) will display the information about the first bin to select product from. There are numerous options for determining the picking sequence in Ceres covered in other documents.

-
You can then substitute a different pallet (if required) or accept the pallet suggested. Next, you must enter the bin code for confirmation purposes. Changing the bin code on the pallet record will be allowed, and warehouse move will be generated to move the pallet to the new bin code. On this line we will accept the bin code and pallet as suggested. Next we enter the quantity picked. For this example we attempted to enter a greater quantity than specified on the order. The following error is displayed and we must adjust our quantity.2

-
Enter the correct quantity and the line will be posted, and the next line will be displayed until all lines have been presented. At completion, the form will clear and you will be allowed to enter the next pick number.
-
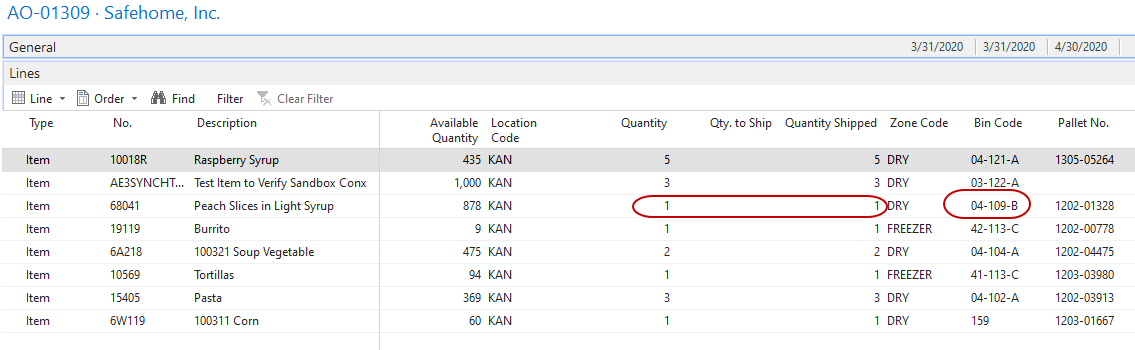
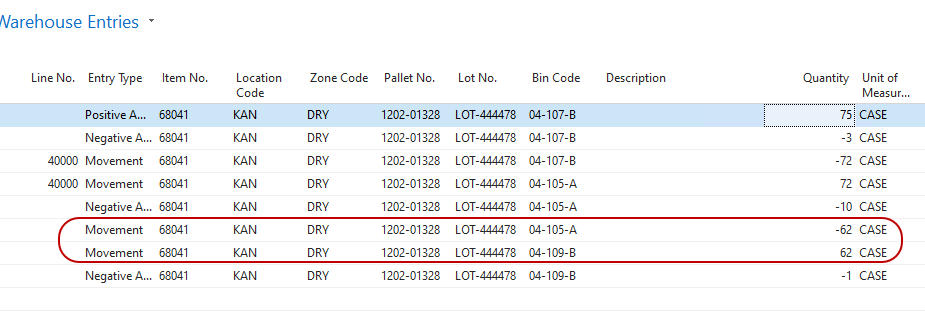
In this next example we have overridden the pallet’s bin code and changed it from 04-109-A to 04-109-B because that is where we found the pallet. This feature can be used to facilitate “Drop On Demand” functionality using the handheld ADCS unit. For installations using this feature, the ADCS pick function will record the transfer of the pallet from its storage bin slot to the pick slot where the pallet currently resides. If the pallet is on the WAP (Warehouse Activity Plan), that line on the WAP will also be updated and posted with the new bin slot information.

-
Finally, on this pick we will short ship the line. The order called for 2 and we will only pick 1 because there was not a sufficient quantity available.

-
After completion of these picks, we return to our order to see the updates that have occurred. Notice that line 3 has a quantity shipped of 1 even though 2 were ordered and that line 2 is being picked from bin 04-109-B not 04-105-A.
-
We can verify that the pallet actually was moved by viewing the pallet record for pallet 1105-01833 and see that it now sits in bin 04-109-B.
-
And the corresponding warehouse move was executed for us.
Inventory Picks with Line Skips
The Inventory Pick with Line Skips is an optional process with ADCS builds upon the process outlined above with the following enhancements:
-
Pick Number Bar Code added to the physical pick documents (portrait and landscape).
-
Sorting options and syncing of the line item sorts between the Pick Page, Pick Report, and ADCS Pick Line list.
-
Ability to skip a pick line on the handheld and then return to process the skipped lines.
-
Ability to split lines and process shorts/cuts for pick lines processed via the handheld.
noteCeres requires the Inventory Pick miniform call on the “MENU-WHSE ACT” mini form to be changed from WA-INVENTORYPICK to WA-INVENTORYPICKSKIP. Please contact your Ceres solution center to setup/create the WA-INVENTORYPICKSKIP mini form.
Sort Order
The sort order for the Pick Lines on the Pick Page, Pick Report (landscape or portrait), and Handheld can be specified on the Warehouse fasttab of the Location card.
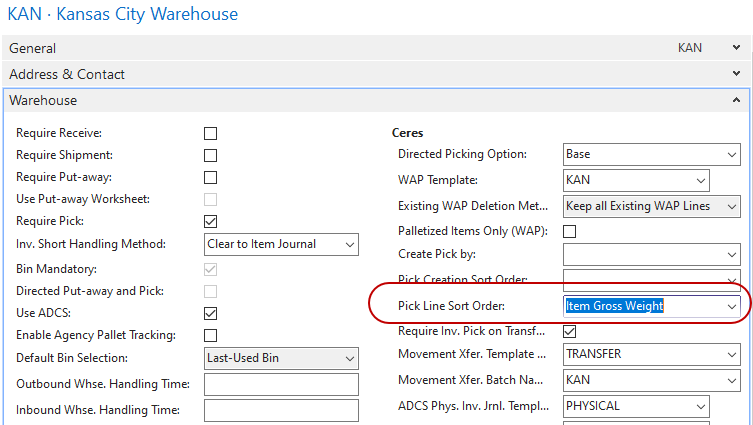
Pick Line Sort Order: This field controls the order of the pick lines on the Pick Page, Pick Report, and Handheld.
- <blank> – The pick lines will be sorted by “Create Pick By” and “Pick Creation Sort Order” settings on the Warehouse fasttab of the Location Card.
- Item Gross Weight – The pick lines will be sorted descending by each Item’s gross unit weight.
Bar Code on Pick Reports
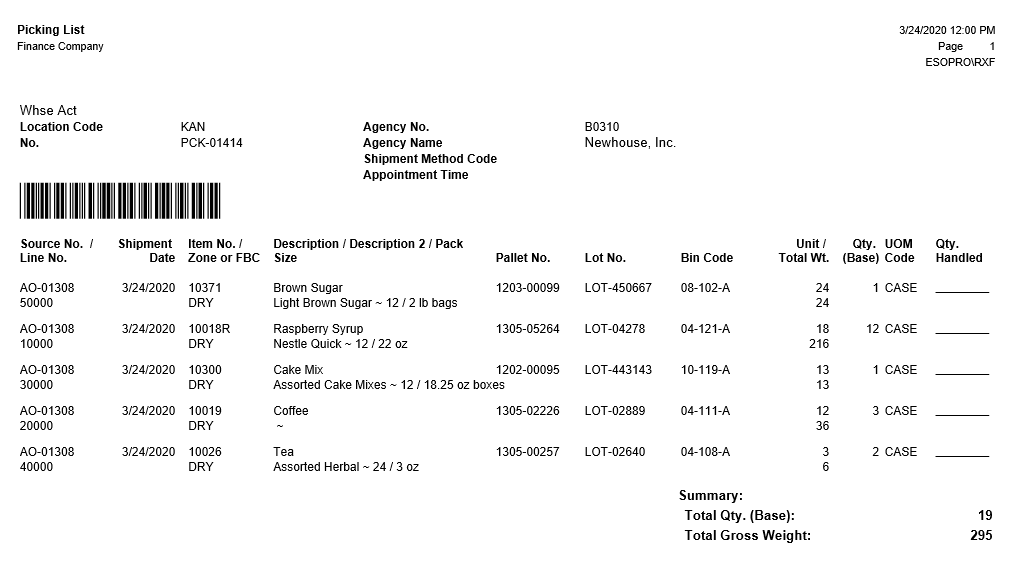
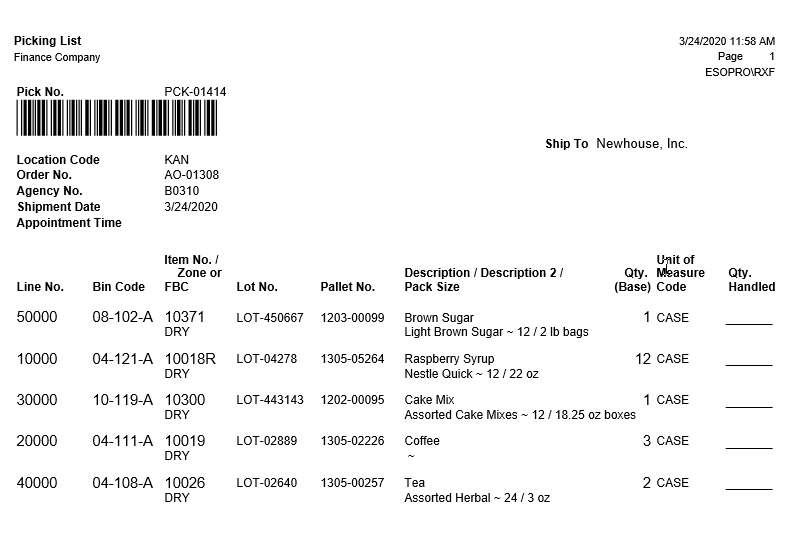
The Pick No Barcode has been added to the Ceres Picking List-Landscape (Report# 14012290) and Ceres Picking List-Portrait (Report# 14012291) reports.
Handheld Pick Process
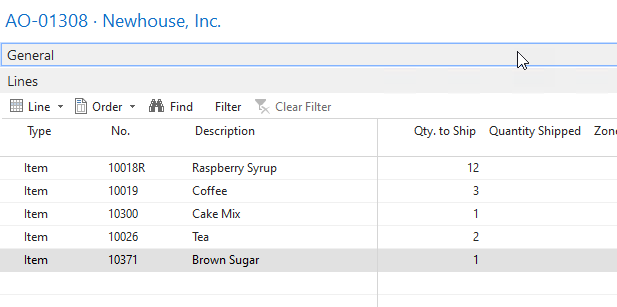
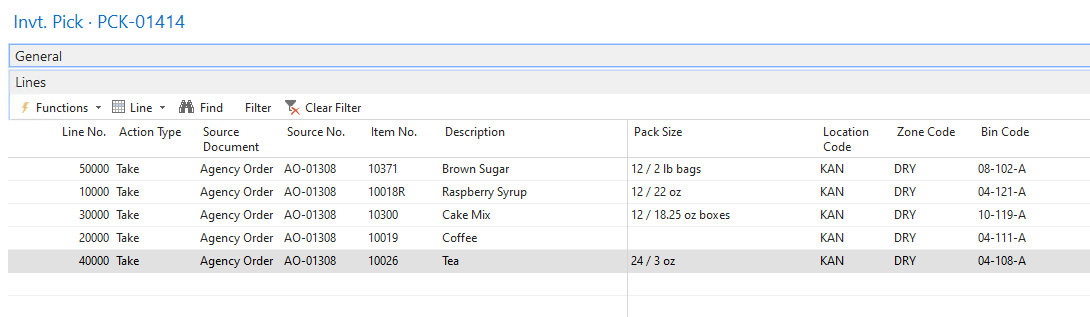
For this example, we have entered an Agency Order and created pick(s) for the order. Because of the setup of our pick generation, in this example 1 pick was created for the Order. Here are examples of the order and the pick created.
Agency Order Lines
Pick Lines
-
To access the Inventory Pick function, select option 4 – Inventory Pick from the Whse Activities Menu on the Handheld.

-
The inventory pick form will be displayed.

-
Scan or enter the pick number you wish to begin working with. If the pick selected is already assigned to another Handheld user, the following error will be displayed. Handheld users will only be able to access picks assigned to their user ID or that have not been previously assigned to any other user ID.

-
If it is necessary to reassign a pick document, this can be accomplished by changing the Assigned User ID field on the General fasttab of the pick. Normally picks would not be assigned to the users prior to the process of picking via handheld, and the handheld pick process will make the user assignment.

-
Once we have a pick assigned to the user or a pick that has not been assigned to any user is selected, the user can then process the pick using the Inventory Pick screen on the Handheld. Scanning/entering the pick will display the information about the first Item to select product for according to the Pick Line Sort Order mentioned above.
noteThe Assigned User ID, Start Date, and Start Time on the Pick Header are populated when the Pick is selected on the Handheld. When picking is complete and the pick has been fully handled, the End Date and End Time are populated.
-
Prior to selecting the Pallet/Bin, three new fields are available for the “Skip” functions.

Skip:
No – The selection proceeds to the “GoTo Skipped” field.
Yes – The current Item is skipped, and the next Item is displayed according to the Pick Line Sort Order.
Go To Skipped:
No – The selection proceeds to the “Exit Skipped” field.
Yes – The first skipped Item (if any) is displayed.
Exit Skipped:
No – The selection proceeds to the Pallet/Bin Code fields to select the Pallet & Bin Codes for the Item.
Yes – If in skipped Items, exit the skipped Items and display the next Item according to the Pick Line Sort Order.
-
You can substitute a different Pallet or accept the Pallet suggested. If substituting a Pallet, the substitute Pallet will need to be confirmed by Scanning/entering the Pallet twice.
Next, you must enter the Bin code for confirmation purposes. Changing the bin code on the pallet record will be allowed, and warehouse move will be generated to move the pallet to the new bin code. On this line we will accept the Pallet and Bin code as suggested.
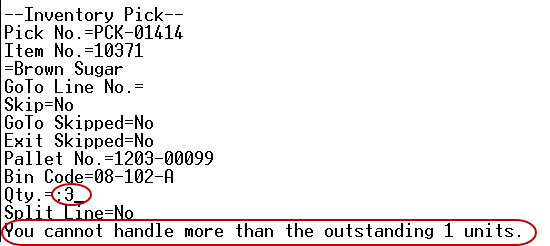
Next we enter the quantity picked. For this example, we attempted to enter a greater quantity (i.e. 5) than specified on the order (i.e. 2). The following error is displayed, and we must adjust our quantity.
-
If a Qty. less than the Order Quantity is entered (Qty. can be Zero) and “Inv. Short Handling Method” on the Warehouse fasttab of the Location Card is set to anything other than “None”, an Inventory Short will automatically be created when the Pick is posted provided Split Line equals “No”. Optionally, the Handheld user can change Split Line to “Yes” and a new line for that Item will be created so the user can select another Pallet/Bin for the remaining Quantity.

Enter 6 on the line that had 12 and select split line:

The Remaining quantity of 6 is prompted for:
 note
noteWhen “Inv. Short Handling Method” is configured and the Qty. entered is less than the Order Quantity and Split Line equals “No”, an Inventory Short will automatically be created when the Pick is posted.
-
If a Qty. less than the Order Quantity is entered and “Inv. Short Handling Method” on the Warehouse fasttab of the Location Card is set to “None”, Split Line is automatically set to “Yes” and a new line for that Item will be created so the user can select another Pallet/Bin for the remaining Quantity.

-
Once the correct quantity has been handled the line will be updated, and the next line will be displayed until all lines have been presented. At completion, the form will clear and you will be allowed to enter the next pick number.
noteOnce all non-skipped lines have been presented, the first skipped line will be automatically re-presented until all lines have been handled.
If a fully handled Pick is Scanned/entered again the following will be displayed.

-
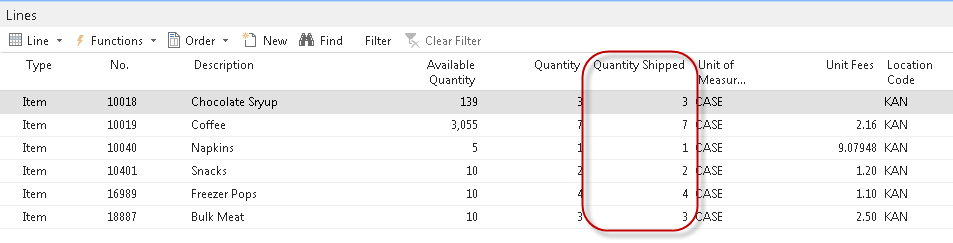
After completion and posting of the pick, we return to our order to see the updates that have occurred.
Navigating the Pick Lines
Go to a specific line on the pick
Enter the line number on the pick that you want to jump to:

The process will jump to that line if it exists and display it:

If the line has already been handled or does not 28exist, you will get this error message:
Skipping the current line
To skip the current pick line and move to next pick line, enter ‘YES’ on the Skip Line as shown here:

Goto Skipped Lines
To circle back and process previously skipped lines, enter “YES” on the Goto Skipped prompt:

Exit Skipped Lines
To break from reviewing skipped lines, enter “YES” on the Exit Skipped prompt:

Related Topics
- Bin Overview
- Inventory Process Flows
- Item Reclass Journal Overview
- Location Overview
- Physical Inventory Counts and Inventory Journal
- Physical Inventory Counts and Warehouse Journal
- Transfer Order Overview
- Inventory Picks
- Warehouse Activity Plan – WAP
- Warehouse Activity Plan and Default Bin Picking 11.Warehouse Pallets and Lots
- Zone Overview