Warehouse Activity Plan and Default Bin Picking
The Warehouse Activity Plan (WAP) serves as a tool for pick bin replenishment in Ceres 5, prior to starting the Pick process, so there is enough inventory in the Pick bins to fulfill the orders for that day. For some food banks, there is not enough pick bin space to move all products down at once, so these changes to the Warehouse Activity Plan (WAP) and the supporting replenishment processes were created.
This is a supplement to the Warehouse Activity Plan (WAP) Procedure.
Ceres Object release 5.00.00 is required for the functionality described in this document.
Replenishment Enhancements
The following components were adapted to address pick bin space constraints when planning pick bin replenishment and picking:
- Warehouse Activity Plan (WAP)
- Picking Sequences defined for bins
- ADCS hand-held pick functionality
- Item Setup options
In summary, the WAP improvements are necessary to better facilitate the replenishment and picking process in warehouses with high volume and varying warehouse configurations. The ADCS changes allow for triggering a cycle count during the pick process if there’s a discrepancy between what a bin physically contains and what Ceres reflects— this is also tied in with the Voxware integration for those sites using that tool for picking.
The Warehouse Activity Plan (WAP) evaluates the demand for inventory associated with released agency orders and suggests inventory movements from Put-Away bins to pick bins in order to fulfill the orders. After the WAP determines demand for inventory, it generates entries into a Movement Worksheet to replenish picking bins, so sufficient product exists in the picking bins when orders are fulfilled. The WAP has been created to make pulling inventory product more efficient by eliminating the need to drop product during the picking process. With the enhancements described here, the food bank can start picking from the pallets that have already been dropped, while identifying others on the WAP for a Drop on Demand to a default pick bin type flow later in the cycle.
General guidelines on setting up the WAP are provided in the partner procedure.
Inventory Picks Prior to Registering the WAP (Default Bin Picking)
Normally Ceres requires that inventory be available in pick bins in order to make fully qualified inventory suggestions (Location, Zone, Bin, Pallet (if the item is palletized), and Lot) on the pick documents. In general, this involves releasing Agency Orders, running the Create WAP process, registering the WAP to record the inventory movements to pick bins, and then creating the pick documents. With Default Bin Picking, Ceres will provide fully qualified inventory suggestions for inventory recorded on the WAP but not moved as yet.
Configuring Ceres for Default Bin Picking
Configuring Ceres to allow for the creation pick documents prior to registering the WAP requires enabling the Allow Default Bin Picking setup option found on the Bin Policies FastTab of the Location Card.
-
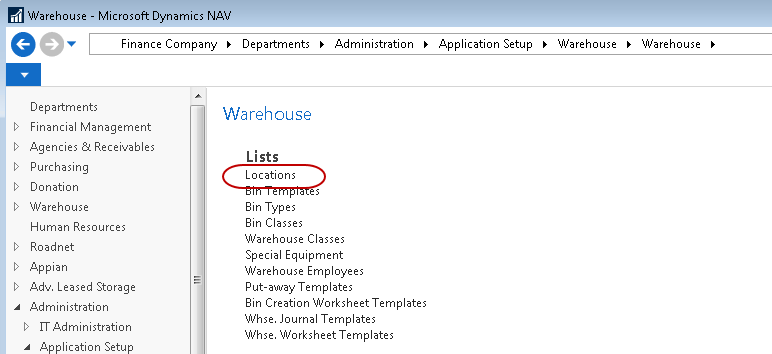
To enable this setting go to Departments ▸ Administration ▸ Application Setup ▸ Warehouse ▸ Locations.
-
Select Locations to display the Locations List.

-
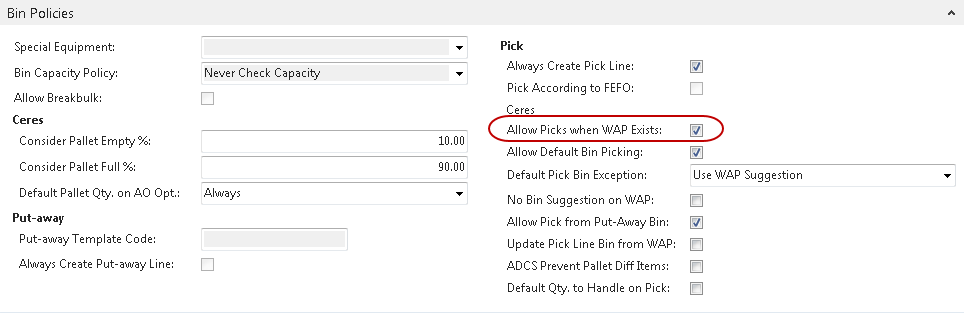
Double click the location you wish to configure for Default Bin Picking. Locate the Bin Polices FastTab and place a checkmark in the Allow Picks when WAP Exists and Allow Default Bin Picking. Then select a Default Pick Bin Exception option. See Location Overview for more information.
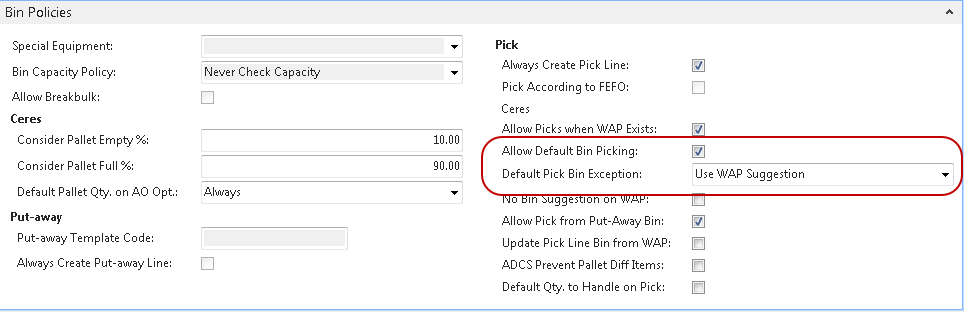
Allow Default Bin Picking: Specifies whether or not this location uses default pick bins.
Default Pick Bin Exceptions: Specifies the action the WAP will take when an item does not have a default pick bin defined.
Use WAP Suggestion – The WAP will attempt to suggest a bin for the movement.
Use WAP Suggestion with Confirmation – The WAP will attempt to suggest a bin for the movement and prompt the user to confirm this action.
Make no Suggestion – The WAP will leave the suggested bin blank.
Make no Suggestion with Confirmation – The WAP will leave the suggested bin blank and prompt the user to confirm this action.
Halt with Error – The WAP will stop processing and report the item with the undefined pick bin. If multiple items are found, only the first one will be reported. Subsequent WAP attempts may reveal other items with the same exception. The WAP will not complete until all items needing movement have defined pick bins.
Prompt for Suggestion Handling – The WAP will prompt the user for action.
-
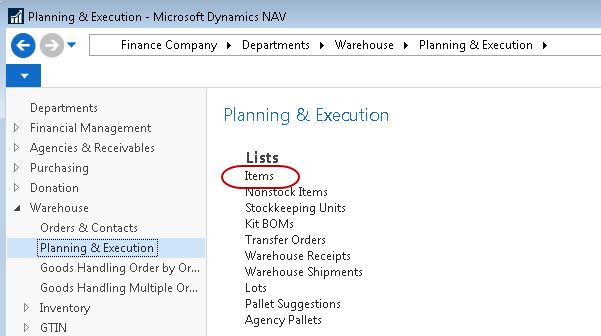
Configure the items you wish to use with Default Bin Picking. To do this, you must specify the default bin for each item. Go to Departments ▸ Warehouse ▸ Planning & Execution ▸ Items.
-
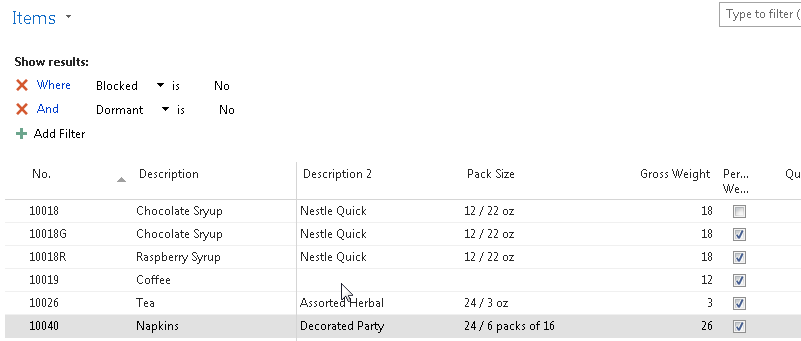
Select items to display the Items List.
-
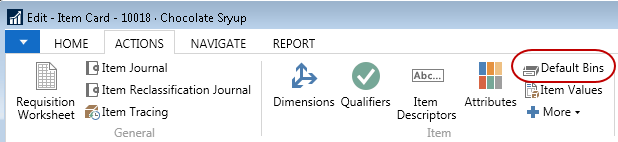
Edit the item you wish to configure for Default Bin Picking. Then select Navigate ▸ Default Bins.
-
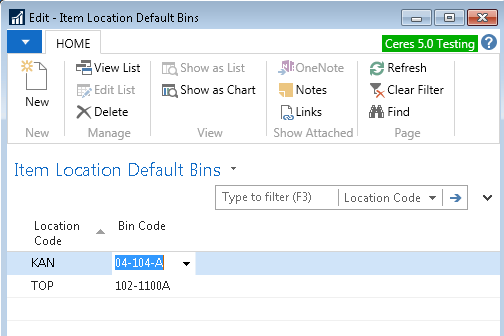
The Item Location Default Bins page will be displayed. Enter the Location Code for the location you are configuring for Default Bin Picking. Next, enter the default bin for the item in the Bin Code field. The bin you specify here must have “Pick” checked for its related Bin Type.
-
Repeat steps 1 through 8 for as many locations and items for which you wish to configure Default Bin Picking.
The use of Default Bin Picking requires a place holder WAP Template to be specified on the Location. However, it will not be utilized for placement suggestion provided the item has been configured with an Item Location Default Bin. See related topics for additional information.
Undesirable pick document numbering can occur when the location has been configured to Allow Default Bin Picking, and the following conditions are true.
- Location is also configured to Create Picks By Zone Code.
- The inventory required to fulfill the Agency Order line’s demand resides in a bin of type Put-Away.
- The Inventory item residing in the Put-Away Bin does not have an Item Location Default Bin specified.
In this scenario, Ceres will utilize the WAP Template specified on the location to determine the To-Bin Code and To-Zone Code. This will not necessarily be the Zone or bin relevant to the desired Zone/FBC Storage Requirement number series. For this reason, care should be taken to accurately represent the desired To-Bin Code and To-Zone Code on the WAP (Movement Worksheet) prior to creating pick documents. See related topics for additional information.
Using Default Bin Picking
For this example, an item “10018R” is being used. This item has been configured for Default Bin Picking in bin 04-103-A for the KAN Location.

The inventory level for the “10018R” item consists of 6 pallets all currently placed in STORAGE bins.
The use of Default Bin Picking begins with the creation, inventory request, and release of an Agency Order (see the Agency Order Overview for additional information).

With our inventory level being what it is, if we were to create a pick document for our order, Ceres would not suggest qualified inventory line on our pick document. This is true because we have a demand of 125 on our order but none available in Pick Bins. Moreover, we have not yet run the Create WAP process to represent our order on the WAP.
This illustrates a key difference in the Agency Order fulfillment methodology when using Default Bin Picking.

Creating a Warehouse Activity Plan (WAP)
To create suggested movements via a WAP:
-
Go to Departments ▸ Warehouse ▸ Planning & Execution ▸ Movement Worksheets.

-
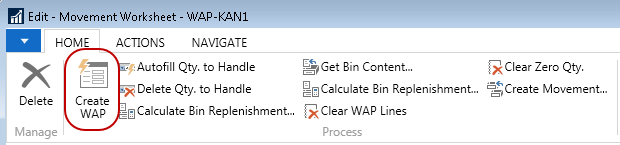
Select Movement Worksheets to display the Movement Worksheet. Be sure you are in a batch related to the location you are working with and then select Actions ▸ Create WAP.
-
Provide the desired filter criteria to limit the WAP to the desired Agency Orders and click the OK button. At a minimum, the Agency Orders to be included must be in the Released status.

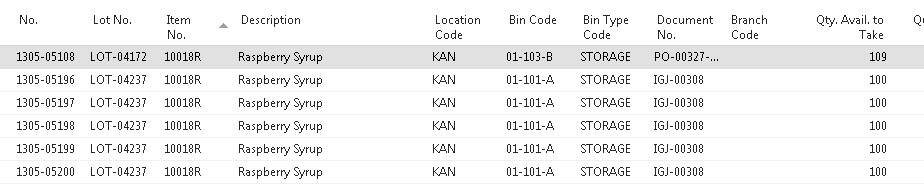
Below illustrates the results of the Create WAP process with our sample Agency Order. Notice that pallets 1305-05196 & 1305-05197 (which currently reside in a Put-Away bin) were suggested and that the 04-103-A” bin was suggested as the “To Bin Code.” This is true because the 04-103-A bin is specified as our default bin for the item.

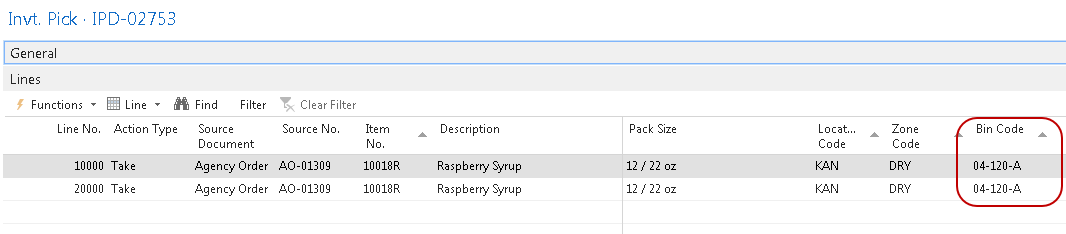
Below illustrates the pick document that was created. Refer to the Agency Order Overview and Inventory Picks Procedure Documents for additional information on creating pick documents.

As we can see from our WAP screenshot above, the pallets do not in reside in Bin 04-103-A; they reside in Bin 01-101-A. So we are in a manner of speaking, “floating” our inventory so that the pick document printing can move forward prior to registering the WAP and actually moving the pallet down.
It is important to note that Ceres will suggest inventory currently residing in Pick Bins first, and in the case where insufficient inventory exists in such bins, Ceres will then suggest inventory represented for the Agency Order on the WAP utilizing the default bin configuration for the item.
If we attempt to post the pick document at this point, Ceres will present an error message similar to the one shown below. This is a normal error message in the Default Bin Picking methodology as the WAP should be registered prior to posting a pick document that contains “floating” inventory.

To resolve, navigate back to the WAP, and at a minimum, register the line or lines related to pick documents containing “floating” inventory.
During the WAP register process, Ceres will attempt to correlate WAP lines to inventory pick lines. When found, Ceres will update the bin code on the pick document with the value of the To-Bin Code on the WAP line. This bin code may be the Default Bin Code the WAP line was originally created with but in some cases, it may have been changed on the WAP and thus it is necessary to update the pick document line accordingly so that sufficient and fully qualified inventory exists in the bin during the posting of the pick document. In this example, the bin was overridden on the WAP to 04-120-A and registered. The pick document has been updated to reflect the overridden bin selected.
When using Default Pick Bins, if it becomes necessary to select a different pallet than the one specified on the inventory pick document, Ceres will check the WAP for that pallet. If the newly selected pallet is on the WAP, then the bin on the inventory pick will be changed to the destination bin of pallet on the WAP. This assumes that the pallet will eventually be dropped to the destination bin and will subsequently be shipped from the destination pick bin. On the inventory pick, Ceres displays both the current bin and the default pick bin.
Default Pick Bin Exceptions
Use WAP Suggestion with Confirmation
The user may click Yes to use the WAP suggested bin for item 10026 or answer No, which will terminate the WAP. The user may then define a Default Pick Bin for the item and re-run the WAP.

Make No Suggestion with Confirmation
The user may click Yes to continue, and the suggested to bin for item 10026 will be blank or answer No, which will terminate the WAP. The user may then define a Default Pick Bin for the item and re-run the WAP.

Halt with Error
The WAP terminates with this message. The user may then define a Default Pick Bin for the item and re-run the WAP.

Prompt for Suggestion Handling
The WAP prompts the user with this message and has the following options:
- Use WAP Suggestion for To-Bin – The WAP will attempt to suggest a To-Bin for the movement and continue.
- Make no Suggestion for To-Bin – The WAP will leave the suggested To-Bin blank and continue.
- Cancel – The WAP will terminate. The user may then define a Default Pick Bin for the item and re-run the WAP.

Warehouse Activity Plan Enhancements
Continuous WAP Suggestions for Released Agency Orders
Continuous WAP suggestion enhancements are related to the Default Bin Picking described above. However, it can also be utilized as a standalone functionality. A food bank may desire to continually create WAP suggestions for the purpose of adding lines to a released Agency Order when that order is represented on the WAP. Additionally, a user may wish to create the WAP in increments to reflect the true fulfillment methodology or activity for Agency Orders.
Configuring Ceres to allow for a released Agency Order to be reopened when that order is represented on the WAP requires enabling the Allow Picks when WAP Exists setup option found on the Bin Policies FastTab of the Location Card as shown below. Once the Agency Order has been reopened, a user may:
-
Add new lines to the order.
-
Modify existing lines if and only if that line is not represented on the WAP, and a related pick line does not exist.
-
Delete existing lines if and only if that line is not represented on the WAP, and a related pick line does not exist.
The Agency Order can again be released, and the Create WAP process can again be run to address the additional demand for the order. The Create WAP process will consider what is already in the plan and will not address existing lines that already meet the current demand need.
An additional enhancement allows for the deletion of individual WAP lines without the need to run the Clear WAP process.
In terms of creating WAP line incrementally to reflect the true fulfillment methodology or activity for Agency Orders, two new filter fields have been added to the Create Whse Activity Plan Page; Order Handling Group Code and Order Routing Group Code. These new fields, as well as any other standard filtering field on the Agency Order header, can be used to limit the WAP run to specific orders.

Pick Creation Enhancements
Picking Sequence Numbers
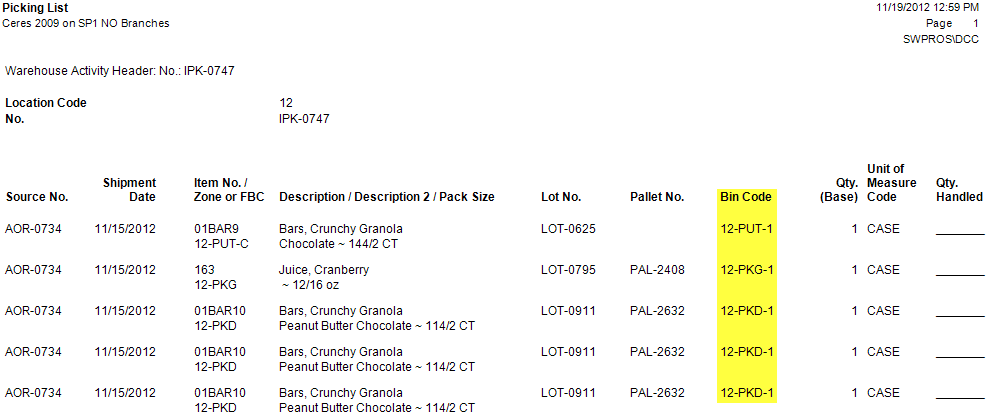
Ceres provides the Picking Sequence No field on the bin record. The sequence numbers specified here will be used on the Picking List report to provide directed picking with regard to the sequence that has been defined.
Configuring Ceres for Picking Sequence Numbers
-
Navigate to the location related to the bins for which you wish to configure picking sequences from Departments ▸ Administration ▸ Application Setup ▸ Warehouse ▸ Locations.
-
Double-click on the location you want to view and then select Home ▸ Bins.

-
The Bins List will display bins for the location.
-
Specify the sequence for each bin.
noteThe Picking Sequence No should be specified for all bins within a location. Bins with a zero value for the picking sequence will cause the Picking List report to display them ahead of non-zero picking sequences.

-
Once pick documents have been created, you can print/preview the Picking List report from the pick document. The example below illustrates the use of the Picking Sequence numbers that have been configured for this example.
noteCeres provides picking sequence number sorting functionality for all pick generation settings. However, the importance that the picking sequence number plays in the sorting differs depending upon the “Create Picks By” setup option specified for the location as well as the New Page Option setting on the Picking List report itself. Refer to the location overview, Agency Order Processing, and Pick Generation Enhancements for additional information.
Cycle Count Notifications
Occasionally the quantity residing in a bin will differ from the quantity Ceres suggested on a pick document. Ceres provides the ability to report such discrepancies via Cycle Count Notifications. Cycle count notifications can be initiated manually from a pick document as well via ADCS Handhelds.
For ADCS Handhelds, an email notification will automatically be generated when the Qty. entered is less than what was on the pick document and will be triggered when the Enter key is pressed on the handheld.
Users may still finish the pick utilizing the pallet consolidation functionality. Refer to related topics for additional information about ADCS enhancements.
When handling picks via the pick document, the email notification is a manual process.
Configuring Cycle Count Notifications for Ceres
SMTP Email must be configured for the following functionality and is reviewed in the next section of this document.
-
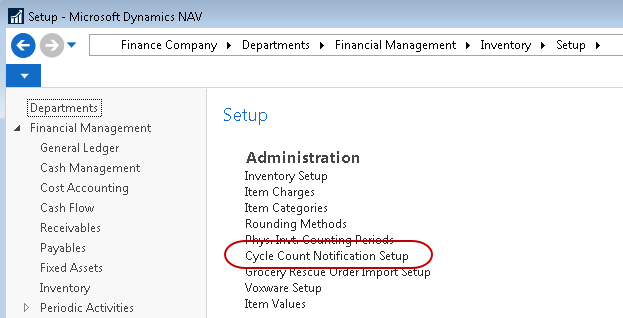
To configure Cycle Count Notifications, go to Departments ▸ Financial Management ▸ Inventory ▸ Setup ▸ Cycle Count Notification Setup.
-
The Cycle Count Notification Setup Page will be displayed.
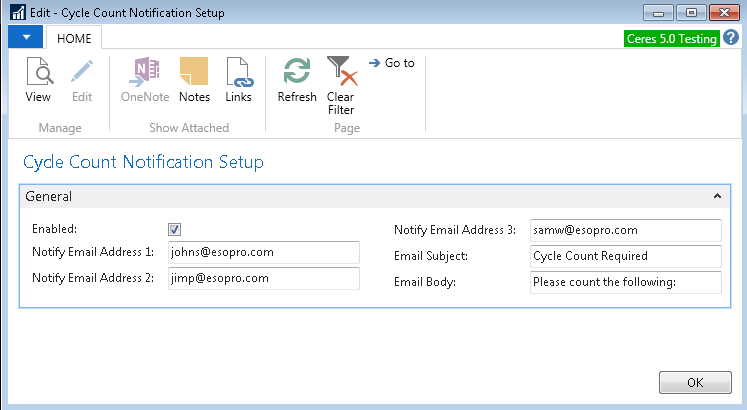
Enabled: Place a checkmark here if you wish to utilize Notifications.
Notify Email Address 1: Here, you can provide the email address for the primary recipient of cycle count notifications.
Notify Email Address 2: Here, you can provide the email address for the secondary recipient of cycle count notifications.
Notify Email Address 1: Here, you can provide the email address for the tertiary recipient of cycle count notifications.
Email Subject: Here, you can provide the text that will appear in the subject line of notification emails.
Email Body: Here, you can provide the text that will appear in the body of notification emails.
Using Cycle Count Notifications
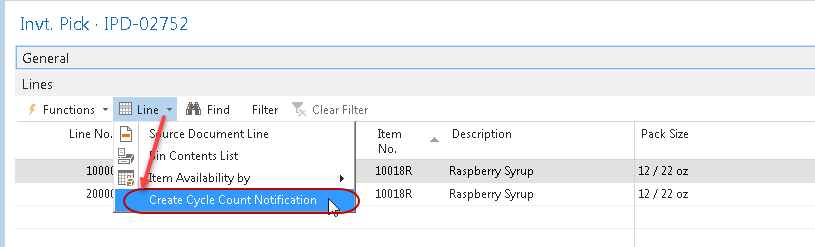
When a bin quantity discrepancy is discovered related to a pick document’s handling, you can initiate a cycle count notification by navigating on the pick document lines to Line ▸ Create Cycle Count Notification.
Ceres will not report back to the initiating user the success of the notification email. However, the notification will be logged in Ceres.
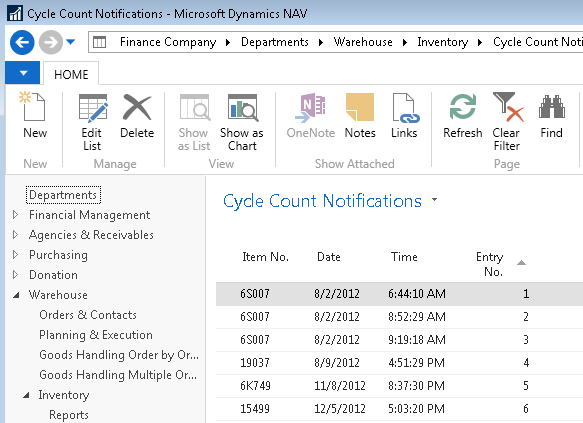
To view the cycle count notifications, go to Departments ▸ Warehouse ▸ Inventory ▸ Lists ▸ Cycle Count Notifications.

The Cycle Count Notifications List will be displayed.
Additionally, email notification(s) will be sent to the recipients as configured for the Cycle Count Notifications setup.

SMTP Mail Setup
-
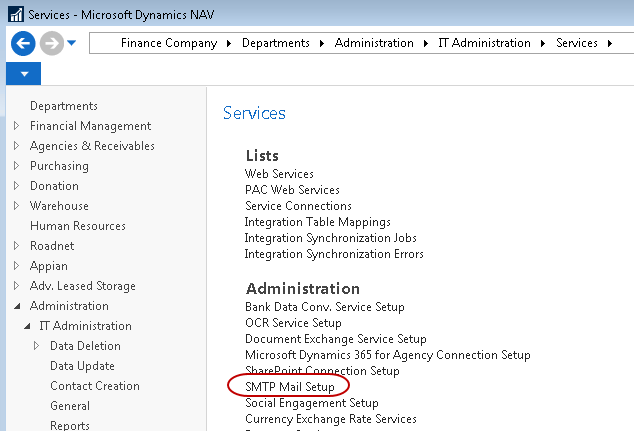
To configure SMTP Mail, go to Departments ▸ Administration ▸ IT Administration ▸ Services ▸ Administration ▸ SMTP Mail Setup.
-
The SMTP Mail Setup Page will be displayed.

SMTP Server: Here, you specify the fully qualified domain name or the IP address of the email server.
Authentication: Here, you specify the authentication type for users connecting to the SMTP Server.
Anonymous – Select this option if you do not require user ID and password credentials to authenticate to your SMTP Server.
NTLM – Select this option if you require Integrated Windows Authentication to your SMTP Server.
Basic – Select this option if you require connection-based authentication to your SMTP Server.
User ID: Here, you can specify the user ID that will be used to authenticate to your SMTP Server. This field is only applicable when using Basic Authentication.
Password: Here, you can specify the password that will be used to authenticate to your SMTP Server. This field is only applicable when using Basic Authentication.