Kitting Overview
The Kitting process (formerly known as Advanced Kitting) provides the user with the tools necessary to set up, manage, and build kits. Kitting allows the grouping and packaging of items together to properly track inventory and costs associated with the components of the kit. Building kit items also facilitates the ability to expedite agency orders by distributing the pre-assembled kits. When creating the kit bill of materials, Ceres 5 allows for the inclusion of substitute items which can be used if sufficient quantities of a primary item are not found. Common uses for kits within the food bank include USDA or CSFP boxes, and some child nutrition programs such as a “Backpack” program.
Ceres Object releases 5.00.00 & 5.00.17 are required for the functionality described in this document.
Concept
Overall Process
Kitting provides a way to accurately track the inventory and cost of products that are made up of a combination of other items, such as backpacks, senior food boxes, pantry boxes or other assembled “kits”. In general, the kitting process facilitates the conversion of a group of items stored in cases into finished kits that contain a combination of units of those items. For example:
We need 1000 food boxes, which each need to contain the following items: 2 boxes shelf stable milk, 2 fruit cups, 2 packages of granola bars, 2 packages Cheese crackers, and 2 cans ready-to-eat entrées. In our inventory system, however, we track these items by case and not by unit.
With kitting, Ceres suggests the number of cases to break down, taking into consideration any leftover units from previous assemblies, and converts the unit components into finished kits, transferring the cost/value information from the original cased goods.
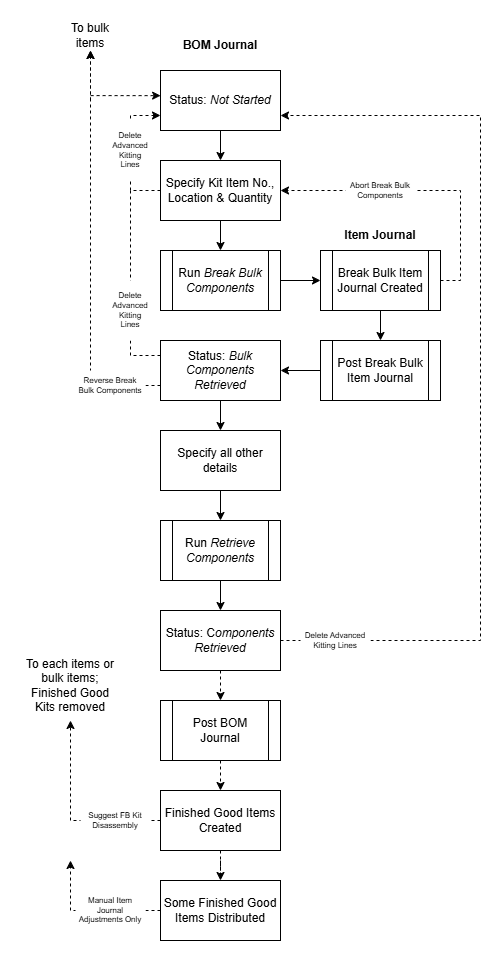
The kitting process uses the following steps (described in detail in the following sections):
-
Complete the required setup for the kit, including items and the bill-of-materials for the kit (Kit BOM)
-
In the BOM Journal, enter the quantity of kits to be made
-
Run the Break Bulk function, which suggests the number of bulk (cased) items to be broken into units on an Item Journal
-
Physically break the bulk items down and post the Item Journal, which converts the bulk items into unit items.
-
Physically assemble the kits.
-
Run the Retrieve Components function, which converts the unit items into finished good kits, and Post the BOM Journal to complete the process.

Specific vs Generic Items
In Ceres, kit components can either be specific, in which each component is connected to one and only one bulk item, or generic, in which each component item might be connected to multiple bulk items. For example, a specific unit component might be “Vienna Sausages,” while a generic unit component item might be called “Protein Source,” and would then be linked to multiple protein source bulk items including “Tuna,” “Black Beans,” and “Vienna Sausages.”
Ceres allows you to connect and prioritize multiple bulk components for each unit component.
The current implementation of kitting in Ceres was formerly called Advanced Kitting. In earlier versions of Ceres, there was also a separate process called Basic Kitting. Basic Kitting is no longer available in Ceres 5, so in this document we refer to Advanced Kitting as, simply, kitting.
Initial Setup
There are several parameters within Ceres to control the kitting process. In this section, we will describe those parameters and the possible settings of each.
Inventory Setup
To access the parameters, search for “Inventory Setup” or navigate to Departments ⯈ Warehouse ⯈ Administration ⯈ Setup ⯈ Inventory ⯈ Inventory Setup.

Open the Kitting FastTab and update the fields.
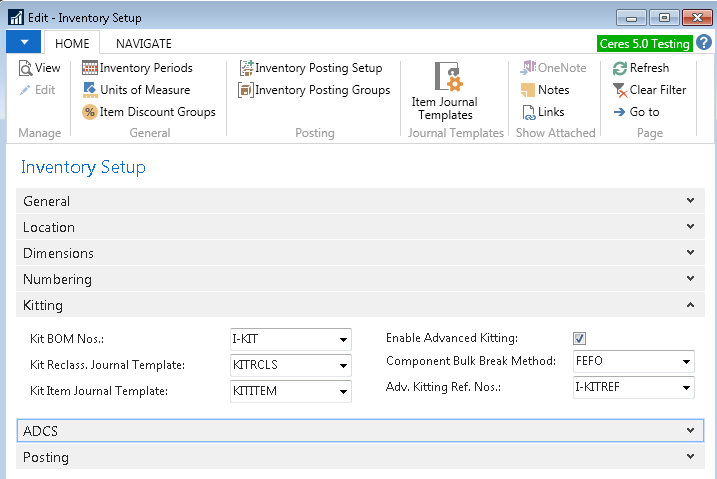
Kit BOM Nos: Select the No Series that will be used to assign a number to your Kit BOMs. Numbers can be assigned automatically or manually.
Kit Reclass. Journal Template: Select the Item Reclass Journal Template that will be used during the kitting process.
Kit Item Journal Template: Select the Item Journal Template that will be used to break down the bulk component items into unit component items. If it does not exist, it can be set up to match an existing generic Item Journal, perhaps with a specific Reason Code.

Enable Advanced Kitting: This field must be checked.
Component Bulk Break Method: This field defines the method Ceres will use to select bulk component items when breaking them into unit component items. When a generic unit component item can be made from several different bulk component items, Ceres may select lots from more than one bulk item. In all instances, Ceres will use multiple bulk component items to satisfy the requirements to successfully build the kits required.

FEFO – First Expired First Out. This method will select the bulk components based on the expiration dates on bulk component lots. With this method, it is possible for Ceres to suggest multiple items as it searches for the earliest expiring lots of all the bulk items associated with the unit components.
Priority – This method will use the priority code field specified on the Kitting Items Bulk Components page of the unit component item. If multiple items have the same priority, it will select based on the lowest Item No. of the component item.
Greatest Quantity – This method will select the bulk item with the most inventory on hand first then proceed to the item with less and less inventory.
Least Quantity – This method is the direct opposite of Greatest Quantity and will try and use up the bulk items with less on hand before proceeding to items with more available inventory.
Adv Kitting Ref Nos.: Select the No. Series that will be used when processing kitting transactions.
Posting Group Setup
Ceres uses Posting Groups to allow you to specify which general ledger accounts to use when posting transactions depending on entry type, item type, donor, vendor, and location.
The combination of General Business Posting Group and General Product Posting Group connects entries to Income Statement accounts (like revenue and expense). Search for “General Posting Setup” or navigate to Departments ⯈ Financial Management ⯈ Setup ⯈ Posting Groups.

The combination of Location Code and Inventory Posting Group connects entries to balance sheet accounts (like inventory and accounts payable). Search for “Inventory Posting Setup” or navigate to Departments ⯈ Financial Management ⯈ Setup ⯈ Posting Groups.

Acquiring Product for Kits
Bulk product received for kits goes through the typical donation or purchase process. Generally, posting groups for donations and purchases are already set up and will not change for kitting, unless you want to set up specific accounts for kitting transactions
Break Bulk Transactions
Unit Component Items are typically set to the same Inventory Posting Group and General Product Posting Group as their associated bulk items. Break bulk transactions use the Invt. Adjustment Account from General Posting Setup, and the Inventory Account and WIP Account from Inventory Posting Setup. G/L Accounts should be set for any combinations needed.
Consume/Output (Assembly) Transactions
It is not uncommon for Finished Good Item kits to be made from multiple bulk sources, including purchased, donated and government product. Because each Finished Good Kit is attached to a single item card, it is attached to just one General Product Posting Group and just one Inventory Posting Group. For example, a kit created from Unit Components with DON, PUR and GOV General Product Posting Groups can only be represented by a Finished Good Item that contains one of these three posting groups.
Consume/Output transactions use the Invt. Adjustment Account and COGS Account from General Posting Setup, and the Inventory Account from Inventory Posting Setup. G/L Accounts should be set for any combinations needed.
Disassembly Transactions
Finished good kits can be disassembled back into their unit or bulk components. In addition to the accounts required for break bulk and assembly transactions, disassembly transactions use the Cost of Disassembly Account from General Posting Setup.
BOM Journal Template and Batches
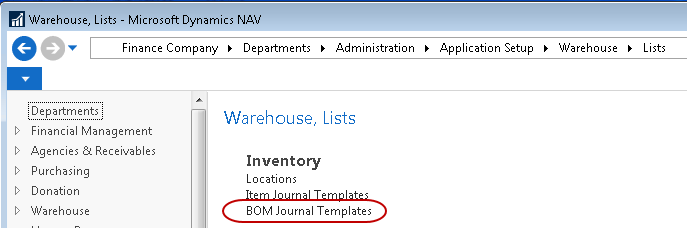
A BOM Journal Template and batches must be set up for kitting. To access the BOM Journal Template, search for “BOM Journal Templates” or navigate to Departments ⯈ Administration ⯈ Application Setup ⯈ Warehouse ⯈ Inventory ⯈ Lists ⯈ BOM Journal Templates.
Click on the Template you wish to use or create one. Then click Navigate ⯈ Batches.

This will open the Batch Page. Create a Batch and complete the fields as required.
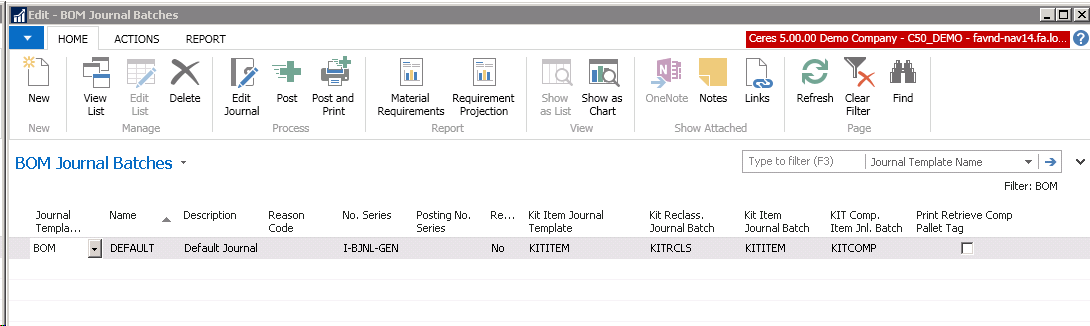
Name: Enter the name of the batch. Multiple batches may be set up for the BOM Journal Template. If you set up multiple batches that may be used simultaneously, it is important that different numbering series be set up for each BOM template to avoid errors. The following fields should be unique for each BOM Journal Batch.
-
No. Series
-
Kit Reclass. Journal Batch
-
Kit Item Journal Batch
-
Kit Comp Item Jnl. Batch
Description: Enter a description of what the batch will be used to process. For example, you may enter “School Backpacks,” or “Holiday Boxes,” or you may leave a more generic batch name if desired.
Reason Code: Enter a default reason code to be entered for transactions created in this batch. All transactions generated from this batch will default to this reason code. Reason codes provide a convenient method of identifying transactions related to a specific task or function.
No. Series: Enter the numbering series to be used to assign transaction journal numbers to kits created using this batch.
Posting No. Series: Enter a separate numbering series to be used for posted transactions from this batch. If left blank, transactions will post with the same number from the No. Series field.
Recurring: For the BOM Journal this should be set to No.
Kit Item Journal Template: Enter a valid Item Journal Template for use with this batch. All item journal transactions related to kitting will use this Template.
You must select the Kit Item Journal Template before Ceres will allow you to select the associated Batches below.
Kit Item Reclass Journal Batch: Enter a valid Batch related to the Kit Item Journal Template specified above. This batch will be used to post item reclassification transactions if required.
Kit Item Journal Batch: Enter a valid Batch related to the Kit Item Journal Template specified above. This Batch will be used to post item journal transactions related to reversal transactions if required.
Kit Comp Item Journal Batch: Enter a valid batch related to the Kit Item Journal Template specified above. This batch will be used to post component and bulk item journal transactions when the break bulk function is used to convert full cases into each item.
Print Retrieve Comp Pallet Tag: Check this box to specify that pallet tags should be generated and printed when the completed finished good kit pallets are created. If left unchecked, no pallet tags will be printed for the finished good kit pallets, however, pallet tags can be printed on demand using the Create Pallets button on the Actions ribbon of the BOM Journal.
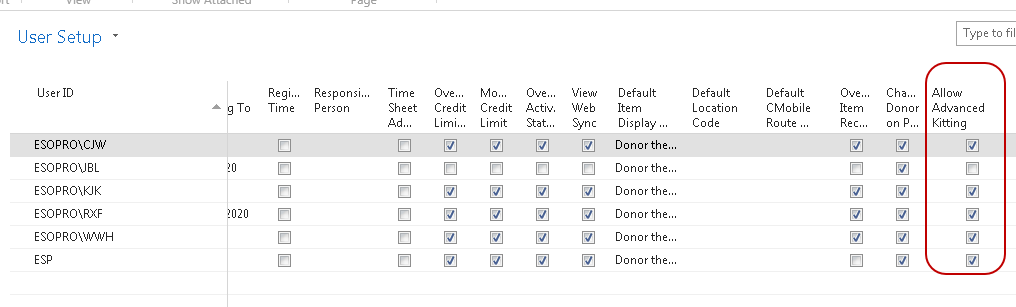
Security
Ceres provides the ability to determine which users are allowed to use kitting functions. This is accomplished by checking the appropriate box on the user setup card for all authorized users.
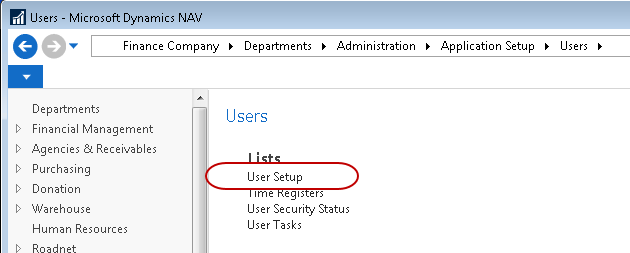
To access User Setup, search for “User Setup” or navigate to Departments ⯈ Administration ⯈ Application Setup ⯈ Users ⯈ Lists ⯈ User Setup.
On the User Setup Page, check the box “Allow Advanced Kitting” for all authorized users.
Kit Costing
Ceres can transfer the value of bulk items, through their unit components to their resulting finished goods. A specific value is tracked for each created Lot. As a result, a single kit run with several Bulk Component Product Source Codes may generate many Lots of finished goods, all with different values. The value of those Lots, however, will sum to the exact value of the Bulk Component items that were used to create the kits.
When using generic Unit component Items, rather than using a blended or assigned cost, kitting in Ceres maintains the value changes associated with any substitutions within a kit run. This is useful if you have a generic Unit Component Item that may have been sourced from Bulk Component Items that were donated, government commodities and purchased items.
When Bulk Component Items are broken into Unit Component Items, Ceres transfers the value (and the weight) of the items by dividing by the Qty. Per Base UOM value entered in the Lines section of the Kitting Item Bulk Components page. In this way, value and weight should always balance during break bulk. 2000 lbs. and $1500 of Bulk Component Items will break into 2000 lbs. and $1500 of Unit Component Items. For example, if 100 cases of peanut butter were purchased for $5000, and each 9 lb. case contained eight 16 oz. jars, we would see the following:
Bulk Component Item:
-
$5000 / 100 cases = $50/case
-
Each case weighs 9 lbs.
Unit Component Item:
-
$50/case / 8 units per case = $6.25/unit
-
9 lbs./case / 8 units per case = 1.125 lbs./unit
If the same peanut butter was purchased for $46/case at a later date, those Lots of that Unit Component would be valued at $5.75/unit.
When Unit Component Items are assembled into Finished goods, Ceres takes the Lot Cost of the individual Unit Component Items and combines them to create a value for each kit. Note: Because a single kit run may consume Unit Component Items that were broken from more than one Lot of Bulk Component Items, individual kits in the run may have different values.
When a kit contains Bulk Component Items that have different FBC Product Source Codes or FBC Product Category Codes, Ceres uses a weighted average to assign values and weight to the Finished Good Kits for each combination of Source and Category. To keep the total values and weights for each posting group equal to the total values and weights on the output kits, the values of the kits within a run may vary significantly.
For example, the following kit is made up of 2 units of a USDA item, 1 unit of a Purchased item, and 1 unit each of two donated items:
| Component | Weight | Value | FBC Product Source Code | Qty. Per | Ext. Weight | Ext. Cost |
|---|---|---|---|---|---|---|
| USDA-1 | 1.5 | $3.00 | USDA | 2 | 3.00 | $6.00 |
| PURCH-1 | 2.0 | $1.85 | PUR | 1 | 2.00 | $1.85 |
| DON-1 | 1.0 | $1.59 | DON | 1 | 1.00 | $1.59 |
| DON-2 | 1.25 | $1.99 | DON | 1 | 1.25 | $1.99 |
| TOTAL | 7.25 | $11.43 |
The blended average weight of each kit is 7.25 lbs. and the blended average cost of each kit is $11.43. Assume we assemble 500 kits from these sources, combining the items by Product Source Code:
| FBC Product Source Code | Weight | Ext. Weight | Value | Ext. Value |
|---|---|---|---|---|
| USDA | 3.0 | 1,500 | $6.00 | $3,000.00 |
| PUR | 2.0 | 1,000 | $1.85 | $925.00 |
| DON | 2.25 | 1,125 | $3.58 | $1,790.00 |
| TOTAL | 7.25 | 3,625 | $11.43 | $5,715.00 |
Because these kits are from separate Product Sources, however, this is not how they will post. Ceres will maintain the weight and value by FBC Product Source Code, allowing the value of kits within the run to vary. This is done by calculating the proportion of kits by weight that were attached to each distinct FBC Product Source Code.
| FBC Product Source Code | Ext. Weight | Total Weight of Kit Run | % of Total | Total Qty. | # of Kits from this Product Source | Value for this Product Source | Kit Value for this Product Source |
|---|---|---|---|---|---|---|---|
| USDA | 1,500 | 3,625 | 41.38% | 500 | 207 | $3,000.00 | $14.49 |
| PUR | 1,000 | 3,625 | 27.59% | 500 | 138 | $925.00 | $6.70 |
| DON | 1,125 | 3,625 | 31.03% | 50 | 155 | $1,790.00 | $11.55 |
| TOTAL | 3,625 | 100.00% | 500 | $5,715.00 |
In this instance, Ceres would divide the 500 finished good kits into three separate lots to maintain the value and weight by Product Source Code through to distribution. The first lot, with a Product Source Code of USDA, would consist of 207 kits, weighing 7.25 lbs., valued at $14.49 per kit. The second lot, with a product Source Code of PUR, would consist of 138 kits, weighing 7.25 lbs., valued at $6.70 per kit. The third lot, with a Product Source of DON, would consist of 155 kits, weighing 7.26 lbs., valued at $11.55 per kit.
Note that the blended average cost of $11.43 is not found on any of the lots even though each physical kit contains items worth exactly that much. If all kits in a run have not been distributed by the end of a period, you may wish to make an accrual to adjust inventory value for this difference.
Master Data Records
Once initial setup is complete, you can proceed with setting up Item Cards and Kit BOMs. Because information from some steps is required in later steps, we recommend setting up kits in this order:
-
Create Bulk Component Items
-
Create Unit Component Items
-
Associate Bulk Component Items with Unit Component Items
-
Create Kit BOM
-
Create Finished Good Item
-
Associate Finished Good Item with Kit BOM.
Bulk Component Items
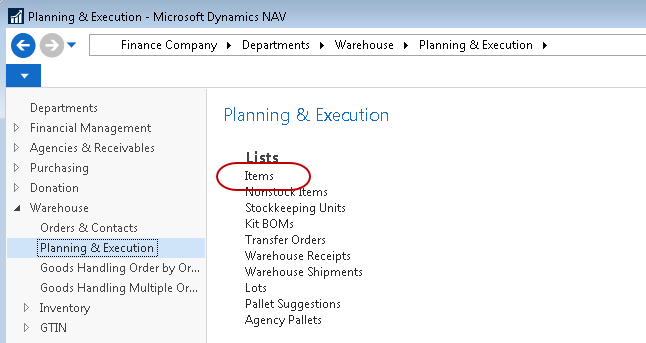
Bulk Component Items, Unit Component Items and Finished Good Items are all entered on the Item Card. Search for “Items” or navigate to Departments ⯈ Warehouse ⯈ Planning & Execution ⯈ Lists ⯈ Items.
Detailed documentation can be found in the Item Overview that defines all of the fields available on Item Cards. In this document we will concentrate on the fields that are specific to kitting.
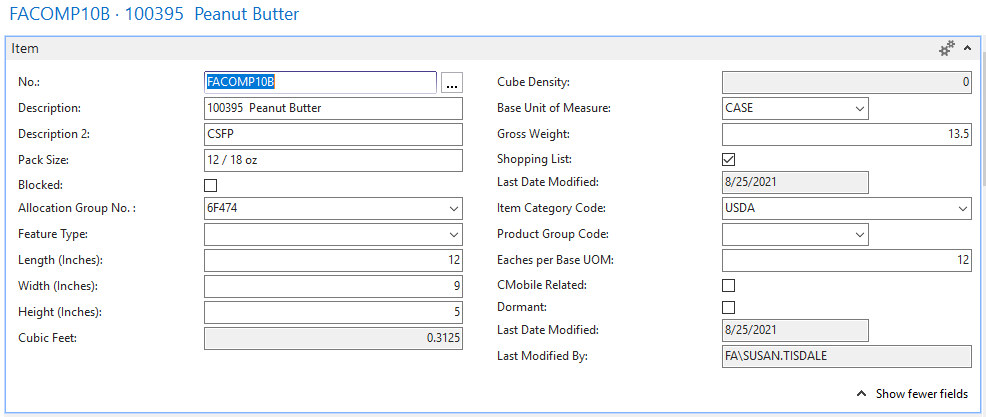
Generally, bulk component items are cased products that will be opened and broken down into units and included in kits. Bulk components can either be palletized or not palletized. Fields on the Item Card that are associated with bulk component items are as follows:
Base Unit of Measure: This is normally set to a case or box.
Gross Weight: This should reflect the total weight of the case or box.
Eaches per Base UOM: This should be the number of eaches/units found in each case. It is used to provide a default value to the Kitting Item Bulk Components page.
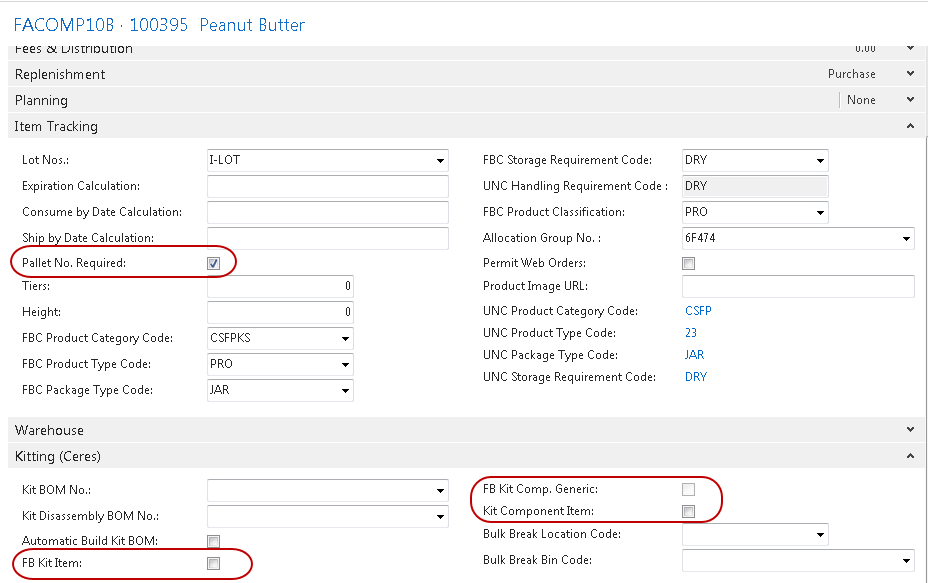
Pallet No. Required: This should be checked if bulk component items are palletized.
FB Kit: This field must not be checked on Bulk Component items.
FB Kit Comp. Generic: This field must not be checked on Bulk Component items.
FB Component Kit Item: This field must not be checked on Bulk Component items.
Unit Component Items
Unit component items represent the individual pieces of a bulk item that are then combined into a finished good kit. In Ceres, unit component items can either be specific, in which each component is connected to one and only one bulk item, or generic, in which each unit component item might be connected to multiple bulk items. For example, a specific unit component might be “Vienna Sausages,” while a generic unit component item might be called “Protein Source,” and would then be linked to multiple protein source bulk items including “Tuna,” “Black Beans,” and “Vienna Sausages.”
Each time a bulk item is broken to create the component, the weight, cost, and value of the bulk item are divided by the quantity per case to calculate these values for the Unit Component Items. These values are stored on each lot so that they can accurately be used throughout the kitting process. This is what allows Ceres to use generic items as the details are all tracked by lot each time the break bulk operation occurs.
Fields on the Item Card that are associated with unit component items are listed below. It may be helpful to create a Unit Component Item template to avoid having to refer to the documentation each time you’re setting up a new Item card.
Base Unit of Measure: This is normally set to “Each”, "EA", "Unit" or some other singular unit of measure.
Gross Weight: This field can be left at zero since the actual weight will depend on the weight and the quantity in the case of the bulk component used. For example, if the weight of the bulk component item is 12 lbs. per case and there are 48 units in the case, the weight of the unit would be 0.25 lbs. (48 / 12 = 0.25).
When the Break Bulk Item Journal is posted, Ceres updates the gross weight of the unit component item on the newly created unit component lot card and posts the weight to the item ledger. Ceres does not update the Gross Weight on the unit component item card. If subsequently a positive adjustment to an each item is required, the unit component item Gross Weight must be manually entered, as it will remain at zero and will prevent use of the item on an item journal.
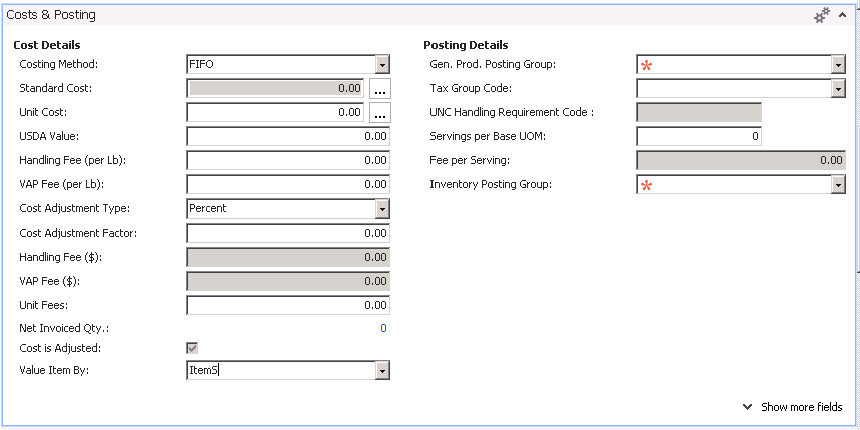
Costing Method: This should be set to “FIFO” so that the actual value will be calculated from the value and quantity of the Bulk Component Item associated with this Unit Component Item.
Unit Cost: This field can be left at zero since the actual value will be calculated from the value and quantity of the Bulk Component Item associated with this Unit Component Item.
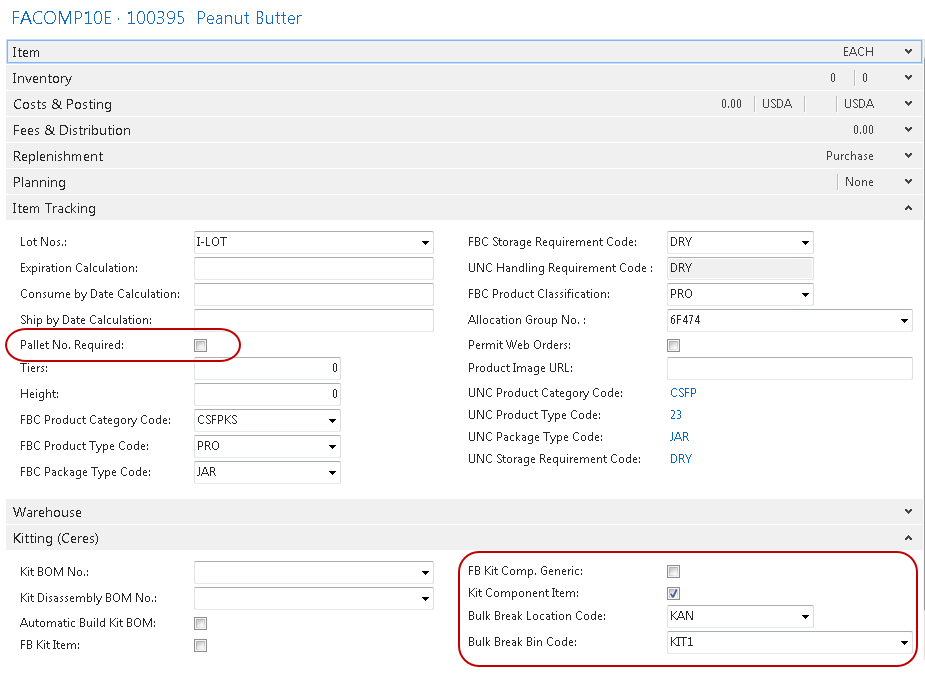
Pallet No. Required: This field must be left unchecked. Unit component items can’t be palletized.
FB Kit: This field must be left unchecked.
FB Kit Comp. Generic: This field should only be checked if the unit component item is a generic item that can be replenished from multiple bulk items.
FB Component Item: This field must be checked. This is what allows the item to be used in a Kit BOM.
Break Bulk Location Code: This field is required and is used to designate the specific location that will be used for the storage of the Unit Item Components until they are assembled into finished kits. When the Bulk Items are broken into Unit Component Items, they are positively adjusted into this Location. As Unit Components are consumed to be converted into Finished Good Kits, they are negatively adjusted out of this Location.
Break Bulk Bin Code: This field is required and is used to designate the specific bin code within the location that will be used for the storage of the Unit Item Components until they are assembled into finished kits. When the Bulk Items are broken into Unit Component Items, they are positively adjusted into this Bin. As Unit Components are consumed to be converted into Finished Good Kits, they are negatively adjusted out of this Bin. The Break Bulk Bin selected should have a Bin Type of Putaway/Pick.
No special setup is required for the Break Bulk Location and Bin codes, however it may be helpful to place Bulk Component Storage Bins and Break Bulk Bins in a designated Work-In-Progress Zone that is Excluded from AE Availability. It may also be helpful to set up Movement Worksheet Templates and batches to facilitate zone and bin moves. Handhelds are also helpful for these tasks.
Associating Bulk Component Items with Unit Component Items
Once the unit component items and the bulk component items have been defined, you must set up the relationship to connect them together. This tells Ceres what bulk item or items may be used to satisfy the requirements for this unit component item. You may assign one bulk item to a specific unit component item, or several bulk items to a generic unit component item. When multiple bulk items are connected to a generic unit component item, a parameter is set to control which bulk items to use first. See the Component Bulk Break Method field in the Inventory Setup section for details.
To specify which Bulk Components can be used for this Unit Component, from the Item Card, click Navigate ⯈ Kitting Item Bulk Components.

The Edit – Kitting Item Bulk Components page will be displayed. On this page, you will enter the Bulk Components associated with this Unit Component. In this example, we show two acceptable bulk items for a generic unit item.
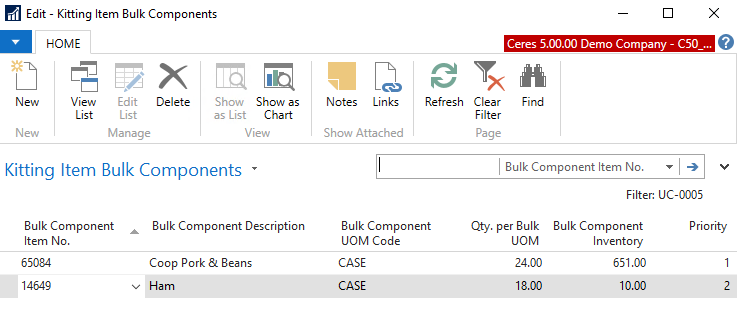
To use specific items instead of generic items, you would only enter one Bulk Component here.
For each Bulk Item entered, complete the following fields:
Bulk Component Item No.: Enter the item number of the bulk component item to be used.
Bulk Component Description: This field will automatically be populated with the description from the bulk item selected. It is not editable.
Bulk Component UOM Code: The Base Unit of Measure will default from the Bulk Component Item and must match its base unit of measure.
Qty. per Bulk UOM: This field is used to define how many units are in each bulk component item case. The value will be copied from the Bulk Component Item’s Eaches per Base UOM, but can also be changed here. This allows Ceres to calculate the weight and value of the unit component from the bulk item’s weight and value.
Bulk Component Inventory: This field will display the available inventory for the bulk item selected. It is not editable.
Priority: If Component Bulk Break Method (in Inventory Setup) is set to “Priority,” this field assigns the order in which bulk items are selected when breaking bulk items into units.
Kit Bill of Materials (Kit BOM)
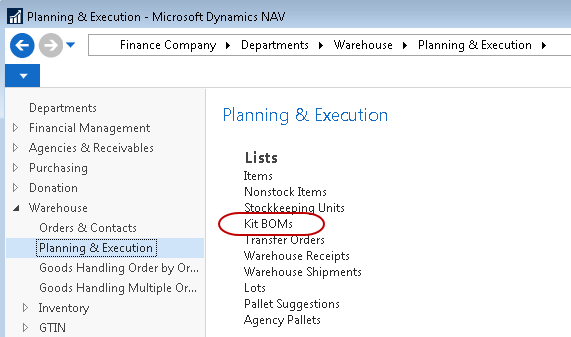
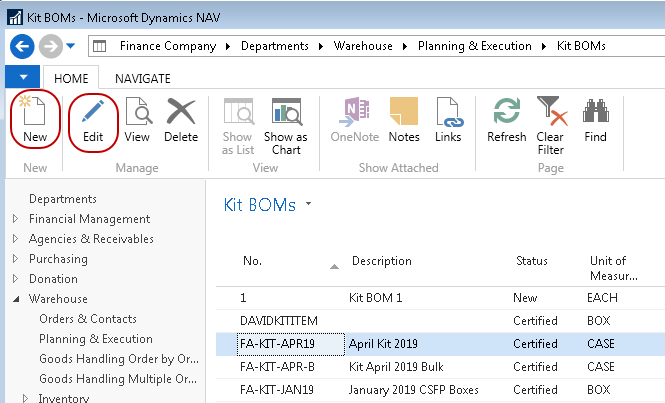
Once you have created the component items and kit item you can continue with the creation of the Kit Kit BOM. Search for “Kit BOMs” or navigate to Departments ⯈ Warehouse ⯈ Planning & Execution ⯈ Kit BOMs.
To enter a new record, click Home ⯈ New. To edit an existing record, click Home ⯈ Edit. The Kit BOM card will be displayed. The card has two FastTabs: General, and Kit BOM Lines.
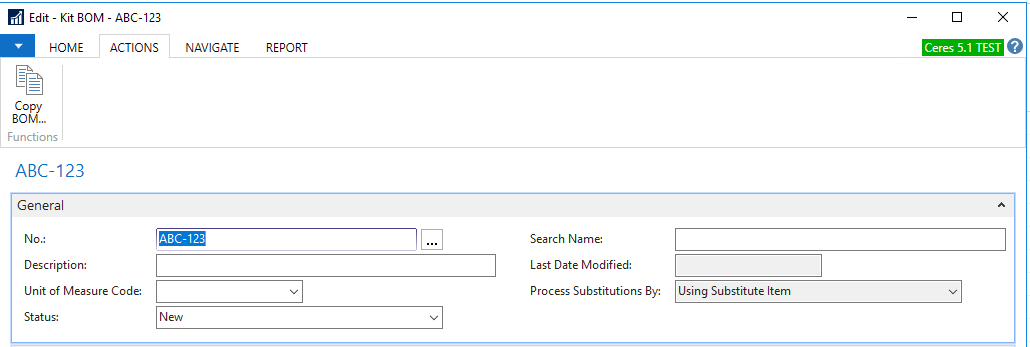
General FastTab

No.: This is the main identifier for the Kit BOM, which can be entered as any combination of text and numbers. Ceres can be set up to automatically number each Kit BOM Card for you, or you can enter the number manually. While the Kit BOM can be any number, many food banks will associate the Kit BOM number with the Finished Good Item Card as we have done here. Kit BOM “FA-KIT-APR19” will be used on Finished Good Item “FA-KIT-APR19.” If you intend to keep old kit BOMs, you might consider a No. that incorporates the item number and a time period. This can be used to see what components were used in previous builds.
Description: Here, you can enter a descriptive title of the Kit BOM. If you intend to keep old Kit BOMs, it might be helpful to enter a time period as part of the title (For example CI SR BOX NOV 14).
Unit of Measure Code: This unit of measure should match the base unit of measure of the finished good kit item.
Status: There are four statuses to choose from. You will only be able to build items with a Kit BOM status of “Certified.” The other statuses are available to show various stages of the Kit BOM. The available statuses are:
New – Indicates a new or planned Kit BOM. This status usually indicates the Kit BOM has never been built before. Modifications to the Kit BOM are allowed under this status.
Under Development – Indicates a Kit BOM that has been used in builds before, however, is now undergoing some modifications. If you wish to make changes to a Kit BOM that has a status of Certified, you must change it to the status “Under Development” before making the changes.
Certified – This status indicates that Kit BOM is complete and ready to be used in builds. Changes to the Kit BOM are not allowed under this status.
Closed – This status indicates that the Kit BOM is no longer in use but is being retained for historical purposes. No changes to the Kit BOM are allowed under this status. Kit BOM with a status of “Closed” can be reopened by changing the status to “Under Development” or “Certified.”
Ceres does not prevent changing the status of a Kit BOM in any way at any time. The different statuses allow users to see the current status of a Kit BOM, to prevent building kits that are not yet ready, or to prevent Kit BOMs from being used.
Search Name: Here, you can enter a search name. You can use the Search Name field to search for a Kit BOM when you cannot remember the Kit BOM number “CI BOX NOVEMBER 2014,” for example. When you enter something in the Description field and press Tab, Ceres automatically copies the contents to the Search Name field. The contents of the Search Name field do not need to be the same as those of the Description field.
If the search name was inserted automatically by Ceres, it changes each time you update the Description field. If you inserted the search name manually, it does not change when the Description field is changed.
Last Date Modified: This field is updated by Ceres and reflects the date the kit was last changed.
Process Substitutions By: This field is disabled and is not used.
Kit BOM Lines FastTab

Type: Enter the type of line from the list. You may choose from “Blank” or “Item.”
Blank – This allows you to enter a comment in the Description field.
Item – This allows you to add Unit Component Item to the Kit BOM.
Item No.: Enter the item number of the Unit Component Item.
Description: When entering an item line, this field will default to the description of the item entered. You can alter the description if desired.
Quantity Per: Enter the quantity of the Unit Component Item that is needed to build one of the kits. The quantity is based on the base unit of measure of the Unit Component Item. In our example above, we will include 1 unit of the mixed fruit, macaroni, and grape jelly, and 2 units each of rotini, and macaroni and cheese.
Unit of Measure Code: The unit of measure will default from the Item Card once you have entered the unit component Item no.
When you have completed entering the components on the Kit BOM, the status must be changed to “Certified” before you will be able to proceed with building kits.
When creating a new Kit BOM, you can copy an existing Kit BOM as a starting point. After giving your new Kit BOM a number, from the Actions tab, choose Copy BOM… and select the Kit BOM that you want to copy from the Production BOM List that opens.
Finished Goods Items Kits
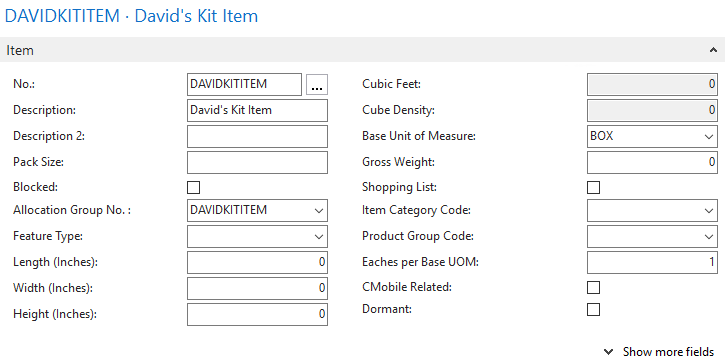
This is the finished goods kit that will ultimately be available for distribution. Finished good kits may be palletized if desired. Fields on the Item Card that are associated with finished goods items are as follows:
Base Unit of Measure: This can be set to a value that reflects the unit of measure for the finished good, e.g., “Box.”
The Base Unit of Measure on the Finished Good Item card must match the Unit of Measure Code on the Kit BOM General FastTab.
Gross Weight: This field can be left at zero since the actual weight will be automatically calculated by the weight and the quantity of all the components consumed in the assembly of the finished kit item.
Costing Method: This should be set to “FIFO” so that the actual value will be calculated from the kit.
Unit Cost: This field can be left at zero since the actual value will be calculated from the kit.
Pallet No. Required: This field is normally checked but is not required on the finished good kit item.
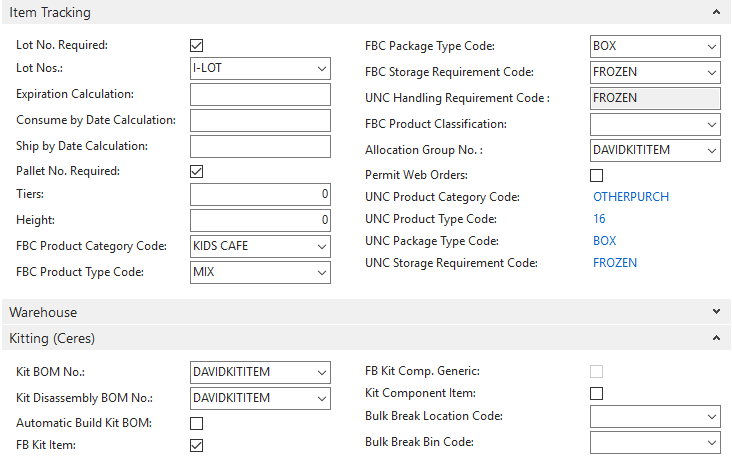
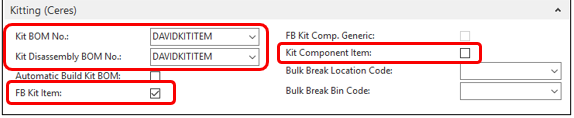
Kit BOM No.: This field specifies the Kit BOM that will be used to make this item.
Kit Disassembly BOM No.: This field specifies the Kit BOM that will be used when breaking a finished good back into its unit components. It is normally the same as the Kit BOM No. specified above.
FB Kit Item: This field must be checked. This is the field that designates that this item is a finished good item.
Kit Component Item: This field must not be checked.
Associating the Kit BOM with the Finished Good Kit Item
Once the Kit BOM is created, you can associate it with the Finished Good Kit Item. This can be done from the finished good kit Item Card. Search for “Items” or navigate to Departments ⯈ Warehouse⯈ Planning & Execution ⯈ Lists ⯈ Items to access the Item Card. Navigate to the Finished Good Kit Item. Select the Kitting FastTab and use the drop-down list to select from a list of available Kit BOMs. The “Kit Disassembly BOM No.” field will default to the same as the “Kit BOM No.” field. Check the “FB Kit Item” box.
Summary of Item Card Setup for Kitting
For Bulk Components, Unit Components and Finished Goods, Item Cards should include the following:
Bulk Component Item
-
No values entered on the Kitting FastTab
-
Eaches per Base UOM filled in on General Tab
-
All other normal item card fields must be entered as well, e.g., Posting Groups, Item Category Code, FBC Storage Requirement, etc.
Unit Component Item
-
FB Kit Comp. Generic: Optionally checked if a generic item
-
Kit Component Item: Checked
-
Break Bulk Location Code: Entered
-
Break Bulk Bin Code: Entered
-
Base Unit of Measure = “Each” or “EA”
-
Gross Weight = 0 (this will be calculated from Bulk*)*
-
Unit Cost = 0 (this will be calculated from Bulk)
-
Costing Method = FIFO
-
Kitting Item Bulk Components Page = Linked to bulk component item(s)
-
All other normal item card fields must be entered as well, e.g., Posting Groups, Item Category Code, FBC Storage Requirement, etc.
Finished Good Item
-
Kit BOM No.: Number of associated Kit BOM
-
Kit Disassembly BOM No.: Number of associated Kit BOM
-
FB Kit Item: Checked
-
Base Unit of Measure = Box or other relevant unit
-
Gross Weight = 0 (this will be calculated from the unit components in the kit*)*
-
Unit Cost = 0 (this will be calculated from the unit components in the kit)
-
Costing Method = FIFO
-
All other normal item card fields must be entered as well, e.g., Posting Groups, Item Category Code, FBC Storage Requirement, etc.
Building Kits
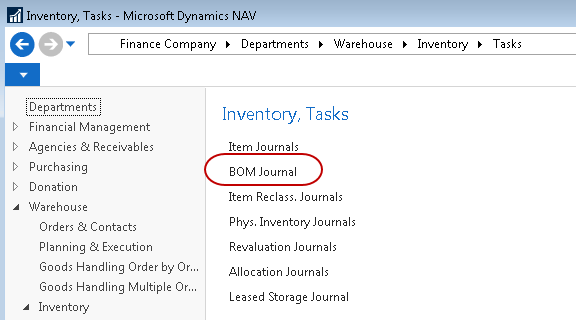
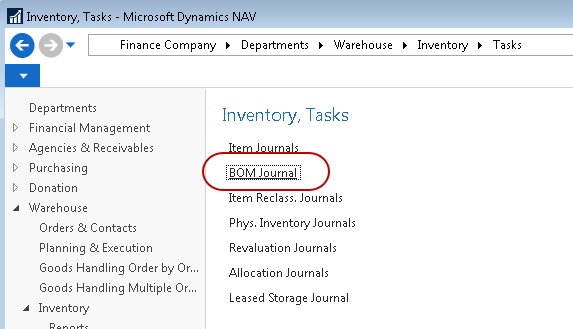
In order to get product from pallets and cases into individual units, we need to break down our bulk components, as well as make sure we’re using up any product that’s already been broken down. As a final step, we’ll physically assemble the kits, tell Ceres how many we’ve made, and let it update the inventory records to reflect where everything is now. All of this takes place on the BOM Journal Page. Search for “BOM Journal” or navigate to Departments ⯈ Warehouse ⯈ Inventory ⯈ Tasks ⯈ BOM Journal.
Specify Kits, Quantity and Location
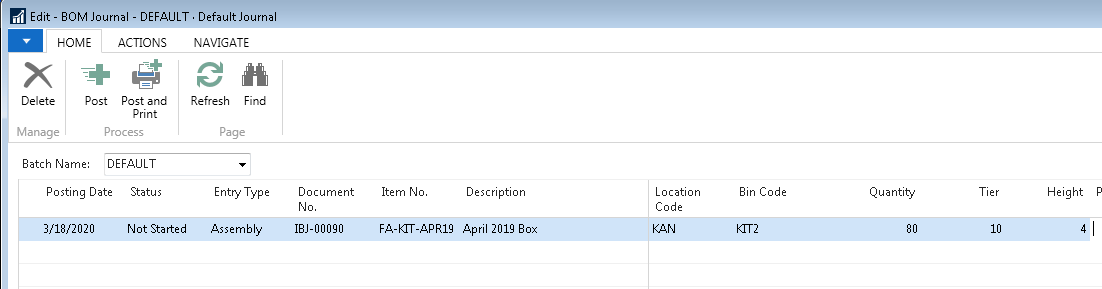
This will open the Edit – BOM Journal page. Enter the Posting Date. Ensure the Entry Type is “Assembly” and enter the Finished Good Kit Item to be built in the Item No. field. First, fill in the Location Code corresponding to the kit run and then enter the Quantity of kits being assembled.
Break Bulk Components
-
Select Actions ⯈ Break Bulk Components to have Ceres determine whether there are enough Unit Component Items available to assemble the requested quantity of kits. If there are not enough Unit Components to assemble the kits, Ceres will calculate how many cases of Bulk Item Components need to be broken down to have enough units for the kit run.

-
If bulk component items must be broken down into unit component items, Ceres populates an Item Journal with the necessary positive and negative item adjustments. A confirmation message is displayed advising the user to review and post the Item Journal created. Ceres does not automatically post the journal, so it must be reviewed and posted manually.

If the unit component inventory is sufficient to cover the build, the message will indicate that no bulk breaks are required, and you can proceed to the Retrieve Components step

-
If there are not enough bulk components and unit components to create the kits, a message will display indicating which Item No. has insufficient quantity. To proceed, additional bulk or unit components will need to be received, Kit BOM components will need to be updated with alternative components, or the quantity of kits to be created will need to be reduced.
 note
noteThere are several reasons that Ceres will report insufficient quantity, including consume by dates, missing FBC Codes, Zones marked "Exclude Warehouse Documents", or the item's presence on another journal. In these cases, the Qty. Avail. Trace tool is a good troubleshooting step.
-
If you wish to stop the assembly operation at this point, you may abort the process and cancel the break bulk components function. This will delete the item journal for bulk component breaks and return the BOM Journal to a status of “Not Started.” To abort the process, select Actions ⯈ Abort Break Bulk Components.

-
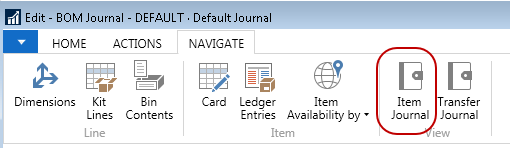
To continue the kitting process, review the item journal and post the break bulk components. To view the journal, select Navigate ⯈ Item Journal.
-
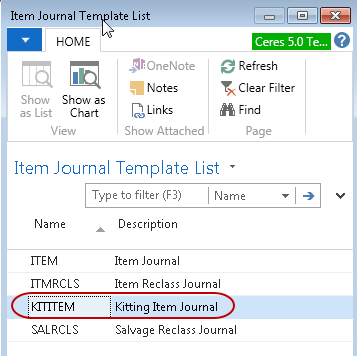
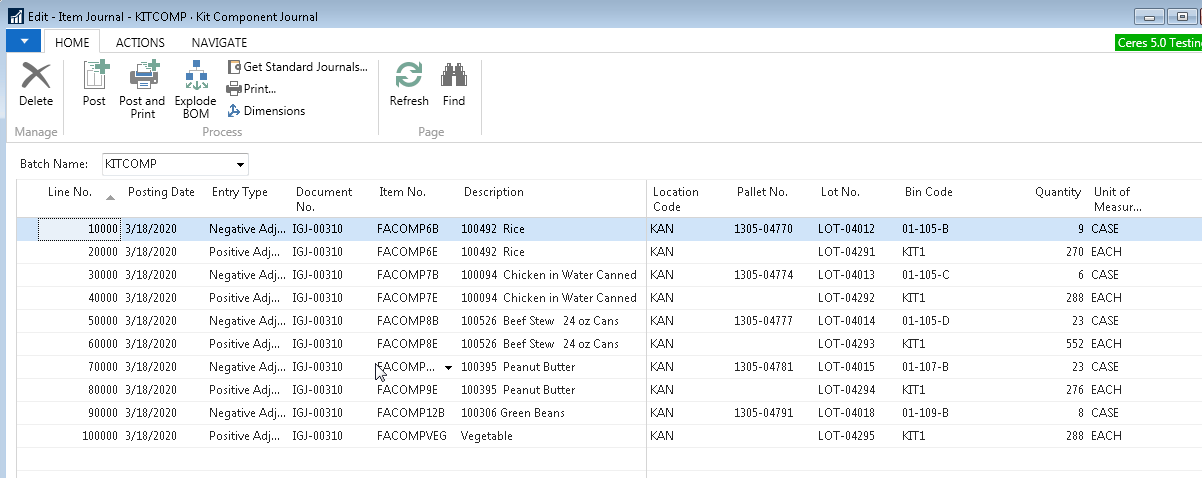
Select the Journal Template being used for kitting. For our example, we have set up a KITITEM – Kitting Item Journal.
-
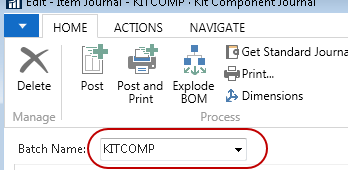
Select the batch designated for Break Bulk Components by using the drop-down arrow in the Batch Name field. We have used a batch called KITCOMP.
-
The item journal will be displayed, showing the bulk components items as negative adjustments and the unit component items as positive adjustments.
-
Select Actions ⯈ Break Bulk Movement Worksheet to create a guide to assist the warehouse in retrieving the bulk components required for assembly.

-
The request form should default to the appropriate Journal Template and Batch.
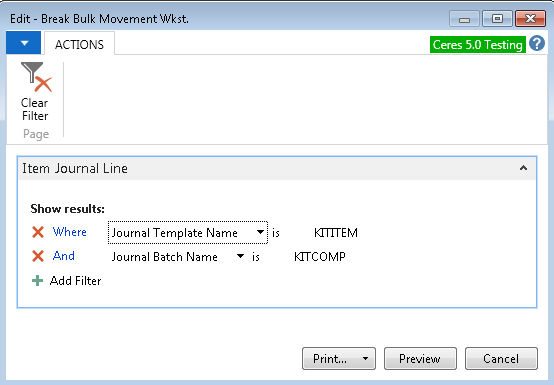
-
Print the report. Below is an example of the Break Bulk Movement Worksheet. Note that this is not an actual movement worksheet nor is it a pick document. It is a report derived from an item journal, which does three things when you post the journal: it negatively adjusts the bulk item quantity, positively adjusts the unit item quantity, and changes the bin location of the units to the Break Bulk Bin Location.

NOTE: For palletized bulk items, the Break Bulk Movement Worksheet may suggest taking a small number of cases off of a pallet. If this is inconvenient or dangerous, you may wish to move the entire pallet to the kitting area (WIP Bin) instead. A pallet cannot be moved if it is listed on the Break Bulk Item Journal so it needs to be removed from the item journal before proceeding. To do this:
-
From the Break Bulk Movement Worksheet, note the pallet number to be moved (with the Movement Report or export to Excel)
-
Delete the entire Break Bulk Item Journal by navigating to the Actions ribbon of the BOM Journal and selecting Abort Break Bulk Components
-
Move the pallet to the WIP Bin using the handheld or movement worksheet when you move the actual pallet to be used in the kits
-
Re-run the Break Bulk process by navigating to the Actions ribbon of the BOM Journal and selecting Break Bulk Components. The Break Bulk Movement Worksheet will now suggest cases from the pallet already located in the WIP Bin. If it does not, you should select the pallets that you did move before posting.
-
-
Once the components have been retrieved in the warehouse and operations has confirmed the break bulk components are available, you can post the item journal, which negatively adjusts bulk component inventory, positively adjusts unit component inventory, and moves the unit quantity to the Break Bulk Bin Location. You may use either “Post” or “Post and Print” if you require a printed document of the transaction.
-
Ceres will acknowledge the successful posting of the journal.

-
Close the item journal, and you will be returned to the BOM Journal.
-
At this point, you may no longer “abort break bulk components” because transactions have posted moving the inventory from bulk to units. However, Ceres does provide the ability to reverse the break bulk process. This is done from the BOM Journal by selecting Actions ⯈ Reverse Break Bulk Components. This process will attempt to reverse the Item Journal just posted to move the inventory back from units into bulk.
noteThis function is only needed if you decide to cancel the assembly of the kits after the break bulk item journal has been posted.

"Retreive Components" and Build Kits
-
Once sufficient unit component items are available to complete the requested number of kits, you can proceed to assembly. Update the BOM Journal line with a Bin Code, Tier and Height for any finished good pallets that are created. The Bin Code can be any valid bin in the selected Location but can be changed before posting. For the Tier and Height, you need to specify the number of kits on one pallet layer in the tier number and the number of layers in the height. In our example, our pallet has 10 kits on a layer, and we stack the pallet 4 layers high.
-
Once you have specified the bin, tier, and height, the next step is to retrieve the components. To retrieve the unit component items, select Actions ⯈ Functions ⯈ Retrieve Components.

-
Ceres will respond by changing the status of the BOM Journal Line to “Components Retrieved,” as shown below.

-
Ceres will explode the BOM Journal to as many lines as necessary to accommodate the mix of component items consumed in the kit assembly while still respecting our pallet limits. Ceres will create lines for each unique combination of FBC Product Source and FBC Product Category code in proportion to the weight of the components consumed in the kits. For example, if 50% of the product consumed, by weight, was LOCAL/DONATED, then 50% of the kits created will have LOCAL/DONATED Codes.
In our example below, the lines were not broken out into groups since all of the components were purchased and are associated with a single FBC Product Source Code and a single FBC Product Category Code. We did get one line for each pallet created.


Here is an example where our quantity of 80 was broken into multiple lines because we used a mix of FBC Product Source Code and FBC Product Category Code.
 note
noteCeres will automatically assign lots corresponding to the lines created by the proportional weights of FBC Product Source and FBC Product Category Codes. It will also automatically create pallets based on your tier and height settings. It is not necessary to use the either the Assign Lots or Create Pallets buttons on the BOM Journal. The Create Pallets button, however, will allow you to print pallet tags on demand if Print Retrieve Comp Pallet Tag is unchecked in BOM Journal Template setup.
-
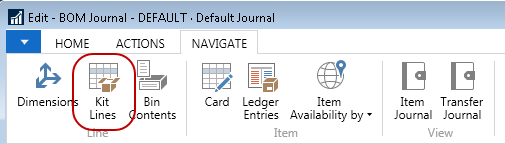
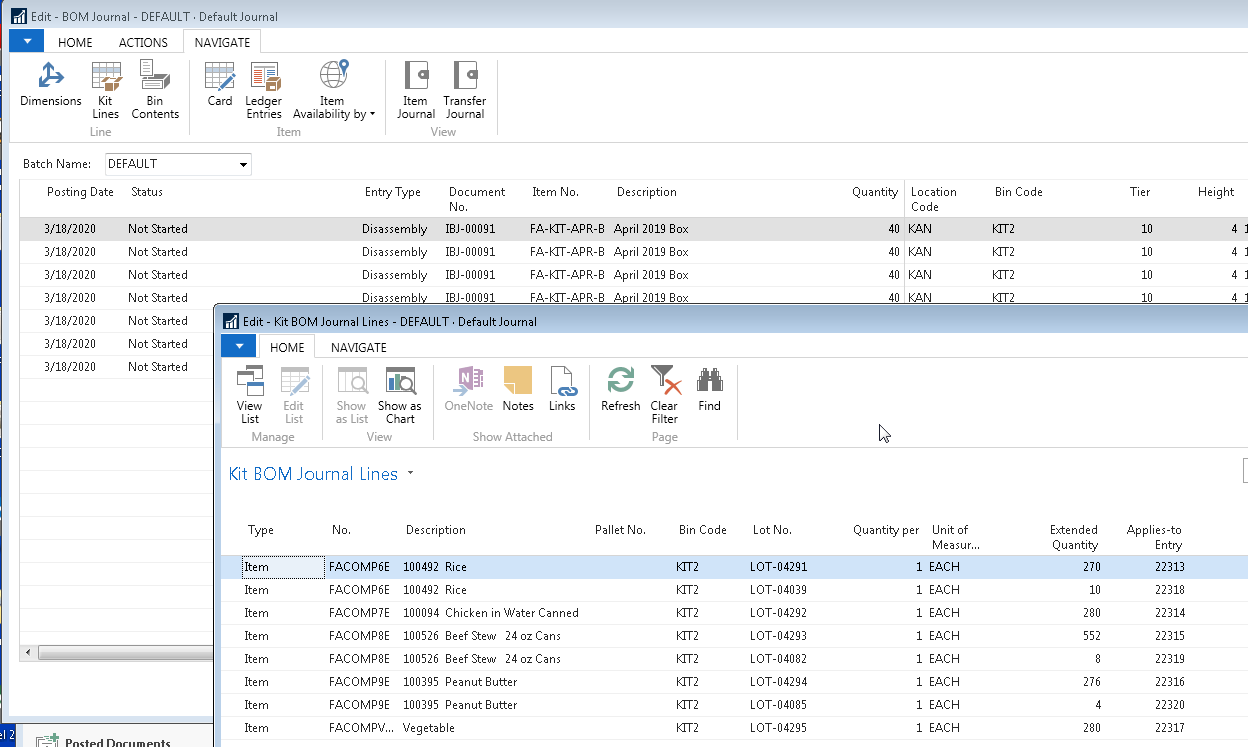
Select Navigate ⯈ Kit Lines to view the Unit Component Items and extended quantity that will be consumed to create the Finished Good Kit Items.
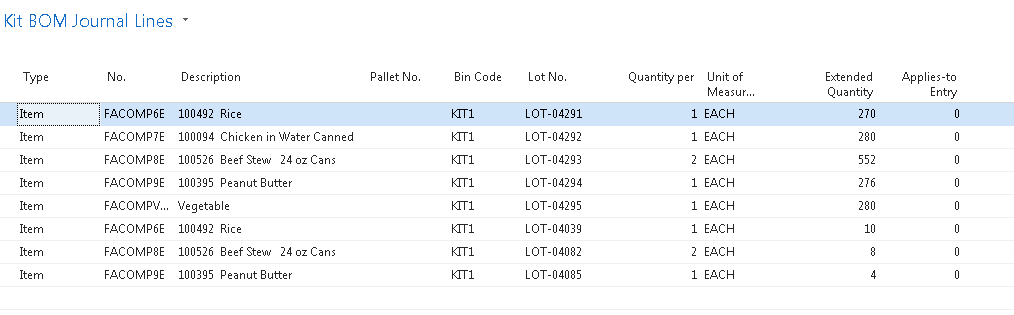
-
The Edit – Kit BOM Journal Lines Page displays the number of units that will be consumed to create the Kits.
-
The Kitting Reconciliation Report displays the details of how individual FBC Product Source Codes and FBC Product Category Codes have been used to split weight and value into Finished Good Kits. It can be run before the BOM Journal is posted by selecting Actions ⯈ Kitting Reconciliation Report.
Post the Finished Good Kits
-
To convert the consumed Unit Component Items into Finished Good Kits, post the BOM Journal, which will make all the necessary withdrawals from Unit Component inventory and will receive our finished kits into inventory in the assigned Bin. Prior to posting, you may change the Bin where the Pallets will be stored in the warehouse. To post, click Home ⯈ “Post” or “Post and Print.”
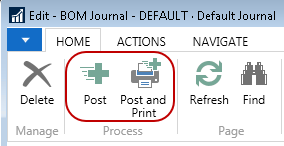
-
Ceres will ask you to confirm the posting. Select “Yes,” and Ceres will post the journal and return the following message if the journal is successfully posted.

Additional BOM Journal Options
The Create Pallets button on the Actions ribbon of the BOM Journal allows you to print finished good kit pallet tags on demand.
The Delete Advanced Kitting Lines button on the Actions ribbon of the BOM Journal is used to ensure that all tables affected by the BOM Journal are reset. It's good practice to use this button when deleting lines from the BOM Journal rather than the Delete Line function found in the Lines section of the BOM Journal.

Rarely, during the Retreive Components step, Ceres will create an extra line with zero quantity on it. Use the Affiliate Zero Quantity Lines button on the Actions ribbon of the BOM Journal to remove the line before posting the kit.
Disassembling Kits
Restrictions on Disassembly
Ceres 5.00.17 was released to address previous issues with Kit Disassembly. This release allows more flexibility in kit disassembly but adheres to the Restrictions listed here. The 5.00.17 Enhancements include the following:
-
The ability to disassemble kits in warehouse locations other than where the kits were originally assembled, providing all the kits are in the same location and bin when disassembly is started.
-
Should kit component items be revalued to a new cost, this enhancement accurately returns kit components back into inventory at their newly established cost from the revaluation.
-
This enhancement prevents the disassembly of previously distributed kits.
Distributed Kits
There are some restrictions on the disassembly of kits that should be noted. If some of the kit has been distributed to agencies, it is no longer possible to disassemble the remaining kits automatically with this process. If you need to disassemble the remaining kits, it will be necessary to record the inventory quantity changes to the finished kit and the component items manually using the positive and negative adjustments on an item journal.
Kit component item revaluation
If any of the components returned to inventory have been revalued through the revaluation journal, the returned components will be returned using the current lot revalued cost and NOT the cost used when building the original kit. This will result in either an overall cost increase or decrease in inventory value depending on whether the cost of the components was revalued to be higher or lower.
Kits in Multiple Locations/Bins
If all kits are still in inventory but have been moved to different locations or bins, it is necessary to move all of the kits into a single location and bin prior to attempting disassembly. Attempting to disassemble kits that are in multiple locations and/or bins will result in this message.
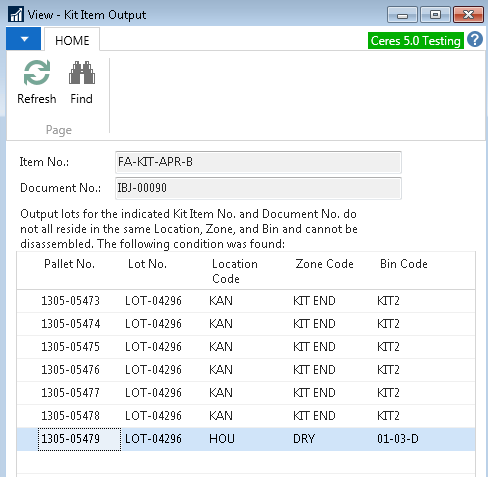
To continue disassembling the kits, you must first move all kits from this batch into a single location and bin for disassembly.
The unit component items returned to inventory will be placed in the same bin where the disassembled kits were located at the time of disassembly. They will not be returned to their original location and bin. After disassembly, you may manually move the component items to any location or bin as needed with an item reclass journal or movement worksheet.
Disassembly Procedure
-
Kits built through the kitting process in Ceres can be disassembled back into either unit or bulk component inventory. This function is called “FB Kit Disassembly” and can be accessed from the same BOM Journal used to originally build the kits. Ceres will allow the disassembly process to return the components back to unit component inventory or completely to the bulk items they were taken from. This can be useful if, for some reason, the wrong bulk items were used in the creation of the kits. To begin the disassembly function, search for “BOM Journal” or navigate to Departments ⯈ Warehouse ⯈ Inventory ⯈ Tasks ⯈ BOM Journal to access the BOM Journal Page.
-
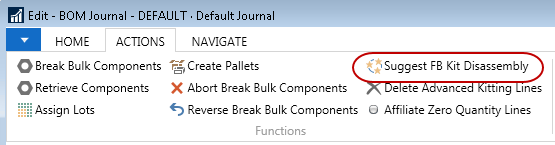
From the BOM Journal select Actions ⯈ Suggest FB Kit Disassembly.
-
This will open the Edit – Suggest FB Kit Disassembly Page, where you can filter to isolate the kits you wish to disassemble. For our example, we’ve selected Item FA-KIT-APR-B and a posting date of 3/18/2020. You must also specify the Document No. from the original build.
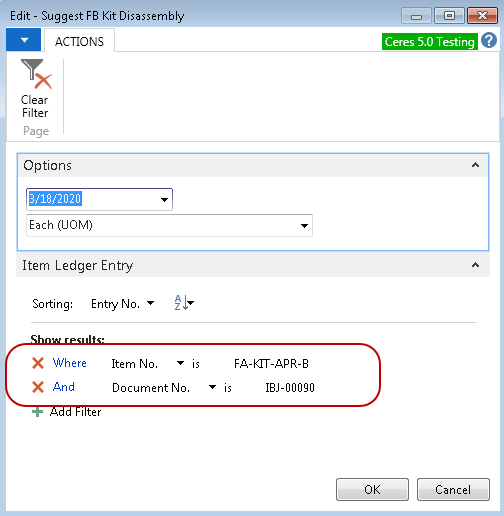
-
On the Options FastTab, select whether the disassembly will return inventory to the Each (UOM) Unit Component Items or Bulk (UOM) Bulk Component Items.

-
Click OK to continue. Ceres will return the following message.

-
Ceres will build the BOM Journal Disassembly and Kit BOM Journal Lines, as shown below.
-
To post, click Home ⯈ “Post” or “Post and Print.”
-
Ceres will ask you to confirm the posting selection. Select “Yes,” and Ceres will post the journal and return the following message if the journal is successfully posted.

Kitting Flow and Undo Conditions