Allocation Agency Orders Overview
Allocation journals may be used to efficiently allocate item quantities to specific agencies and build agency orders as a group. Once an item is allocated in the allocation journal, the quantity allocated for that item cannot be distributed to another agency. This document outlines the setup required and the allocation agency order process.
Ceres Object release 5.00.00 is required for the functionality described in this document.
Overview
Allocated agency orders can be created in several ways.
-
Manually
-
By setting percentages in the Item Allocation Group
-
Import from an Excel Allocation spreadsheet
This document explains how to the create agency orders using the allocation journal entries . It also explains how to how to process and update allocated orders on Agency Express.
Ceres allows for the balance of Quantity to Allocate to remain in the allocation journal if its entirety is not allocated. The balance can be subsequently and repeatedly consumed as desired (full balance, partial balance) via the Get Allocations function on the agency order or the Create Orders function on the allocation journal.
Creating Allocation Journal Entries
-
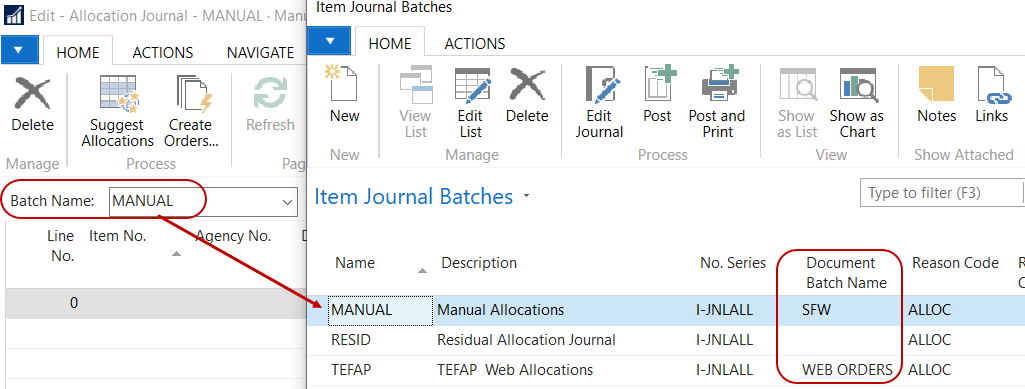
The allocation journal can be accessed from the Departments ▸ Warehouse ▸ Inventory ▸ Tasks ▸ Allocation Journals.

-
If multiple allocation journal batches are setup, select a batch from the dropdown found in the Batch Name field.
-
If a Document Batch Name is linked to a batch, it will be populated on the allocation journal line when a new line is created. This field will be used on agency orders to have the ability to link allocations to a specific agency order batch. In this manner, allocated orders can be sent to Agency Express as a batch instead of on an order by order basis.
-
Click OK to select the batch.
Manually
-
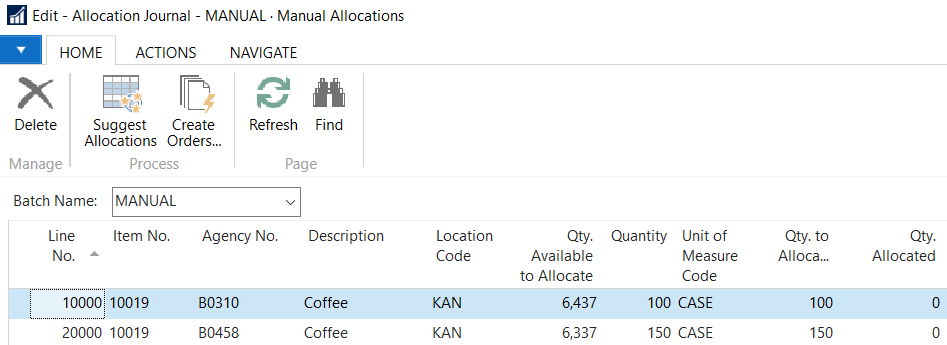
Once a batch has been selected move down to the lines.
-
Enter or select the Item No. to allocate.
-
Enter or select the Agency No. for which you are allocating the item.
-
In the Location Code field, enter or select the location from which the product will be fulfilled. This will determine the Available Quantity for allocation.
-
In the Quantity field, enter the quantity to allocate for this agency. The Quantity to Allocate field will update with this value.
-
If other items should be allocated to an agency, or if the same item should be allocated to other agencies, repeat the steps above to create the additional allocation journal entries. The Qty. Available to Allocate will update each time a quantity is entered to show the reduction in available quantity for a specific item.
-
The allocated items will remain in the journal, until deleted, so agency orders can be created from the journal.
Importing Allocations from Excel
Using a simple Excel spreadsheet, you may create the allocation entries and then import those entries directly into the allocation journal. The design of the spreadsheet is very simple and includes 4 fields. Download the allocation import template Excel file here
- Agency No.: Agency to which you are allocating to.
- Item No: Item which you are allocating
- Qty to Allocate: Quantity of the item that you are allocating to the agency.
- Shipment Date: Date the items that are allocated to the agency will be shipped

-
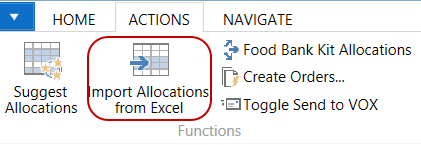
To import the file, select Actions ▸ Functions ▸ Import Allocations from Excel .
-
An Import Allocations from Excel Request Page will display. Update the fields as needed

Batch Name: Defaults based on the batch you selected in the allocation journal.
Location Code: Enter the location the items will be fulfilled from.
Shipment Date: Enter the shipment date if you want to override the shipment dates from the file.
noteIf a shipment date has been entered on the Request Page that is different than the shipment date in the file, a message will display indicating that the shipment date will be overwritten when the file is imported. Click Yes to proceed or No to cancel.

Workbook File Name: Click on the ellipsis button and browse to where the allocation spreadsheet was saved.
Worksheet Name: Click on the ellipsis button to select the sheet you want to import.
-
Click Yes or OK to import the file. The entries will now display in the journal.
 note
noteThe imported entries will be appended to any entries that already existed in the batch.
-
You can update the entries just like you would any other entries in the journal.
-
The allocated entries will remain in the journal, until deleted, so agency orders can be created from the journal.
Using the Suggest Allocations Function
If the item quantities to be allocated to each agency are based on a fixed percentage of the total quantity available, you can automate the creation of the allocation journal entries without importing from Excel. This streamlines the allocation process when product is ready to distribute.
-
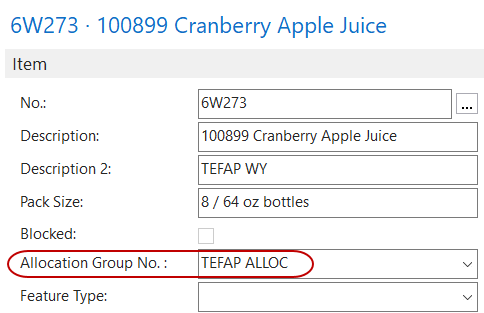
Go to the Item FastTab of the Item Card for the item to be allocated. Confirm that an Allocation Group No. has been assigned to the item. This can be the Item No., or a generic allocation Group, such as TEFAP ALLOC that has been setup as an item specifically for this purpose.
-
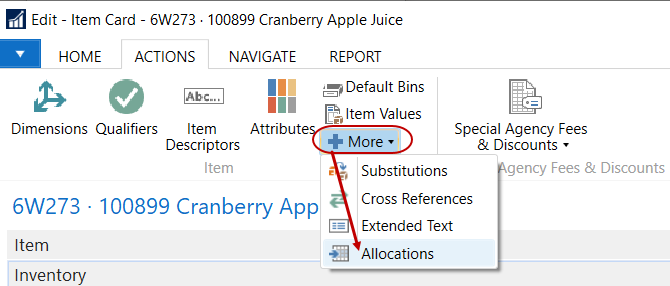
From the Item Card, select Actions ▸ Item ▸ Allocations. The Item Allocations Page will display.
-
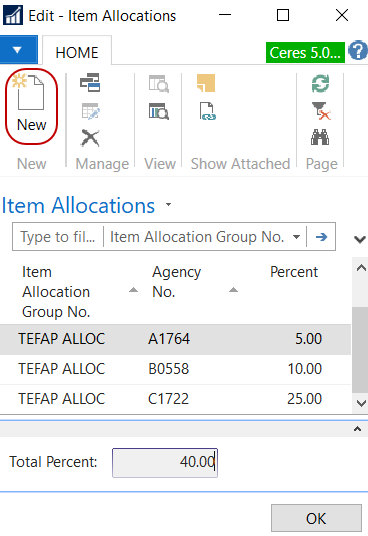
In the Agency No. field, enter the agency. In the Percent field enter the percentage of the total quantity available that should be allocated to this agency. The percent allocated can never be more than 100%, but it can be less. To refresh the Total Percent calculation at the bottom of the Page, press F5.
-
When finished entering all agencies and percentages, click OK.
-
Once all the items and percentages per agency have been specified, the next time that allocations are ready to be distributed, the Suggest Allocations process can be run to streamline allocations.
-
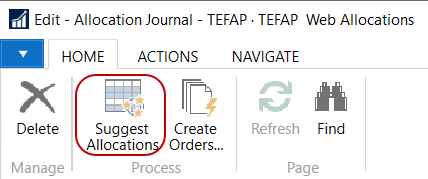
When you are ready to create allocations, open the Allocation Journal. Then select Home ▸ Process ▸ Suggest Allocations.
-
A Suggest Allocations Page will display where filters can be entered to restrict the items/agencies that will be included in the journal.
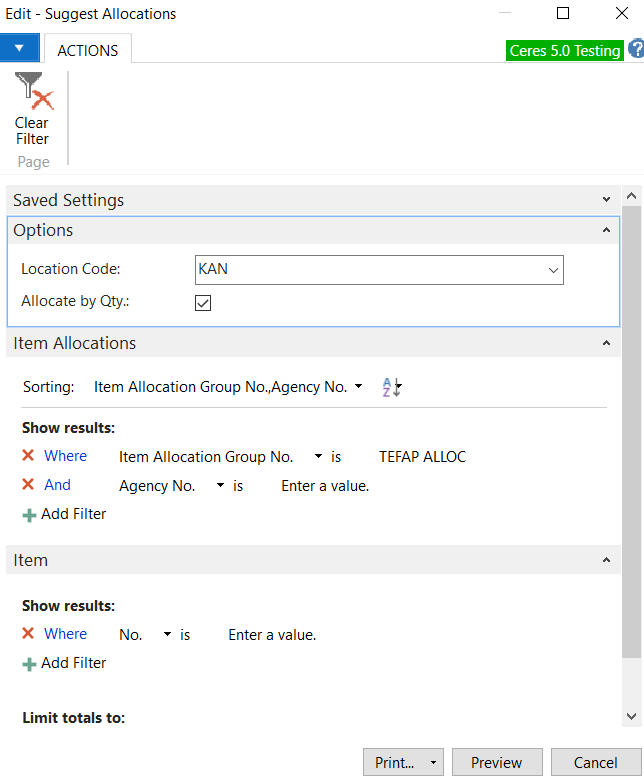
-
On the Options FastTab you can select a Location Code to restrict the location the items will be allocated from. If you do not wish to allocate the full Qty. Available per item, you can check the Allocate by Qty. box to specify the quantity to allocate for each item. The Item Allocations by Qty window will display when you hit Preview or Print.
-
On the Item Allocations FastTab you can set filters to restrict the items or agencies included in the Journal. If no filters are entered, all items with quantities available to allocate that have been set up with agency percentages will be included, unless filters are set on the Item FastTab.
-
On the Item FastTab, you can select specific items, pallets, etc.
-
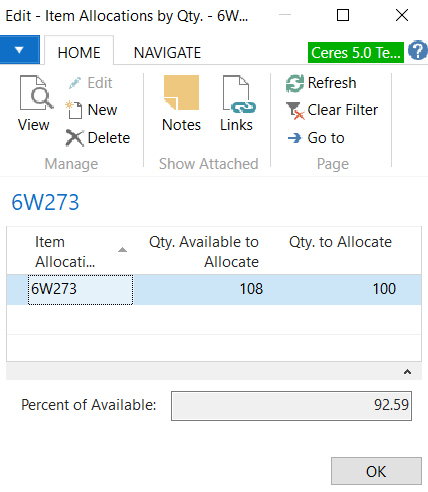
If Allocate by Qty. was checked on the Options FastTab, choosing Print or Preview will display on the Item Allocations by Qty Page. This allows users to adjust the quantity to allocate per item. The adjusted quantity to allocate will be the basis for the report to calculate the allocations.
 note
noteThe Percent of Available displayed at the bottom is based on the line your cursor is on. As you move to the next line, that value will change based on what you’ve allocated in relation to quantity available to allocate.
-
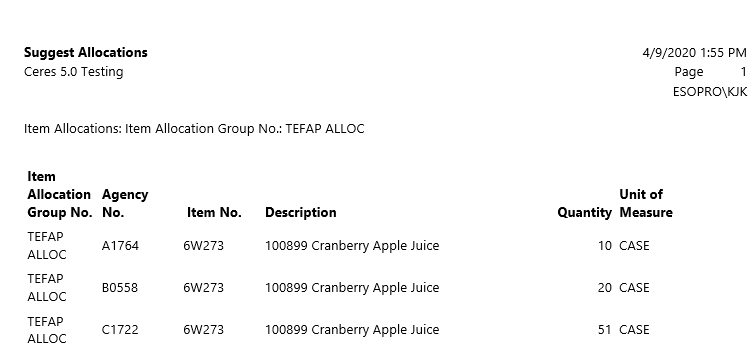
If using the Allocate by Qty. feature, click OK and the allocations will be suggested. Otherwise, choose Print or Preview to generate the journal. Print will provide you with a printed copy of the Suggest Allocations report, while Preview will display on screen. The report shows how many (per unit of measure) were allocated by Item and Agency No.
-
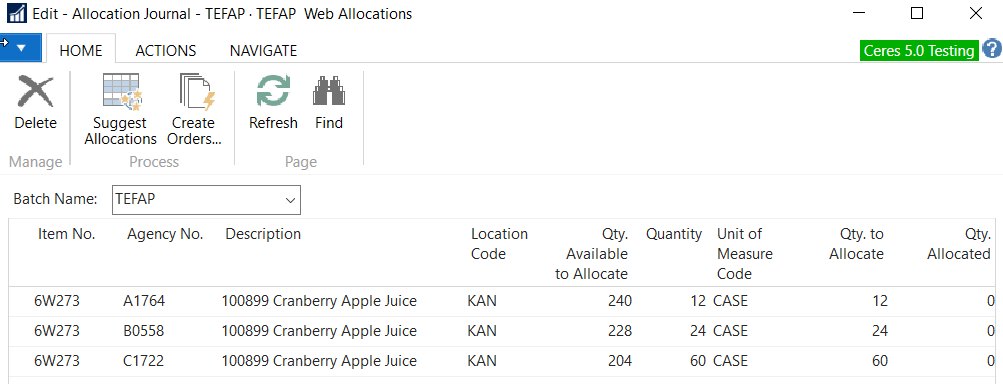
If Previewing, close the window and you will be returned to the allocation journal and can view the quantity to be allocated based upon the percentages set up on the Item.
noteThe Qty. Available to Allocate is reduced on each line as quantity is allocated. If another line is added to this journal, the Qty. Available to Allocate will reflect what is available.
-
The allocations created by this function are only suggested allocations based on the percentages assigned on the Item Card. You may change the quantities as desired by updating the value in the Quantity field.
-
The allocated entries will remain in the journal, until deleted, so agency orders can be created from the journal.
Creating Agency Orders from the Allocation Journal Entries
-
There are two options for placing allocated product onto agency orders
-
Generate agency orders from the allocation journal entries by running Create Orders function.
-
Wait until an agency places an order and then add the allocated Items to that order, if so desired.
-
-
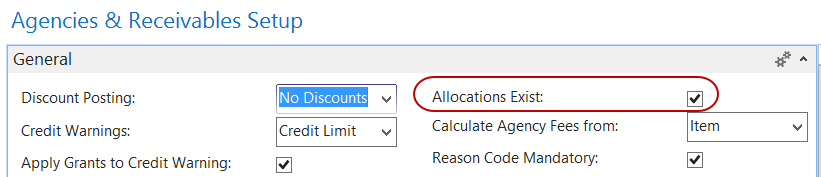
To receive a reminder that allocated quantities exist when creating manual agency orders, the field Allocations Exist must be checked on Agencies & Receivables Setup ▸ General FastTab. This generates a reminder when the order is placed.
Allocation Journal Create Orders Function
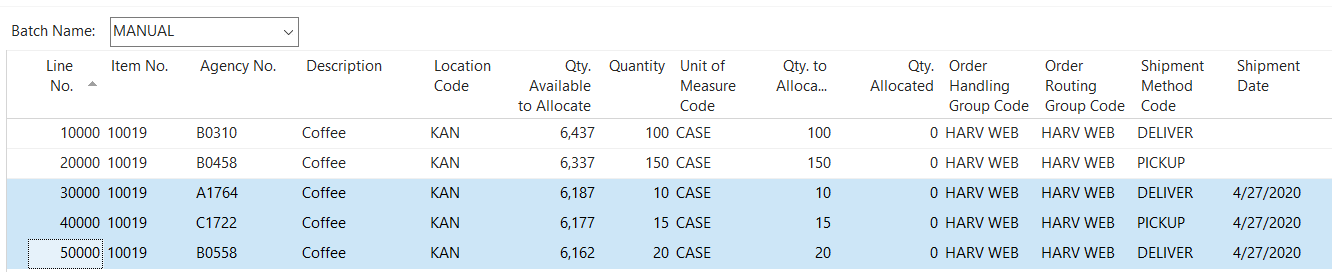
When creating orders from the Allocation Journal Create Orders function, you can use different fields in the allocation journal to filter and create orders for selected subsets of the allocations. Certain fields are editable (Document Batch Name), whereas other fields (Order Handling, Order Routing, Shipment Method Code) are not because they are flow-fields where the data flow from the agency setup to the journal. The non-editable fields can be modified from the Agency Card, and then updated in the allocation journal by reselect the Agency No.

-
Set or update Shipment Date, Reason Code, Document Batch Name as desired. These can be used to filter records for the Create Orders Process.
noteVoxware users will want to pay special attention to the Send to VOX field and set it accordingly before creating agency allocated orders. Please refer to the Voxware section of this document for more information.
-
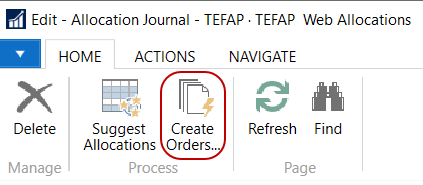
Once the allocation journal is properly filtered for the desired records, select Home ▸ Process ▸ Create Orders.
-
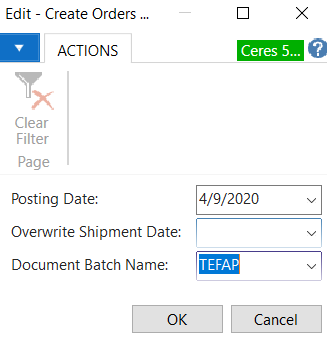
From the Create Order Request Page, enter the Posting Date to be used for the orders to be created. If you wish to override the Shipment Date on the journal lines, select the date to use in the Overwrite Shipment Date field. If you are using Document Batches, then you may select the Agency Order Document Batch you wish the orders to be created in. The Document Batch Name can be used to override the existing Document Batch Name field on the Journal Lines if desired.
 note
noteA blank Document Batch Name is a valid value. The Posting Date will be filled in with the current work date if it is left blank. If the Overwrite Shipment Date is left blank it will use the existing Shipment Date on the allocation line.
noteSince allocation lines can have different shipment dates, the Create Orders process will create allocation orders by shipment date (when the Overwrite Shipment Date on the Request Page is blank).
-
Click OK to create the orders.
-
The allocation journal will be updated to show the quantities allocated.

-
Orders will be created based upon the number of agencies in the allocation journal. There will be one order per agency.
-
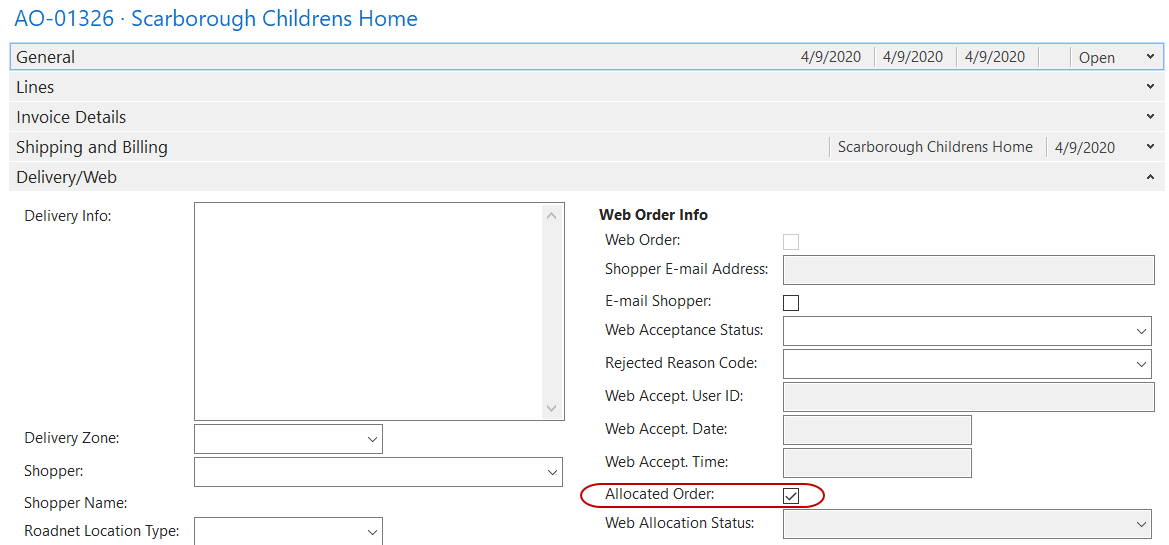
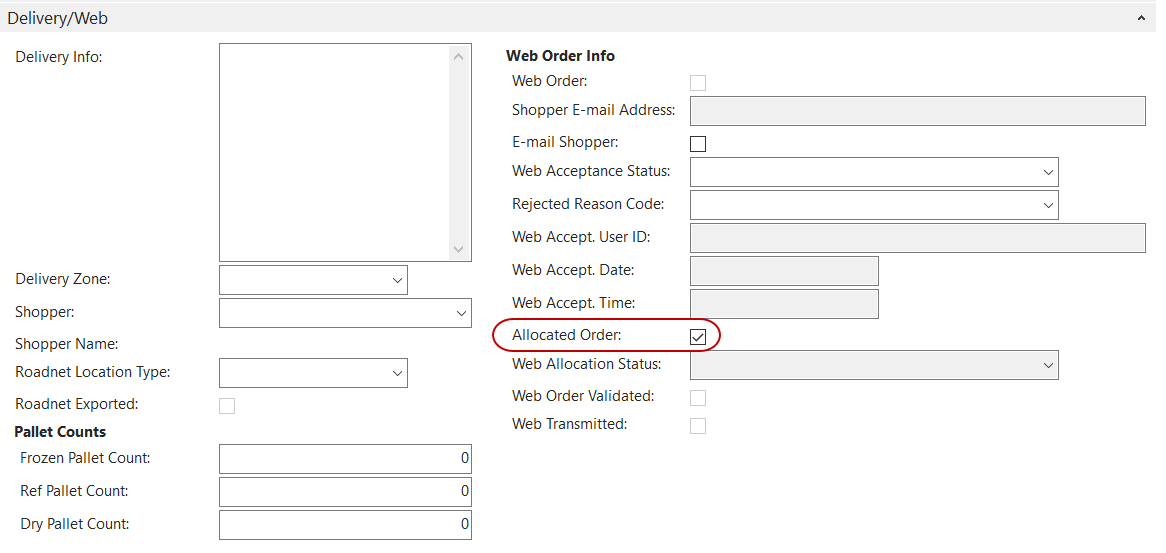
Orders created from this function can be found in the appropriate Document Batch and then by filtering Allocated Order = Yes, Shipment Date, etc. Below is an example of an order created from the Create Orders function.
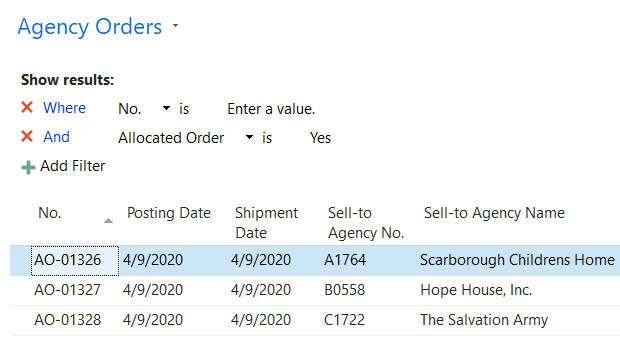
Below is an example of an order created from the Create Orders function. Note that the Allocated Order field on the Deliver/Web FastTab is checked.
-
At this point the allocation journal can be cleared by deleting the lines. The lines can also be left intact and the quantity can be updated to show the Quantity to Allocate for the next time.
Agency Order Get Allocations
The Get Allocations function allows you to bring in the allocation journal entries into a new or existing agency order. If the Allocations Exists field is checked in the Agencies & Receivables Setup, a reminder message will display letting the user know allocations exists when an order is created for that agency.
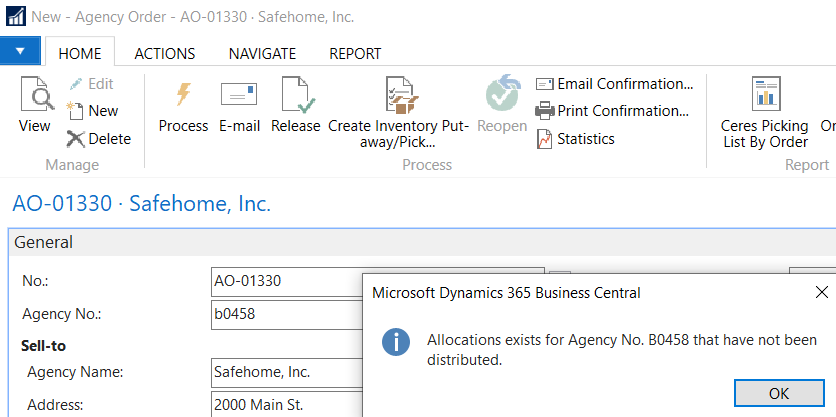
The allocation exist message is a reminder only in that clicking OK to the message does not bring in or add the allocation entries to the order. The process of bringing in the entries s handled by the Get Allocations function.
-
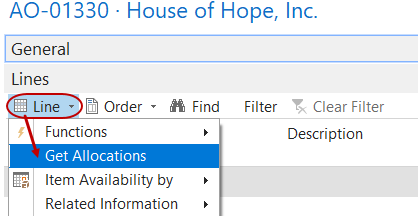
Create or update an agency order like you normally would from Agencies & Receivables ▸ Order Processing ▸ Agency Orders. When you are ready to bring in the allocation journal entries to the order, go to the Lines FastTab and then select Lines ▸ Get Allocations.
-
An Allocation Jnl. Lines Page will display with the items and quantities that are available to be allocated, and the quantities that have been allocated.

-
Click OK to proceed which will copy the lines from the allocation journal to the agency order.

-
Once the lines have been copied to the agency order, the Qty to Allocate and Qty Allocated fields are updated. If you run the Get Allocations function again see that the fields have bene updated. In the below example Qty to Allocation of 150 is now 0, and Qty Allocated is 150.
 note
noteChanging the quantity on the agency order after the line have been copied to the order, does not change the Qty to Allocated or Qty Allocated in the Allocation Jnl Lines. For example, if the quantity on the order changed from the allocated quantity of 150 to 100, the Allocation Jnl. lines will still reflect that 150 has been allocated.
-
Process the order like you normally would.
-
At this point the allocation journal can be cleared by deleting the lines. The lines can also be left intact and the quantity can be updated to show the Quantity to Allocate for the next time.
Handling Remaining Quantity via Agency Express Setup
Once the order is submitted back to Ceres from Agency Express, the quantity difference between allocated and requested quantity or remaining amount can be handled in several ways. The Agency Express Import process takes this into consideration the allocation specific setup options on the General FastTab of the Inventory Setup.
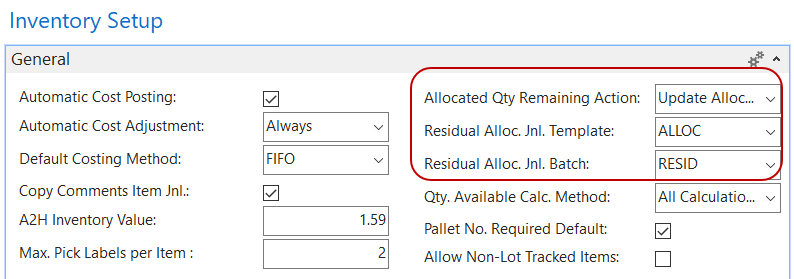
Allocated Qty. Remaining Action: Select one of the options
Blank - This is the default setting. No action is taken. The Remaining Amount is put back into regular inventory to be placed on another order. This is how all earlier versions are handling the remaining quantity.
Update Allocation Journal - Ceres locates the corresponding Journal Line and updates the Qty. to Allocate as the remainder between the allocated quantity and requested quantity. An Allocation No. from the No-Series, specified on the Numbering FastTab of the Inventory Setup, is created and populated on the line. If the line no longer exists in the journal, Ceres will create a new line for the remaining quantity.
Create New Allocation Journal - Ceres will create a new allocation journal line entry in the Allocation Journal Template and Batch as specified in the Residual Alloc. Jnl. Template and the Residual Alloc. Jnl. Batch fields specified on the General FastTab of the Inventory Setup Page.
Create New Allocated Order - Ceres will create a new allocated order with a single line for the remaining quantity.
Create New Allocated Order and Send to Web - Ceres will create a new allocated order, same as above, but will also automatically send this order back up to the web.
For the Create New Allocated Order and Create New Allocated Order and Send to Web options, Ceres will create only one agency order which will contain all web order lines (per web Order) for which the quantity was reduced.
Residual Alloc. Jnl. Template and Residual Alloc. Jnl. Batch: These two fields determine which Template and Batch will be used when an allocation journal line needs to be updated but is missing or a new allocation journal is specified for the remaining amounts.
Allocation Nos: The Allocation Nos. series are used for creating a unique number as a link between an allocation order and the allocation journal line for update purposes. This setup value is on the Numbering FastTab of Inventory Setup.
When allocation journal lines are completely allocated, they can be removed from the journal by deleting the lines.
Appointment Consumption Setup
When allocated orders are created for agencies with standing appointments, Ceres can be configured to use those appointments for the created allocated order. There are two parameters on the General FastTab of the Agency & Receivable Setup Page called Appointment Consumption Method and Confirm App. Consumption. Based on the setting of these parameters Ceres may use standing appointments for the allocated the order.
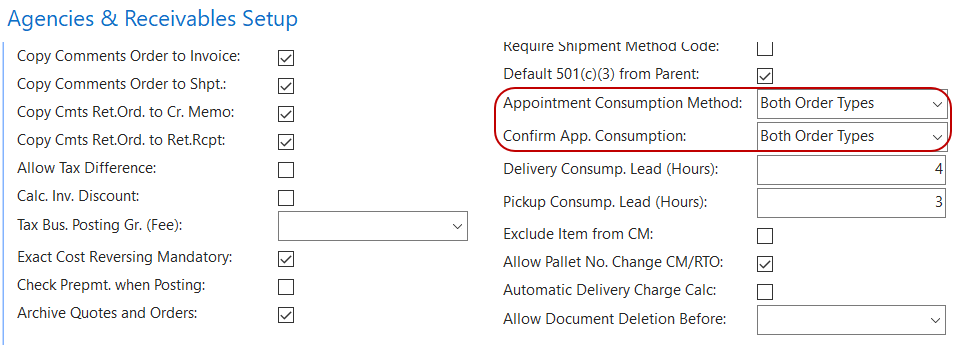
Appointment Consumption Method: Select one of the options.
Blank - This setting will not consume any appointments for created allocation orders.
Manual Orders Only - This setting will not consume any appointments for created allocation orders. It only affects manually created agency orders.
Allocation Orders Only - This setting will direct the system to search for a standing appointment and/or appointment time. If a viable appointment is found (as described below), the system will attempt to use that appointment based on the logic described below.
Both Order Types - This setting will direct the system to search for a standing appointment and/or appointment time. If a viable appointment is found (as described below), the system will attempt to use that appointment based on the logic described below.
If a standing appointment exists for the combination of agency, shipment template (based on shipment method), and shipment date, then the appointment time on the standing appointment will be selected for the order. If no appointment time exists for that shipment date, but there is a shipment date in the future available, the shipment date and appointment time from the standing appointment will be used.
If no standing appointment can be found or used, the system will then try to find an appointment line to use. Ceres uses the Preferred Delivery Time and Preferred Pickup Time field on the Shipping FastTab of the Agency Card to determine the agencies preferred time. Using the appropriate time based on shipment method of the order. Ceres will search for an appointment line for the order’s shipment template, shipment date, and preferred time (based on shipment method). If an appointment is found then that appointment time will be used. If no appointment line can be used for the shipment date, Ceres will look for the next available date at the agency’s preferred tome.
Confirm App. Consumption: Select one of the options
Blank - This setting will not prompt the user when an appointment will be consumed for the created allocation orders.
Manual Orders Only - This setting will not prompt the user when an appointment will be consumed for the created allocation orders.
Allocation Orders Only - This setting will prompt the user to confirm the usage of an appointment line before it is used. If the user does not confirm the appointment, then Ceres will not consume the appointment time and use it.
Both Order Types - This setting will prompt the user to confirm the usage of an appointment line before it is used for both manual orders and allocated orders. If the user does not confirm the appointment, Ceres will not consume the appointment time and use it.
Voxware
Voxware is used by some food banks to facilitate the order fulfillment process. If you are using Voxware, it is important to decide whether or not, orders created via the allocation process are to be sent to Voxware for picking.
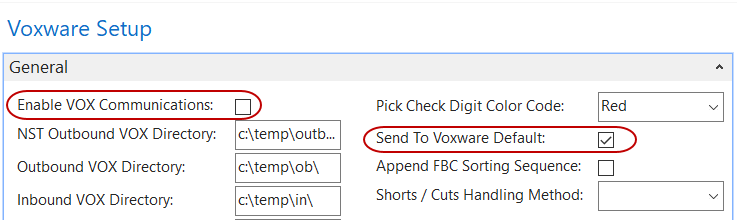
When using both Suggest Allocations and Import from Excel automated functions to create allocation journal lines, the Send to VOX field on the allocation line is set by default based on two parameters. These parameters are on the Vox Setup Page shown below.
The two parameters are Enable VOX Communications and Send To Voxware Default. If both of these parameters are checked as shown below, then by default, the Suggest Allocations and Import from Excel functions will both set the Send to Vox field to Yes (checked). If either of these parameters or both are unchecked, then by default the Send to Vox field is set to No. It should be noted that even if the Send to Vox field is set to Yes and Vox is not installed at your food bank, then the field is simply ignored.
-
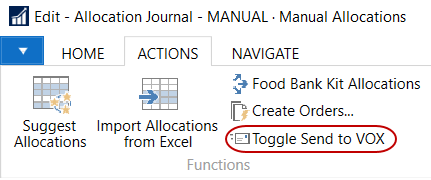
Once the allocation lines have been created on the Allocation Journal, there is a function that allows you to toggle the Send to Vox field on all the allocation journal lines on and off.
-
To toggle the Send to VOX field, select Actions ▸ Functions ▸ Toggle Send to VOX. This will change the Send to VOX field to the opposite value, either On to Off or vice versa.
Allocated Orders and Agency Express
There are different processes the need to be performed and steps when handling orders on Agency Express which are outlined below.
Sending Allocated Orders to Agency Express
If your food bank has decided to allocate orders to agencies via the web, by checking Allow Allocation Orders Online on the Web Order FastTab of the Agencies & Receivables Setup, you can push orders to agencies regardless of whether that product is normally available to them via Agency Express.
All item information is transmitted to the web so that even items that are not permitted for web ordering will still display related information on Agency Express if included on an allocated order. As previously mentioned, if you are using batches, but do not have a customization to place allocated orders into a specific batch, then the allocated orders will be found in the blank batch.
-
If you are not using batches, simply locate your orders via Agencies & Receivables ▸ Order Processing ▸ Agency Orders.
-
It is also possible to create the order and then Get Allocations from the Agency Order Lines FastTab via Line ▸ Get Allocations. If allocated orders are created this way, you may want to create them in the WEB batch in order to keep them with other web orders.

-
It is also possible to mark an existing order as an Allocated Order, by placing a checkmark in the Allocated Order field on the Delivery/Web FastTab. This field will automatically update from the Get Allocations or the Create Allocated Order functions.
-
The orders can be pushed to the web, one at a time, by going to Actions ▸ Functions ▸ Send ▸ Send Allocated Order to Web. They can also be sent in a batch via the Send Allocated Orders to Web job in Periodic Activities.

-
The user will be prompted for confirmation: Select Yes to send the order.

-
The user will receive a confirmation that the Order has been set to be transmitted (this does not indicate success of the actual file transmission).

-
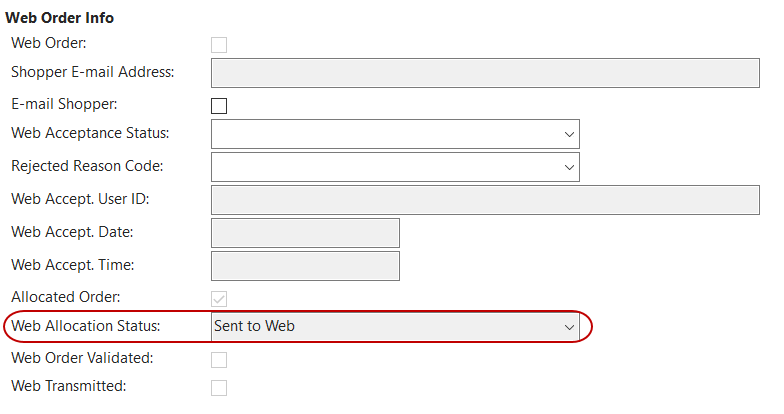
The Web Allocation Status for this order will change to Sent to Web on the Delivery/Web FastTab of the agency order.
-
Once the order has been Transmitted, the Web Transmitted field will be updated.

Processing Allocated Orders on Agency Express
-
Once an Allocated Order has been transmitted to the web, the shopper must do something with the order. The options are.
-
Accept the allocated order in full
-
Accept a portion of the allocated order
-
Reject the entire allocated order
-
-
On Agency Express, the Shopper will see an order that has an Agency Order number instead of a PO number and the status will be ALLOCATED:

-
To edit the order, click the Pencil icon. The user will receive the following message,
-
At this point, the Shopper can,
-
Submit the order (as it is) by clicking the Submit Cart

-
Reduce the quantity on any/all lines and click the Submit Cart button.
noteA pickup/delivery date and time must be selected (if using backward compatibility, it must be filled in) before submitting the order.
-
-
The shopper will receive the following window to decide if they wish to submit or not.

-
Select OK to submit the order. If cancel is selected, the shopper will be returned to the order to make any adjustments, and reject or submit again.
-
If submitted, the shopper should receive the following confirmation.

-
The order should change status from Allocated Order to New Order and the editing

-
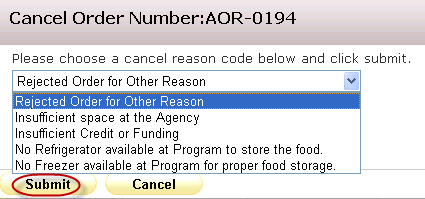
To reject the order, instead of clicking the Pencil Icon, the shopper should click the

-
Click Cancel to return to the Order Management Window without rejecting the order.
noteThe rejected reason codes above must match those that exist in Ceres exactly for the order to process in Ceres.
-
If the order is submitted as Rejected, the status will now show as Cancelled in Order Management.

Processing Submitted or Rejected/Cancelled Allocated Orders
-
Once the allocated order has been submitted by the shopper, it should be handled like any other web order.
-
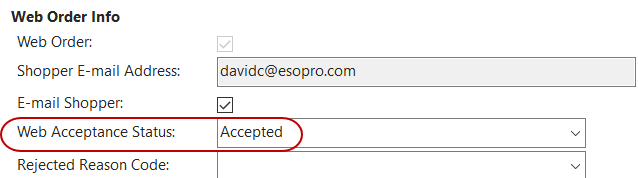
If the order has met the validation/auto-accept criteria, then it will be marked as Accepted. Note that the order is now marked as a web order as well.
-
The shopper will now see the status changed to Released once the acceptance status has been transmitted to the web.

-
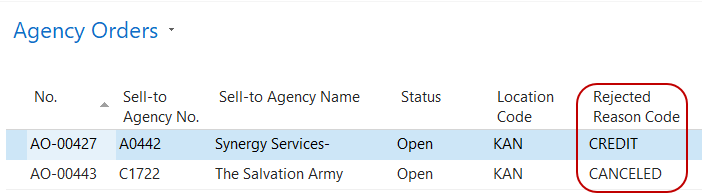
If the order has been rejected, it will display the Rejected Reason Code when viewed from the Agency Orders List:
-
Until the order has been changed to Food Bank order processing status, the shopper will still be able to reduce the allocated order quantity or reject the order entirely.
Running the Update Web Allocation Batch Routine
-
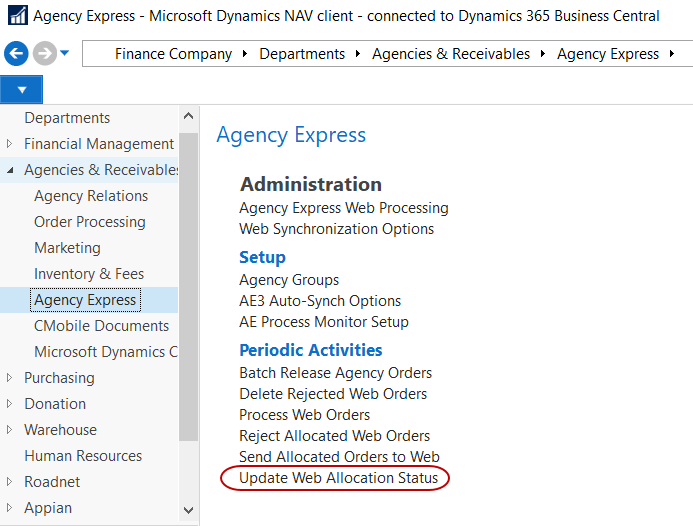
The Update Web Allocation Status Report (batch data update routine) can be accessed from Departments ▸ Agencies & Receivables ▸ Agency Express ▸ Periodic Activities ▸ Update Web Allocation Status.
-
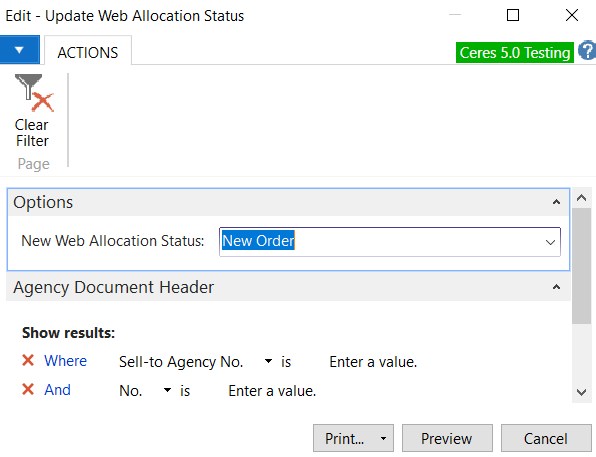
The Update Web Allocation Status Request Page will display where users can set filter criteria based on how they want to run the report. A description of the fields follows.
 note
noteThe Update Web Allocation Status process will filter agency orders for those marked as an Allocated Order and Web Transmitted. If moving an agency order to the Web Allocation Status of Accepted by Shopper, the process will mark the allocated order as a web order so that the Validate Web Order and Process functions will be applicable. Make sure to review and update your filters each time before running this batch update.
New Web Allocation Status: Select the Web Allocation Status you would like set on the selected allocated web orders. The options you can select from are the same options that are available on the Allocated Web Order Status Drop down list are Blank, New Order, Sent to Web, Accepted by Shopper.
Show Results Section: The batch update (report) is based on the agency order fields so any standard filtering field may be selected to refine the agency orders that you would like to include in the update, such as Agency Order No. (No.), Sell-To Agency No., or other filters as needed.
Limit Totals To Section: This option is not applicable as no numeric totaling is conducted.
Printing or Previewing the Batch Update Report
The batch update is completed using a Ceres Report for processing. The orders that will have their Allocation Status changed by the batch update can be printed or previewed for review. The results of the report display after the status is changed.
-
The report can be printed or previewed and saved by clicking the Print or Preview button. This will provide an historical record of the allocated orders that were updated in case any of the updates need to be reverted.
-
The Updated column in the report indicates whether or not the Web Allocation Status for the Allocated Order was successfully changed. The Updated column will normally report Yes except in the case where the New Web Allocation Status selected on the Request Page matches the Old (current) Web Allocation Status and no update was made.
