MealConnect Integration User Guide and Error Handling
The purpose of this document is to outline how to use the MealConnect integration with Ceres 4 to run routine processes and how to deal with errors that arise. This document covers the functionality release from August 2015.
Purpose
The MealConnect portal (MC) is designed to allow the recording of facilitated pickup from Donors by Agency/ Program volunteers or staff. CERES has been updated to allow the food bank to pull the details entered in MC and create/ post both the donation order and the agency order in CERES. In order to use this capability, your food bank will require:
-
Specific Ceres functionality (both Objects and Executables)
-
An MC account and master data setup in MC for the donors, agencies/ programs and product categories/ items
-
One time and master data setup in Ceres to accept information from the MC portal
Please note that the communication path is only one way – from MC to Ceres. All matching information, like Agency/ Program information, must be manually entered into MC, even if it exists in Ceres.
This document covers the daily CERES import and order processing, along with common error handling considerations. Separate documentation was created for the initial setup and master data setup and should be referred to whenever system structure changes are needed.
The intended audience for this document is the Ceres users that work with the incoming transactions, and Ceres users who handle errors resulting from MC integrated data.
This procedure applies to Ceres version 5.x.
If you are interested in more information regarding this capability, please contact Sam Harris, Coordinator of Product Sourcing Innovation at saharris@feedingamerica.org.
Overview
MealConnect is used to enter and record Agency pick up of goods from a Donor. A communication setup has been developed to allow CERES to pull the details entered in MC and record both the donation order and the agency order in CERES. Setup in MC is required for the donors, agencies and items that will be impacted by this workflow. The food bank must also map or link them to the related CERES donor, agency and item. In addition, on the donor, the link to the FBC Product Source is also required. The transaction import can be setup and automated via the Ceres Job Queue function, and it can also be manually processed as needed or if preferred. The Job Queue option may require a new NAV/ Ceres license component.
A Unique MC ID is used to link the donation and agency order “pair” within CERES. The donation order is created and posted, then the agency order is created and posted. If during the creation or posting errors are encountered, a holding table for the error entries is created in CERES for user reviews. A knowledgeable user should be assigned to check the error log and correct any issues each day the import runs. The entire batch of errors can be reprocessed, or each transaction can be reviewed, corrected and reprocessed individually. A Global log is also provided for global errors such as communication issues between MC and CERES as well as status update messages.
There are separate documents related to the initial implementation and installation of the functionality:
Implementation Guide for the Ceres VAR or Service Desk
A One Time Setup guide for CERES areas to be reviewed and setup
An MealConnect Initial Set up and Admin Use Guide
This document is a user guide and error handling guide. It provides information on getting and processing transactions in Ceres. For any questions or references to the initial setups, please refer to the other documents here and as provided in the Related Documents list at the end of this Procedure.
CERES and MC Communications Process Flow
Before looking into the actual use, a high level of the process flow is documented here. In the CERES Setup Guide, the Job Queue is typically used to setup automatic transaction downloads and is recommended to be scheduled nightly or at least once a week. With this setup, CERES will pull the orders from MC, process, and send back a confirmation to MC once the orders are successfully processed in CERES. Any orders where Ceres cannot process both the donation and agency orders will be captured in CERES in the MealConnect Orders list page. This document covers the handling of those errors and the reviews in more details in the below sections.
The overall flow is that
-
The MC records are pulled by CERES to attempt processing as defined in the job queue setup (see Setup guide for more information)
-
Alternately – the User triggers a manual download of transactions from the MealConnect Orders List Page. See next page for more instructions.
-
The communication is closed and CERES then attempts to process the records
-
If both the donation and agency order are successfully posted, they are marked to be sent back to MC as confirmed
-
If either the donation order or the agency order fails to create and or post due to any errors, these are stored in the CERES MealConnect Orders list with the related error
-
-
Once all records have attempted to be processed, CERES sends back to MC to confirm the list that posted
-
Only the records that successfully post both the donation and agency order are sent back to MC as completed
-
This means that in MC, any records not yet sent, as well as any records sent but that have errors, are NOT updated in MC as processed or confirmed.
-
If any errors are present on the orders when Ceres attempts to process them, there will be an email notification sent to a selected group for each error that exists. After the error emails come through, the user will need to go to the MealConnect Order List and make the corrections to then reprocess the orders.
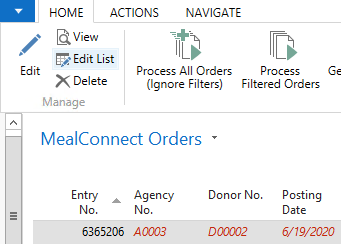
The MealConnect Orders List is the central “dashboard” for error review, correction and re-processing.
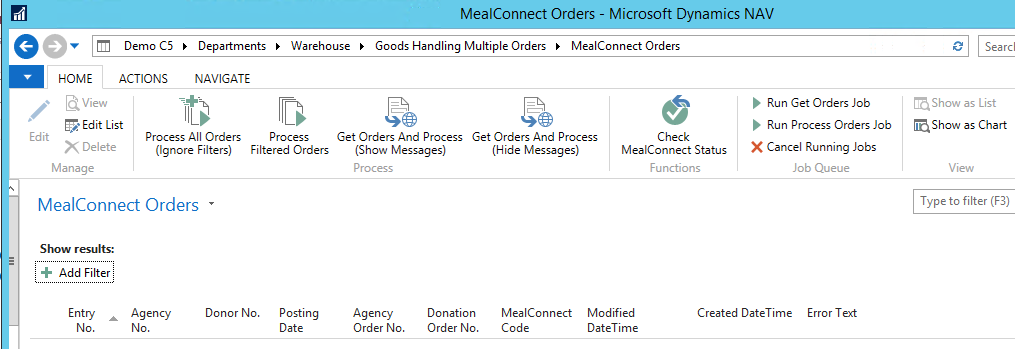
MealConnect Orders
Before beginning to look at the error handling process, below is an overview of the page, the functions, and navigation to view the details of the orders. Access to this is from Departments/Warehouse/Goods Handling Multiple Orders/under Lists, MealConnect Orders
Review of order list, errors and details
All of the MCID’s that cannot be created or posted in CERES due to errors, or if orders are processed in CERES but are unable to be confirmed back to MC for some reason are shown in this list. This is in effect the error handling log so to speak. Any orders that were processed and confirmed back to MC are not shown, they are in the posted transactions. The list shows the entry number, related agency, donor, posting date, and error message. The list is similar to the other “order lists” where there are two parts to the order, a “header” and the “lines”.
The “header” contains the overall information related to each of the MC ID’s.
-
The header in the MC Order List can be deleted by the users, which will also delete the related lines for the items linked to the transaction
-
As the details were deleted in CERES for processing the record, MC is NOT updated that the transaction is processed
-
Therefore, the next time records are received from MC, the transaction will attempt to be created again
-
If the transactions can still not be created or posted, the error message will be captured again.
-
Notes
-
The individual lines linked to the MCID cannot be deleted
-
If the donation order is created or posted the record cannot be deleted or modified in order to keep the agency and donation orders in balance.
-
-
-
It consists of the fields
-
Entry # - CERES entry # for a unique identifier, corresponds to the MCID
-
Agency # (editable)
-
Donor # (editable)
-
Posting date (*editable)
-
Agency order # - for reference to the linked open or posted agency order
-
Donation order # - for reference to the linked open or posted donation order
-
MC code - this is the MC transaction ID including the leading characters for the food bank account.
-
Modified date/time
- System populated as the data/time of the last attempted process of the record
-
Created date/time
- system populated as the date/time of the initial creation of the line in the holding table
-
Error Text
-
Fields that are noted as edited can be edited here on the list if the error is at the header level, click on actions, edit list
The fields are editable for updates as needed, and or mapping issues from MC to CERES.
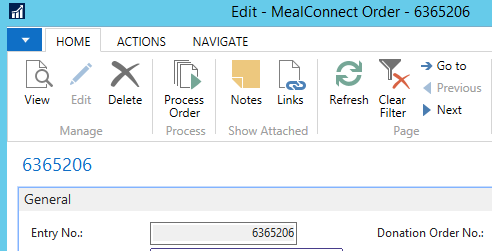
To view the details for the items and quantities, on the “line” details,
Right click, and select view to view, or edit to go into edit mode to make changes
Or click on Home and view or edit

The details of the order will be shown
This will show each line level detail of the item and quantity that were ordered.

The header fields noted above are shown, and editable here as well. The item no. is also editable on this view in case of item mapping issues from MC to CERES.
On the main list view of the MCID’s with errors, filtering can be set like on other list pages in CERES. The next section discusses the overview and reprocessing options. A later section will review detailed examples of errors and how to update and reprocess the transactions.
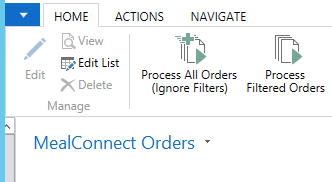
Process Options Overview

In the “Process” Box of the page are several options for reprocessing orders. All of these options will run on the user’s computer screen, using the userid and user setup of the user selecting to process these areas. This means it will tie up the users screen while processing transactions. They may be beneficial when handling small amounts of errors, or for viewing the prompts and or messages related to the individual order errors. This section is not using the NAS or the job queue to process. The Job Queue section, covered below, will use the NAS to process the errors or to communicate with MC to get new orders as well as process the orders.
Note: Regardless of whether the process is done on the user computer or via the NAS, starting the process orders will go through the order creation and posting, and will lock the tables the same as the normal posting of orders does. For this reason, consideration should be given as to the best time to process large quantities of orders with errors vs the processing of a few errors, or each individually.
-
Process all orders (ignore filters)
-
Attempts to reprocess on the screen whatever is in the list, it does not communicate with MC for any new orders
-
If there were any filters set on the page, it ignores the filters and tries to process all the lines in the table
-
-
Process filtered orders
-
Attempts to reprocess on the screen whatever is in the list, it does not communicate with MC for any new orders
-
If there were any filters on the page, it uses those filters and tries to process just those records
-
-
Get Orders and Process (show messages)
-
This will communicate with MC to get any records from MC that are not yet updated or posted in CERES
-
It will show each error message on the screen to the users
-
This option is not running the job in the background, it will use the computer user session to communicate with MC and attempt to process the records.
-
See details below, this process can be stopped if needed by answering “no” to continue
-
-
Get Orders and Process (hide messages)
-
This will communicate with MC to get any records from MC that are not yet updated or posted in CERES
-
It will not show each error message on the screen to the users, but will attempt to post and update the lines in the list view with any that contain errors
-
This option is not running the job in the background, it will use the computer user session to communicate with MC and attempt to process the records.
-
Process All Orders (Ignore Filters)
When this option is selected, an attempt is made to reprocess the existing error list regardless of any user entered filters for viewing the list of orders. Any orders that are able to be processed are posted and communicated back to MC. Any errors that are encountered will be displayed on the user screen for a response.
If it is an error that stops that one order from being able to process, the user is asked at the end of the message “Continue processing?” yes will continue on the list to the next order to try to process, no will stop to allow the user to investigate.
As an example, the first order below had an issue with qualifiers,

Select yes to continue processing will go to the next order, select no and the process will stop.
Process Filtered Orders
The only difference in this option from the first one is that if the user entered filters on the page, only the list of filtered order are set to try to post. This can be beneficial if for example one Donor or Agency had an issue that is now updated, filters can be made for that donor/agency and then attempt to reprocess just the orders that are now updated.
If any new errors are encountered, those will be displayed to the user as noted above with the same option to continue to process yes or no.
Get Orders and Process (Show Messages)
This will communicate with MC using the users session. As errors are encountered, the user will be prompted with each error detail. The user can respond to the messages and decide whether to continue or stop the processing.
If it is a user question for yes/no, the message will display for the user to answer.
For example, if the activity status is not active, the user can answer yes/no to continue processing the order if their user setup allows for the override.

If it is an actual error, as is the example where the activity status does not allow the order to post, then the user can respond to the continue processing yes or no.

If yes is answered,
-
it will continue communicating with MC for the next record, it will not post the record with the error but will leave it in the order list
-
for the next record it finds to process, if the donation and agency order can post, the orders will be created and posted,
-
records will continue to process until the next error is encountered, and the new message will be displayed
If no is answered,
-
the communication will stop and no new records will attempt to process
-
any errors encountered will be kept in the list for user reviews
Once the process is stopped, or once all records are processed from MC into CERES, the list will contain only the orders that had errors, as shown below.

Note related to max # of records.
In the CERES Setup Guide, the MealConnect Setup allows for a “max # of records” to be setup. Note that if there are more records pending in MealConnect than the max # of records, the CERES system will continue to try to communicate with MealConnect until either all records are processed or are in the error log. There is a potential that by running this option the same orders that are stored in the error log may continue to be prompted to the user on the screen. For this reason, it should be noted that the “continue” option can be selected as “no” in order to stop the process.
For our example, let’s say that the max records are set to 10 and there are 20 orders pending in MealConnect.
If only one order error is updated to be fixed, then the process will be that
-
CERES gets the first 10 records from MC to process
-
1 processes
-
9 give errors
-
-
CERES sees that there are still 19 total orders pending, so it pulls the first 10 records
-
9 are from the original list above that will give errors
-
1 will be new – it may process or it may receive an error
-
If it does not process, the user will see 10 errors (9 repeated and 1 new) and the process will stop since the max is 10 and there are 10 errors
-
If it processes, CERES will see 18 records pending and get the next 10 again and continue
-
-
-
If the new record above processed, as noted, CERES will see 18 records pending and grab the first 10
- This will continue until it either errors at 10 or until all 18 are attempted to be processed
For this reason, the “continue” option of “no” was added so that the user can stop the process to address the posting issues and not continue to see the repeated errors at each attempt
-
This repeat of the same errors trying to reprocess can also be avoided if the max # records is updated to a higher number.
- For example, if the max # of records was 20 or higher it would pull all records at the same time and only loop through each order error once to the user.
Get Orders and Process (Hide Messages)
This will communicate with MC using the users session. As errors are encountered, the user will NOT be prompted with each error detail. Each record will continue to process or be recorded in the list along with any errors for the user to review. Once the process is stopped, or once all records are processed, the list will contain only the orders that had errors, as shown above.
Functions Overview
The Functions area has two options, Global Log and Check MC Status
Check MC Status
The check MC Status is a way to manually check to see if the communication between MC and Ceres is working. In addition to showing the confirmation of the communication, it will also show how many records are pending in MC to be sent to Ceres.

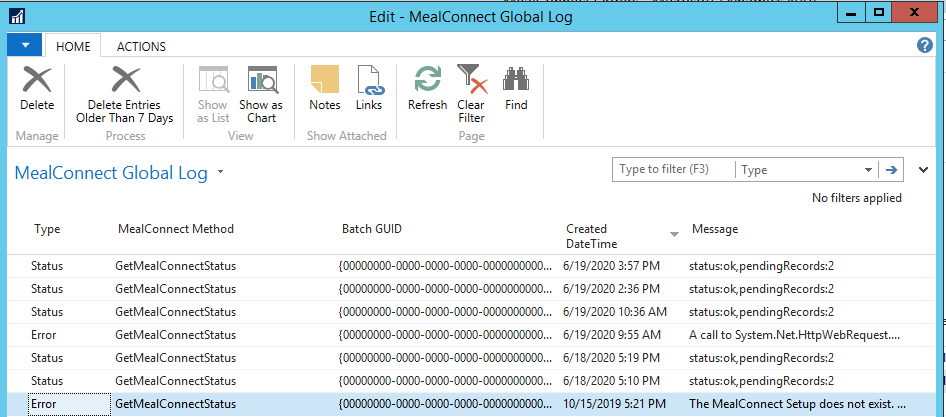
Global Log
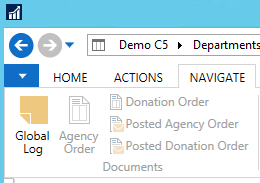
The Global Log is just a log of all of the communications with MC for the Status checks as well as any errors that were encountered during the attempted job queue runs.
There is an option to delete entries older than 7 days that can be used to keep the log updated to only view the last week. This can be used to clear the old log entries from the list. The logic used is based on both the date and time and will delete entries that are older than 7 days from the current date / time. There may also be time zone issues depending on the server and time stamps if the servers are in a different time zone.
Job Queue Overview

In the “Job Queue” box of the page, as noted in the above section for manually running the process, these options communicate with the job that is being run by the NAS. These options are accessible on this page, but do not use the user’s computer screen and session to process. It is required to have the job queue entry setup for the first two options to work. The setup of the job queue entries is covered in detail in the CERES Setup Guide and should already be created at this point.
Run Get Orders Job
It is recommended that the process to get orders from MC and process be setup to run either nightly or at least once a week. This is the beginning process that will find the unprocessed orders in MC, send to CERES, attempt to post, record any errors for reviews in CERES, and update back to MC the orders that successfully posted. However, access to run the get orders job is accessible here on the MealConnect Orders list in case there is a need to run this process manually.
-
This will communicate with MC via the job queue and using the NAS instead of the user screen like the options in the process box does
-
This is how the users can run the job “now” if they need to either run it now as a one-time process, or if they have chosen not to setup an automated recurring job to run automatically
-
No errors messages are displayed on the user screen as the NAS will handle the communications and will populate the MealConnect Orders List with any errors or exceptions.
Run Process Orders Job
The run process orders job will probably not be setup to run automatically as there are user reviews and updates of the errors needed prior to reprocessing the orders with errors.
-
This option will only attempt to process the list of orders in CERES that have error messages
-
This is similar to the above Process all orders (ignore filters), except it will run in the background via the NAS and not use the login session of the user’s computer screen.
-
This option will not attempt to communicate with MC to get any new transactions
-
No errors messages are displayed on the user screen as the NAS will handle the communications and will populate the MealConnect Orders List with any errors or exceptions.
Cancel running jobs
-
This allows a way to stop the communication with MC or the process of the errors if there is a need
-
For example,
-
if a communication is started it in the middle of the day and is locking up the system, or if it was not intended to start the full communications process
-
or if one morning the job setup to run at night is still in process and it needs to be stopped
-
-
The function has built in logic to continue processing whatever MCID order set is in process, and then before starting the next MCID it will stop
-
MC will get the handshake back of the orders successfully processed,
-
So the next time the job starts, it will only need to send the records that were not yet processed from the last time
-
-
Note that if the process was running all night and had to be stopped the next day, the use of Get MC Status may be beneficial to check how many records are left in MC for processing.
Error Handling
Notes
CERES version
Standard NAV, even without CERES, has a function to allow for warnings and prompts that the users see to be suppressed or hidden to allow for import and auto creation of orders. This is to allow orders to be created without requiring a user to say yes/no, etc to the various prompts on the screen.
CERES made modifications to allow for some of the warnings and prompts to be ignored as part of the grocery rescue import process. This section on error handling is based on CERES 5.
Related to the errors captured in the order list, please note that only the first error or warning that stops the process is displayed. Once that error is handled or addressed, if no other errors are encountered, the orders will be processed, and the order will be removed from the list. If there are additional errors or warnings captured, the error text will be updated for the new error for further user reviews as needed.
Examples of errors that may be encountered include but are not limited to the below.
Donation Order
As part of the MC logic and process, food drives are not supported. All orders are treated as not related to a food drive, regardless of if the donor is linked to food drives or not. Therefore, no errors will be captured in MC related to food drives. The MC orders will not be marked as being linked to a food drive.
One other area added into the logic is that, even if a donor is marked as blue receipts, the donation orders that are processed from MC are not to be check marked as blue receipts in order to not duplicate reporting.
Also, in order to not receive any errors about the UNC Notice No. required, all orders created from MC will populate the UNC Notice No. as the Donation order # to allow for the donation orders to be created via the MC communication automatically.
Appointments for Agency Orders
As the appointments for Agency Orders are based on location and shipment method combination, and the recommendation is to setup a separate location and shipment method for MC orders, there is no expected errors or handling for appointments. If for any reason you encounter an error related to appointments, refer to the setup guide and review the customer shipment method and the MC location to ensure separate codes are setup that do not have appointment templates or schedule lines.
User setup
The userid that the system uses when processing transactions depends on how the process is run.
-
Process section
-
The user that is logged on is used as the user for order creation and posting
-
All security and user settings in the user setup are used for these processes
-
-
Job queue section
-
The userid that the system uses is based on the NAV executable version but is related to the job setup and NAS user. (See CERES Setup Guide for more details)
-
All security and user settings in the user setup are used for these processes when the job areas are used.
-
The main area to note here is that if the error messages are related to posting dates or to prompts and override user permission, you need to know what user was trying or will be trying to run the updates in order to update the correct user. This is also covered in more details in the error handling section below.
Error Email example
The CERES Setup guide covers the email setups. If setup is to send emails for the errors, below is a screenshot of what the email will look like


Reprocessing Records / Errors
The below section will review specific errors in detail that may be captured in the lists, and information on what needs to be updated in order to allow the entries to be processed. Once the error has been addressed, there are several options for how to reprocess the transactions.
-
From the one transaction record,
-
From the list, you can open to view the one transaction details
- Right click, and select edit
-

- Or click on Home and edit
-
The details of the order will be shown for updates as needed at the line level
-
At the top of the screen is a “process order button” that can be used to process the one order
- Via the various options on the MC Orders list page,

-
To only process errors, not to get new orders from MC,
-
Process all orders (ignore filters)
-
Process filtered orders – as long as this order is in the filtered list
-
Run Process Orders job
-
-
To process errors and get any new orders from MC,
-
Get Orders and Process (Show Messages)
-
Get Orders and Process (Hide Messages)
-
Run Get Orders Job
-
Captured Errors Handling Examples
Invalid URL

As the MC Setup contains user entered URL information, there is the potential that the users makes a typo. Various errors may be received that start with a note related to “A call to System.Net.HttpWebRequest….” , may appear. Refer to the MC Implementation manual and confirm the correct URL information exists I the MC setup screen.
Posting Date Invalid
If you receive an error about the allowed posting date, you have two options for processing
Remember, the allowed posting date is linked to the userid the system is using for process, see note above. 
-
Change the posting date on the line in the order list to a date that is allowed for posting
-
Change the userid setup to allow the posting date if the order needs to post to the date listed on the line
- Remember however if you are overriding to allow posting dates on a user, the option for how you are processing, from the one user screen and process, vs the use of the job different users may need to be adjusted for allowed posting date ranges.
Once this is updated, the order can be processed now via any of the options as noted in the above “Reprocessing Records / Errors” section. If this is the only error that was encountered, the orders will be processed and removed from the list. If other errors are encountered, the line in the list will be updated with the new error message.
Note about reporting dates:
As part of the communication process, the receipt date from the MC website is used to populate the posting date in CERES on the order. This is to allow for matching of the dates in both systems and for reporting. However, as receipts may be entered later after a month is closed, there is the potential that the MC date falls into a period that cannot be posted to in CERES. For this situation, the logic is that the posting date will be changed per the food bank requirements, however the “order date” in CERES will remain as the MC receipt date. This will then allow for CERES to capture the orders MC Receipt date and CERES posting date.
Blocked donor/item/agency
For these scenarios, the donor, item or agency must be un-blocked in CERES to able to proceed.
Once this is updated, the order can be processed now via any of the options as noted in the above “Reprocessing Records / Errors” section. If this is the only error that was encountered, the orders will be processed and removed from the list. If other errors are encountered, the line in the list will be updated with the new error message.
Missing FBC Product Source Code
For CERES 5 this value populates to the donation orders from the donor setup, not from MC. This is so that you do not have to setup the FBC Product source twice (in MC and in CERES). If an FBC Product Source is not entered on the Donor this must be updated in CERES for the MC orders to be processed.

Go to the Donor, select the correct FBC product source from the list.
Once this is updated, the order can be processed now via any of the options as noted in the above “Reprocessing Records / Errors” section. If this is the only error that was encountered, the orders will be processed and removed from the list. If other errors are encountered, the line in the list will be updated with the new error message.
Donor (Vendor) Cannot Be Found
CERES 5 has added logic to the Donor to mark “food drive donor”. If this field is check marked, then donation orders cannot be created for the donor, only food drive orders. If the donor is setup on the MC website linked to a donor that is a food drive donor, the system cannot create a donation order. The error will say that the vendor cannot be found.

In order to process the order, you have two options
-
Uncheck the “Food Drive Donor” field on the Donor card
-
Select a different Donor for the transaction
The decision on which to do is an internal food bank decision based on if the donor is really to be only linked to food drive orders or if the mapping was setup incorrectly on the website. If the decision is to change to use a different donor, don’t forget to log into the MC website to update the mapping for future orders.
Once this is updated, the order can be processed now via any of the options as noted in the above “Reprocessing Records / Errors” section. If this is the only error that was encountered, the orders will be processed and removed from the list. If other errors are encountered, the line in the list will be updated with the new error message.
Inventory Posting Setup
The setups are documented in more detail in the CERES Setup Guide. If you receive an error about missing inventory posting groups, the items have a cost and the setup for the combination of the MC location code and the items inventory posting group is missing.

The item, cost and inventory posting setup should be reviewed to determine the correct action to take for processing:
-
Add setup for the items inventory posting group and the MC location code to the inventory setup
-
Change item cost to zero on the item card
-
Selection of different item
-
Update the one order to use a different item to process
-
Update to MC website if mapping to be updated to use a different item
-
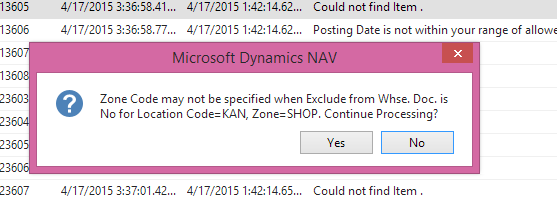
Zone Code
If you receive an error related to the zone may not be specified when exclude from whse doc is no, this is a data and setup issue. This error can be displayed for two different reasons:
-
The MC zone is not setup properly as “exclude from whse doc”
-
The Agency has a zone setup as their default on the agency card that is not setup as “exclude from whse doc”
When the orders are created from the MC communications, the agency and default values are populated. Therefore, if the agency has a setup that is not valid, this error could be related to the agency card setup. After the initial order creation, the MC orders are updated to use the zone/bin from the MC setup area. Therefore, the error could be related to the MC zone.
For this scenario, there are two ways to address this issue and should be discussed to determine the correct update to be made:
-
Remove the Zone Code on the Agency card under the Shipping tab.
-
Update the zone code to “yes” or check mark for the exclude from whse doc.
- This could be the MC Zone, or the Zone on the agency card
Agency Activity Status
If the agency activity status does not allow posting, an error will be encountered and captured.

If the activity status does not allow posting, then either
-
On the agency the status must be updated to a value that allows posting.
-
Or the activity status must be changed to allow posting
Once this is updated, the order can be processed now via any of the options as noted in the above “Reprocessing Records / Errors” section. If this is the only error that was encountered, the orders will be processed and removed from the list. If other errors are encountered, the line in the list will be updated with the new error message.
As a note… either from the list or from the one order, even if the userid setup has allow override activity status warning, you can attempt to process the order, but it will not post as posting is not allowed for that status.
If you attempt to process on the screen and view the messages, you will receive the prompt
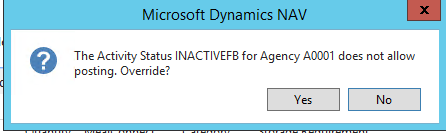
However, since that status does not allow posting, the next error encountered will be

The order line in the list is now updated with the new message

Dimensions Required
If dimensions are required as part of your CERES setup, during the attempt of posting of the donation or agency order, an error may be captured if dimensions are missing from the related order. How and when the error is captured depends on how the dimension requirements are setup, but the error text will display the dimension value that is missing.

From looking at the list, you can tell if it is the donation order or the agency order that is missing the dimensions.
-
If the error is related to the donation order,
-
There will either be a donation order shown that was created
-
Or the donation and agency orders will both be blank
-
-
If the error is related to the agency order,
-
you will see the related posted donation order listed (line 1 above)
-
the agency order may or may not have a number populated
-
The method of updating the dimensions on the order differ depending on where the dimension required is setup, and if the MC setup is to be used to add default dimensions, the account type default dimension are to be used, the individual Agency/Donor setups for dimensions are to control populating the values, or if manually selection is required at the transaction level. (See CERES Setup Guide for more details on the setup options)
How you update the dimensions will depend on the setups and process flow for population of the dimensions. In addition, how you update to populate the dimensions will depend on if the orders are created but will not post or if the orders cannot be created.
-
If the orders are created but not able to post
-
The order that was created can be opened and the dimension selected to be used for this order
-
The MC Setup can be updated to check mark to defaults the dimensions with the selected dimension values
-
Dimension list, default dimensions per type
-
Note: Updating the individual agency/donor will NOT update the order that is created, but can be updated for future orders for the donor/agency
-
-
If the orders are not created
-
Since the orders do not exist, you can setup the default dimension values in any of the areas, but there is no order that can be updated individually, one of the setup areas must be used
-
Either in the MC setup
-
Or on the agency/donor/item
-
Or the default dimension value per type
-
If MC setup is to be used to populate default dimensions
Go to the MC setup,

-
make sure there is a check mark in the “default dimensions” for the Agency and or Donation Orders
-
Make sure there is a selection filled in for the various dimensions that are required, ie Department, Project and or GL Branch
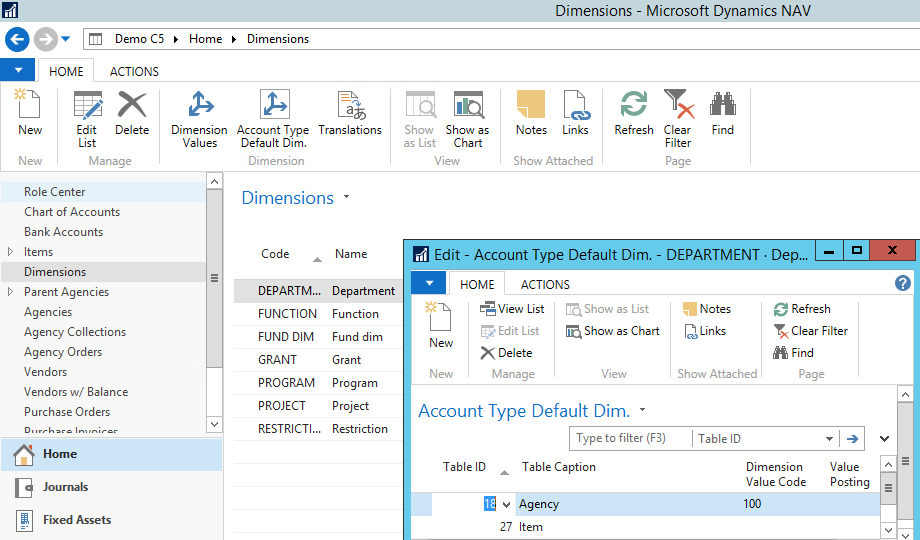
If the Default dimension value per type is to be used
-
Go to the dimensions list, click on the dimension (in our example, department)
-
Click on the “Account Type Default Dim”
-
In the list, select the type and default value
Once this is updated, the order can be processed now via any of the options as noted in the above “Reprocessing Records / Errors” section. If this is the only error that was encountered, the orders will be processed and removed from the list. If other errors are encountered, the line in the list will be updated with the new error message.
Dimension Combination

The normal CERES posting logic is used for donation and agency orders related to the dimensions. If your dimension setups included blocked dimension combinations, and an order tries to post to this combination, the standard CERES error will be encountered that the order cannot post due to the combination being blocked.
A review of the dimensions in the MC setup and if applicable on the Agency should be reviewed. The error text will show the combination that is trying to post that failed
![]()
Setup must be updated either on
-
the dimension combination to be allowed if the blocked setup is not correct
-
the MC setup if the wrong dimensions are in the MC setup for use as default values
-
the Agency/donor if the dimension is flowing from the record in NAV and a different value needs to be used.
-
The open donation or agency order if created and the error was captured during the attempt to post
Once this is updated, the order can be processed now via any of the options as noted in the above “Reprocessing Records / Errors” section. If this is the only error that was encountered, the orders will be processed and removed from the list. If other errors are encountered, the line in the list will be updated with the new error message.
Shipment Method Code

A setup was added to the Agencies & Receivables setup to allow “Shipment Method Required”. If this is setup as “yes” and there is not a default shipment method on the Agency card, the order will be captured in the error handling log. In order to allow the order to be process, a default shipment method code must be setup on the Agency.
Once this is updated, the order can be processed now via any of the options as noted in the above “Reprocessing Records / Errors” section. If this is the only error that was encountered, the orders will be processed and removed from the list. If other errors are encountered, the line in the list will be updated with the new error message.
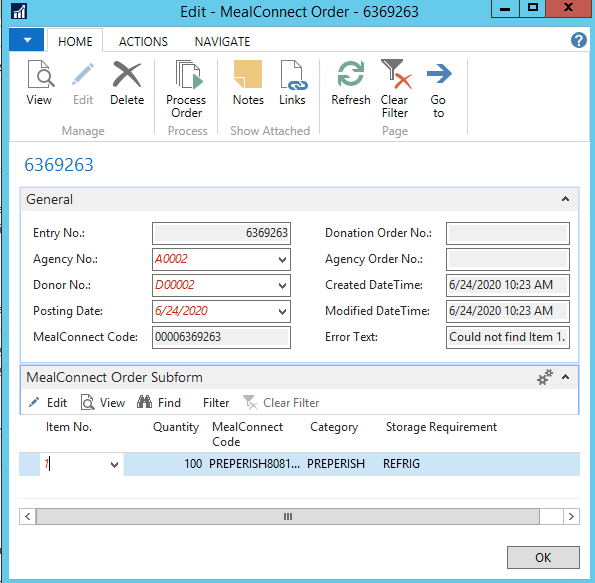
Item not mapped in MC
If items are not mapped in MC and an order comes into CERES, it will appear in the list with the below error message.
There are two different ways that can be used to update these transactions
-
update each order in CERES from the order list to select the CERES item as needed
-
Delete the lines in CERES in the MC Order List, update MC mapping on the MC website, and reprocess the get order
To add the item to be used on the CERES order, open the entry in edit mode.

Right click, and select edit

Or click on Home and edit

The details of the order will be shown, including both the MC Category and Storage Requirement to allow the user to select the correct item for reporting in CERES. Click on the line, in the Item No field and select the correct item in CERES.
Once updated, you can click on “Process Order” to try to process this one order, or you can close the one transaction, return to the list of orders and process later via any of the options as noted in the above “Reprocessing Records / Errors” section. If this is the only error that was encountered, the orders will be processed and removed from the list. If other errors are encountered, the line in the list will be updated with the new error message.
If you update the orders directly in CERES, remember to log into MC and update the item mapping so that future orders processed will come into CERES with the correct item.
To update MC mapping and resend to CERES.
You must first note the items that require mapping, the combination of the MC category and storage requirement, and then delete the lines in the MealConnect Orders list.
**if you do not delete the records in CERES in the MealConnect Orders list the new mapping details will not be updated in CERES.
Log into the MC website and update the item mapping.
In CERES, the next time the get orders is run, the new mapping from MC will be sent and the orders will be recreated.
-
If you want to run this manually, select it from the MealConnect Orders list in CERES using one of the get orders process, or via the Run Get Orders job.
-
If you have setup to have the MC communications automated at night, the updates will process during the next batch.
Qualifiers
If the Agency and Item combination are setup with Qualifiers, and the setups do not allow for the agency to receive that item, it will be captured in the list.

The only way to be able to process this is to adjust the qualifier setups.
-
Add the needed qualifier to the agency based on the item setups of qualifiers
-
Remove the incorrect qualifiers setup on the item
Once this is updated, the order can be processed now via any of the options as noted in the above “Reprocessing Records / Errors” section. If this is the only error that was encountered, the orders will be processed and removed from the list. If other errors are encountered, the line in the list will be updated with the new error message.
Updates to the MCID once partially processed
Once posting has begun on the MC record, changes to the data in the record are no longer allowed. This is to ensure that the donation order that posted for the posting date and items are not changed on the agency order to keep items and dates from getting out of balance.
Once the line in the list has the donation order posted, if a user attempts to change the header details, a message will be displayed not allowing the user to leave the record and record any changes.
![]()
If a user attempts to change the line details, a message will be displayed not allowing the user to leave the record and record any changes.
![]()
Use the F5 or refresh to discard changes
Deleting an MCID from the list
Records can be deleted from the MealConnect Order List as long as nothing is posted related to the transaction. If the donation order is created but not yet posted, the line can be deleted from the list, which will prompt the user with the messages for deletion of the order. Individual lines cannot be deleted from the MC order details however to make sure that individual lines are not delete in error. The next time the communication with MC happens, the record is resent and recreated if the error is still encountered, or if a new error is encountered.
If for example, the donation order is posted, but the agency order did not post, you can see the line has the donation order number. If a user selects to delete, the first prompt to the user is to confirm delete

If the user selects “yes” they will see an error message that they cannot delete.

This is to ensure that the user does not delete and have MC recreate entries that are already in progress. The reason for this is related to not allowing changes once posting has started.
Once the record is received from MC into CERES, changes can be made in CERES to allow for updates to the posting date or mapping issues, such as the Agency, Donor, or Item changes. Since the details of the donation order are posted, the agency order must in turn match to make sure the inventory is posted on the same day for the same items to keep the transactions in balance. So to ensure that any changes made between what MC sends and what is updated in CERES, the record cannot be deleted once posting starts in CERES.
For any lines that are not yet started in the posting process, the line can be deleted, however it will be resent from MC until it is processed in CERES and confirmed back to MC as processed.
Error 500
If an error 500 is encountered at the end of the process, this is an error that CERES cannot communicate the confirmation of the orders back to MC.
Note, that the MealConnect Orders List will continue to hold the orders in the list, with the error text of “Waiting to confirm”. The orders are processed in CERES just not confirmed back to MC yet.
Note, this confirmation back from CERES to MC is the final part of the “handshake” and is what actually updates MC that the orders are processed in CERES and thus “sent”. Until CERES confirms back to MC that the posting was successful, the orders will still show as not sent.
Job Queue Automated Processing
The details of the job queue entries setup is documented in the CERES Setup Guide, and references in the above section. The job queue entry is setup once and the set includes the frequency of how often the job will run.
The recommendation is that the get orders and process function is setup to run either nightly or at least weekly. Even if it is setup to run automatically, it can still be process manually from the MealConnect Orders List. If there is a desire to view the job status to confirm if it currently in process, or the last time it was run, there are a few ways to look up this information.
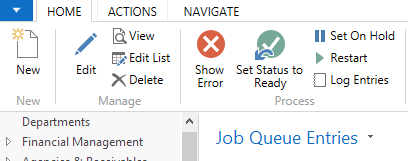
View Status
To view the status of the automated job, you can go to the job queue entries, on the list the column for status will be shown. To access the Job Queue Entries, go to Departments/Administration/Application Setup/Job Queue. Under Lists is the Job Queue Entries.

If the status is
-
ready, it is ready for the next run
-
in process, it is processing
-
Error has encountered an issue
-
On hold, it has been set to on hold
Status issues
If the job is “on hold” you can reset the status by clicking the Set Status to Ready in Process section of Home tab
If the job had an error, you may need to contact someone in IT. The error should be researched and determined as to whether the NAS and services will require a restart. See below log entries for error information.
If the job is in process, this may need further reviews if the process has been running for a while, or there is the belief that it should already be finished. See below for more details.
View Log Entries
To view the log entries for the job queue entries, go to the job queue log entries

You can view the list of entries, see the start and end date/times and any error messages encountered.
Note if the end date/time is blank then either the process was stopped and did not complete, or if it is the current process, then it is still in progress.

If the job is in process, you can review the start time to review if you believe the process is taking too long. Keep in mind that you can view the start/end times of previous log entries. This information along with knowing how many records are to be processed can help you to determine if there may be any issues with the job, or if it is just still processing.
Note, that you can go to the MealConnect Orders list and use the “cancel running jobs” to attempt to stop the job. If this is not successful, you may need to contact IT to discuss and look into restarting the services for the job. Also be sure to review the job status and reset any that are noted as on hold.
Note: There is a standard feature for “delete entries older than 7 days”. This can be used to clear the old log entries from the list. The logic used is based on both the date and time and will delete entries that are older than 7 days from the current date / time. There may also be time zone issues depending on the server and time stamps if the servers are in a different time zone.
Other Notes
Deletion of Posted Agency Invoices and Posted Donation Orders
The CERES Setup Guide contains detailed information on why this is not allowed. Security should be setup to not allow most users to delete posted agency invoices and posted donation orders. The high level reason for this is to ensure that the posted transactions remain in the history for reporting purposes. It is an internal decision at each Food Bank as to the allowing of the deletions, and how long the history should be kept.
MC Receipt Date vs CERES Posting Date
In the above error handling section, it is noted how to update and override either the allowed posting dates or the posting date on the orders in order to allow posting in CERES. Below is information related to the process flow and areas to be considered when changing the dates whether on the order in the allowed posting setups.
As part of the communication process, the receipt date from the MC website is used to populate the posting date in CERES on the order. This is to allow for matching of the dates in both systems and for reporting. However, as receipts may be entered later after a month is closed, there is the potential that the MC date falls into a period that cannot be posted to in CERES. For this situation, the logic is that the posting date will be changed per the food bank requirements, however the “order date” in CERES will remain as the MC receipt date. This will then allow for CERES to capture the orders MC Receipt date and CERES posting date.
Process Flow Suggestions
Although some areas have been referenced and noted as to the suggestions on process flows, below is the overview of the suggestions.
-
Job Queue Entry for Get Order and Process setup daily
-
This is the process that will pull the orders from MC and create/post into CERES
-
If this is not setup nightly, then at least weekly is suggested
-
This is so that orders are processed through the month in smaller batches, and it is not required to try to work through all posting/process and error handling for the entire month at month end
-
-
Error Handling
-
Daily view and update / process the MealConnect Orders List
-
Note, if the job is setup to run weekly, this will be done weekly as well
-
This is to review and adjust any errors to allow processing as needed
-
Internal discussions / decisions should be held to determine any time of day impacts to processing.
-
If a large amount of errors are encountered and need to be processed, is it OK to process in bulk during the day, or should the order be updated and wait for the next day after the nightly update to review any that are still in the error log?
-
-
Month End
-
Ensure that all errors are processed at month end
-
Once the donation order is posted, the agency order cannot be posted into a different month, this is to maintain the reporting of the inventory flow in the same month
-
Also, at the first of the next month the allowed posting dates will need to be adjusted for the users to run the process to ensure prior month and current month receipts can get processed
-
-
Review inventory quantity in the MealConnect location
- Both quantity and value should net to zero once all transactions for the month are processed
-
Related Documents
- MealConnect Implementation Guide
- MealConnect Setup Guide
- MealConnect Setup and Admin Materials
- Item Overview
- Donor Overview
- Agency Overview
- Agency Order Overview
- Donation Order Overview