Item Journal – Adjusting Quantities
Item Journals are used to conduct several types of transactions. This document describes Adjusting Item Quantities which is useful when discrepancies arise between the quantity in Ceres 5.0 and the actual quantity in the warehouse. This may also include adjustments done because of disposal of product (TRASH). See related documents for additional information on these tasks.
Ceres Object release 5.00.00 is required for the functionality described in this document.
Creating and Posting Item Journal Adjustments
-
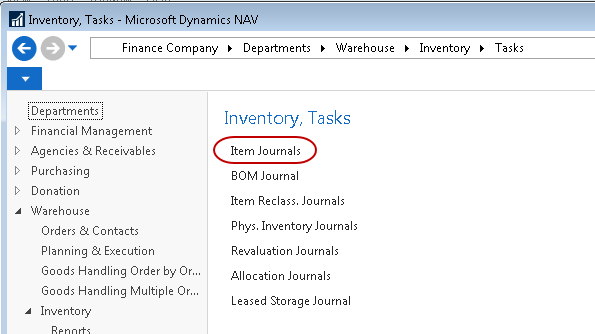
The Item Journal can be accessed from Departments ▸ Warehouse ▸ Inventory ▸ Tasks.
-
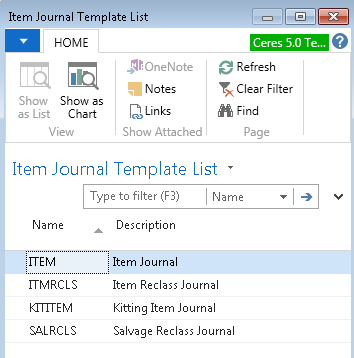
If using multiple Item Journal Templates, select your template from the Item Journal Template List and click OK:
-
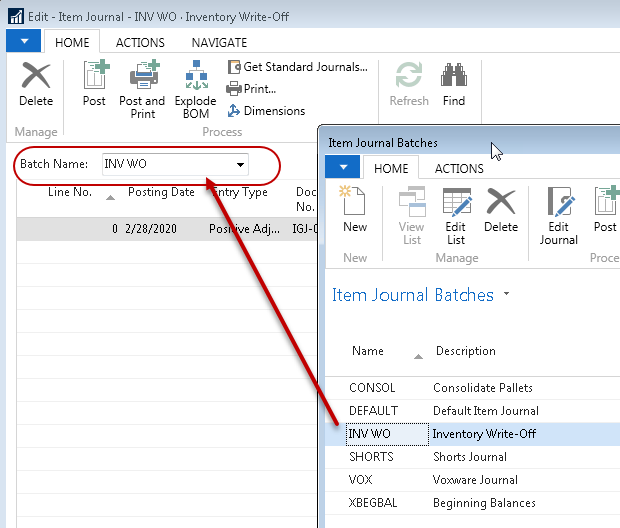
If using Item Journal Batches, select your Batch from the “Batch Name” field at the top of the Item Journal form and click OK.
 note
noteThe following columns may be in different locations on your window or may not be visible. If you wish to add any that may be missing, right click the header of the lines section and select “Choose Columns” from the context menu.
-
Fill in the “Posting Date” field with the date you wish to show the adjustments as being made.
-
Fill in the “Entry Type” field with either ‘Positive Adjustment’ or ‘Negative Adjustment’, depending on whether you wish to increase or decrease the quantity on hand.
-
If desired, enter a “Reason Code” to describe why the adjustment is being made. This field may be mandatory if Ceres has been configured to require reason codes. Regardless of whether Ceres is configured to require a reason code it is recommended that you use reason codes whenever possible. Accurate recording of transactions will allow you to run reports by Reason Code at a later date to help track your inventory adjustments.
- For example, if you are negatively adjusting an item due to a TRASH adjustment, you may wish to select a Reason Code that corresponds to the type of Trash adjustment you are making. When you run the Receipts and Distribution report, it will find the transactions labelled with your designated Reason code for Trash for proper reporting.
-
Enter the Document No. (If you have assigned a document number series for your journal template or batch, the value will populate for you).
-
Enter or select the Item No. you wish to adjust.
-
Enter the Location that the adjustment will take product from (negative adjustment) or put product into (positive adjustment).
- If using Branches, be sure to show the Branch Code column and to select the appropriate Branch.
-
Enter the quantity to be adjusted in the ‘Quantity’ field.
-
If the “Entry Type” is ‘Negative Adjustment’, enter or select the Pallet No. you wish to adjust.
-
If you are not palletizing items, then your Pallet No. field will be blank. In this case, you may wish to select the Lot No. you are adjusting.
-
Once the Pallet No. (or Lot No.) is selected, the Bin, Lot and other information from the original Pallet will auto-fill on the line.
-
-
If the “Entry Type” is ‘Positive Adjustment’, enter or select the Pallet (or Lot if not using Pallets) for which you wish to increase the quantity or enter Tiers and Height information to facilitate creating a new Pallet and Lot.
-
If selecting an existing Pallet/Lot, the other information associated with that original pallet/lot will auto-fill on the line.
-
If creating a new Pallet/Lot, be sure to fill in the Bin Code where the product is to be stored, Lot Consume By Date, Lot Expiration Date, Lot Ship by Date, FBC Product Source, FBC Product Category and any other pertinent information.
-
Finally, enter the Tiers and Height to determine how many pallets need to be created for this entry.
-
Click on Assign Lots from the Actions ribbon to assign a lot number for the positive adjustment line. If more than one positive adjustment lines exist, the function will create lots for all such lines.

- A dialog box will display asking if you want to assign lot numbers. When yes is selected, the lot number will be generated, and a confirmation prompt will display that the assignment is complete.

- If using Pallets, click on Create Pallets from the Actions ribbon.

- Select to Create Pallets, Print Labels or both at this time. If the labels are not printed now, they can be printed later using the same function or from a report.

-
-
Be sure to confirm that all the data has been entered correctly, especially paying attention to the Posting Date, Entry Type and Quantity and then Post or Post & Print the journal.
Correcting Lines
If a Lot number already exists on the transaction line and the user needs to change the Item Number, you must clear the “Lot No.” field before changing the Item No. Attempting to change the Item No. when a Lot No. is already assigned results in the following error.
![]()
Related Topics
- Item and Lot Ship By, Consume By and Expiration Dates
- Item Journal Suggest Lots
- Item Reclass Journal Overview
- Physical Inventory Counts and Inventory Journal
- Reason Code Mandatory Overview
- Warehouse Pallets and Lots
- UNC Coding and Relation to FA Reporting