Accounts Payable ACH Processing
Ceres allows you to pay vendors or send refunds to agencies using electronic payments rather than by printing paper checks. Electronic payments are made through the Automated Clearing House (ACH) and exported into a standard National Automated Clearing House Association (NACHA) file format used by most banks in the United States. Ceres 5 provides the capability to create the transmission files; it does not transmit or upload the files to your financial institution. That is a manual process and varies by bank.
ACH transactions require separate setup for both the organization bank account that will be sending payments and the vendor bank account that will be receiving payments.
Ceres also allows refunds to be paid to agencies via electronic payments, but some of the fields required for this functionality are hidden by default on the Agency Card and would need to be added by your VAR.
If you're trying to record a payment in Ceres that's already been paid through a service like Concur or Bill.com, see the Processing AP Checks document
Ceres Object release 5.00.00 is required for the functionality described in this document.
Set up Organization Bank Accounts for Electronic Payments
-
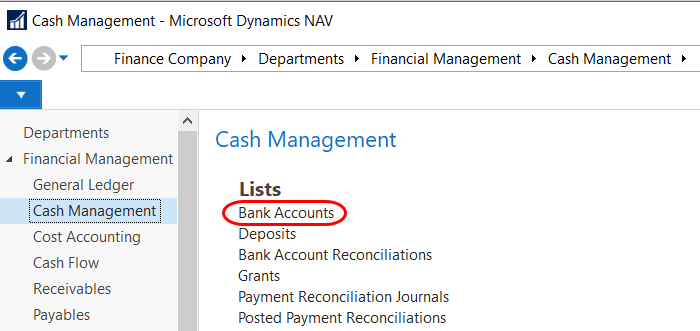
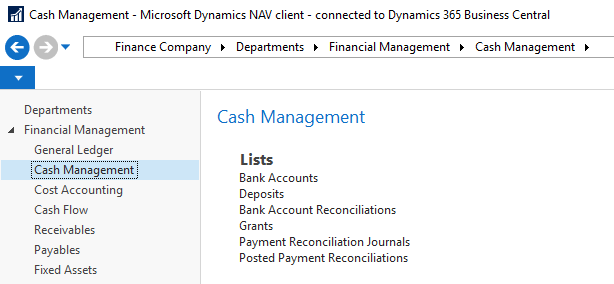
Details about ACH are set up on the organization’s Bank Account card. The Bank Account card can be accessed from Departments ⯈ Financial Management ⯈ Cash Management ⯈ Lists ⯈ Bank Accounts, or by entering Bank Accounts in the search box and choosing the related link.
-
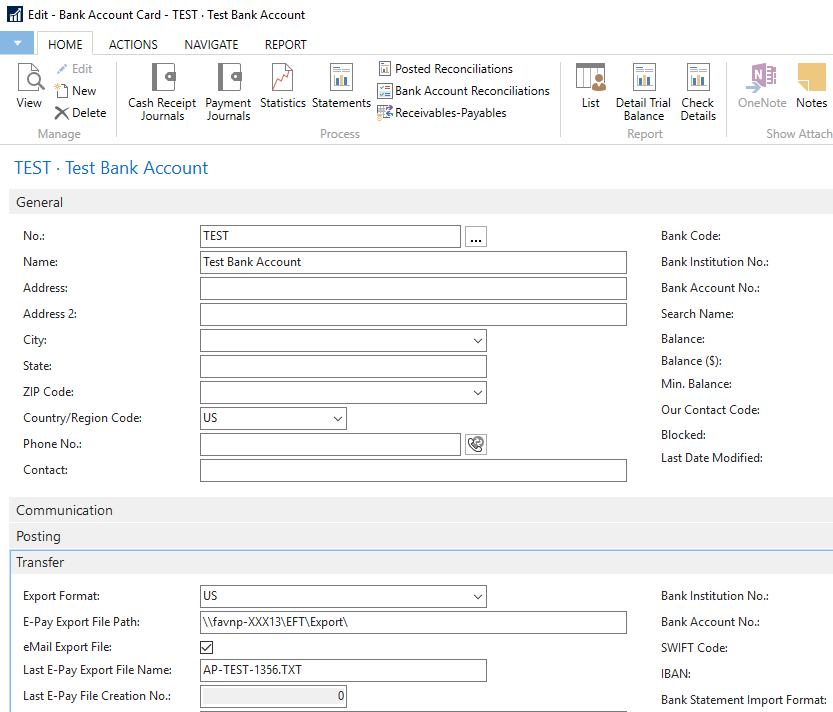
The fields associated with ACH can be found on the Transfer and Posting FastTabs of the Bank Account Card, as shown below.
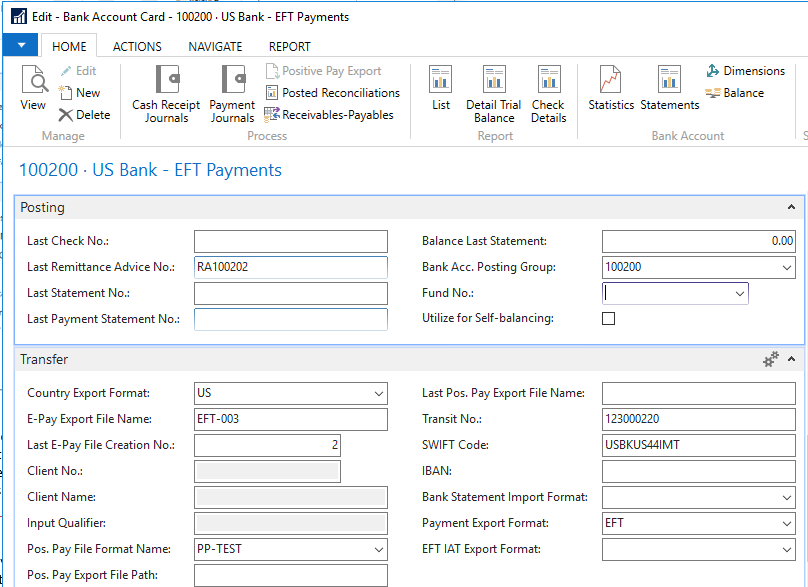
Last Remittance Advice No.: Used to number remittance advices.
noteInstead of using check stock to print remittance advice for vendors receiving electronic fund transfers, you can print remittance advice using blank paper. If you use this option, you must use a different number series so that they are not confused with your check numbers. We recommend that you use letters in the number series so that you can easily identify these as non-checks. For example – RA00000.
Country Export Format: Required. Choose US.
E-Pay Export File Name: The export file name without any path information. The file name should contain digits. The name will be incremented every time that it is exported, maintaining a permanent record of every file that you export to the bank.
Last E-Pay File Creation No: Will initially start at zero and will increment as Export Files are created.
Transit No: The routing number for your bank account. Note: The Bank Account No. and Bank Branch No. (if required for ACH) are on the General FastTab.
SWIFT Code: The SWIFT Code number for your bank. This is only required if you will be using wire transfers and is not required for ACH.
Payment Export Format: Required. Choose EFT.
Set up Vendor Bank Accounts for Electronic Payments
-
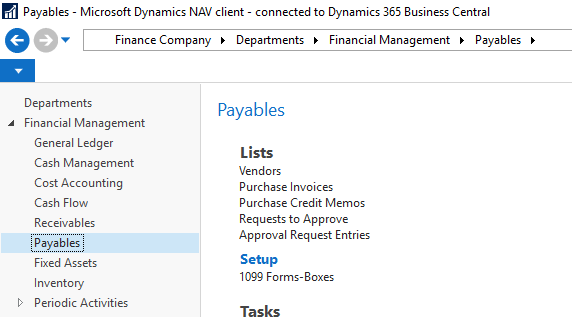
Banking details for the vendor are set up on each individual Vendor card. The Vendor card can be accessed from Departments ⯈ Financial Management ⯈ Payables ⯈ Lists ⯈ Vendors, or by entering Vendors in the search box and choosing the related link.
-
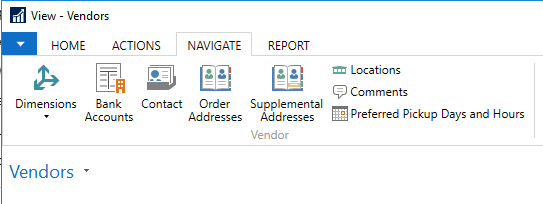
Select the vendor for which you want to set up electronic payments. On the Navigate tab, in the Vendor group, choose Bank Accounts.
-
Select the vendor bank account or create a new vendor bank account. The fields related to ACH are detailed below.
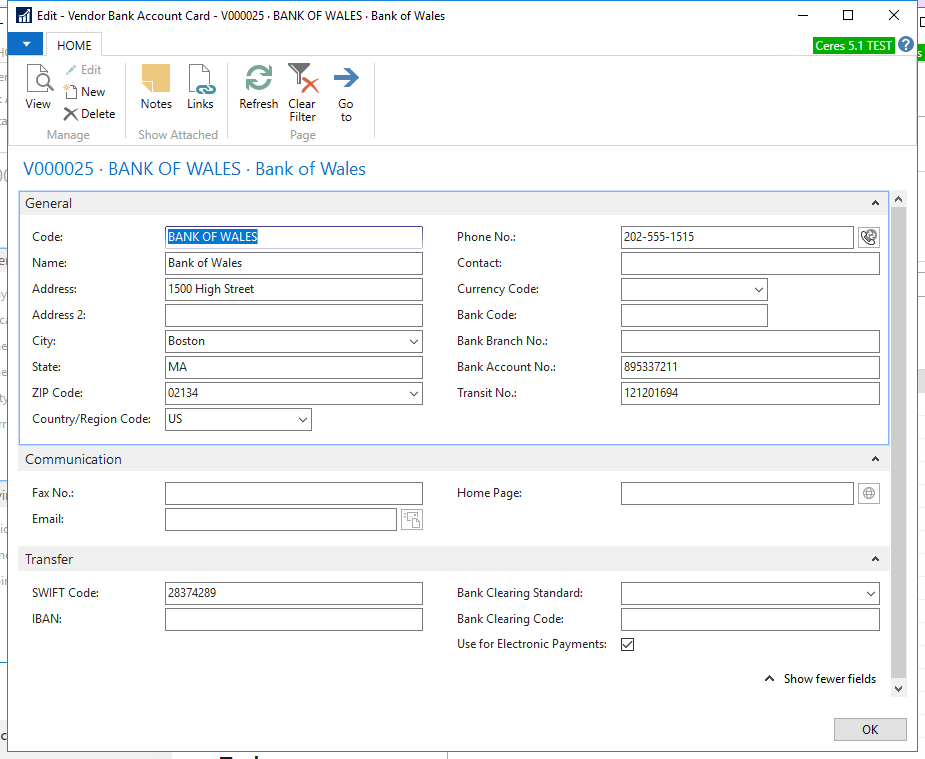
Code: Used to identify this vendor bank account. You cannot have two accounts for the same vendor with the same code.
Name: The name of the bank where the vendor has this bank account.
Address: The address of the bank where the vendor has the bank account.
Bank Account No.: The number used by the bank for the vendor bank account.
Transit No.: The routing code for the vendor bank.
SWIFT Code: The SWIFT Code number for the vendor bank. This is only required if you will be using wire transfers and is not required for ACH.
Use for Electronic Payments: Check this box to indicate that this bank account is used for electronic payments.
noteOnly one bank account for electronic payments can be selected per vendor.
-
On the Payments FastTab of the Vendor Card:

Set the Preferred Bank Account Code to the Vendor Bank Account to have the information default in on the Payment Journal. If this vendor is always paid by ACH, change Payment Method Code to ACH. Ensure that the ACH Payment Method Type is Bank Account, and that the Bank Account No. is set to the bank account you will use to make electronic payments.
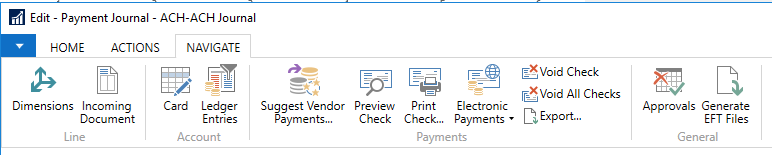
Paying Vendors by ACH
When you select electronic payment in the payment journal, the information is exported to a file, which is transmitted to your bank. The bank then transfers the payment from your bank account to the payee's bank account. If you are using the electronic payment option, both a remittance advice and a transfer file must be generated before the journal can be posted.
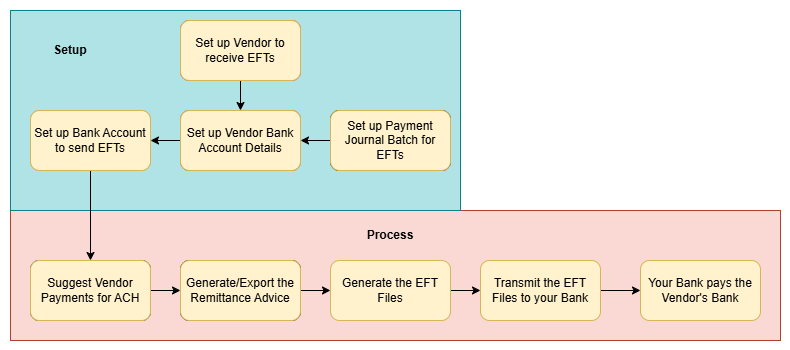
Generating Electronic Payments
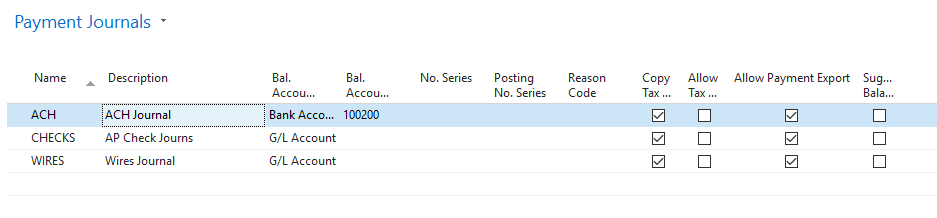
You may wish to set up a distinct payment journal batch for ACH Payments, but this is not required. Any payment journal batch used for electronic payments must have the Allow Payment Export box checked.
-
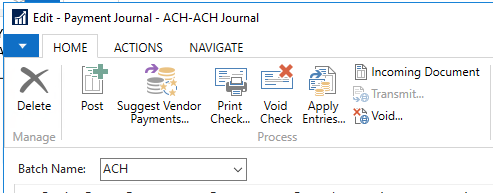
Create a new payment journal from your selected batch.
-
In the payment journal, select Suggest Vendor Payments… from the Home ribbon.
-
In the options panel that opens, fill in the fields below:
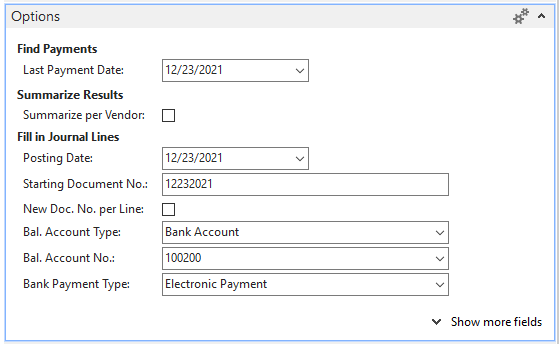
Last Payment Date: The last valid payment date for vendor ledger entries.
Summarize per Vendor: Select to make one line per vendor, rather than having each invoice create its own remittance advice. If summarized, the remittance advice lists the individual invoices that are being paid. All the open invoices and credit memos are combined in a single payment line.
Posting Date: The posting date.
Starting Document No.: The document number that appears on the first payment journal line
New Doc. No. per Line: Select to fill in the payment journal lines with consecutive document numbers.
Bal. Account Type: Bank Account.
Bal. Account No.: The account number for the bank account used for outgoing electronic payments.
Bank Payment Type: Select Electronic Payment to export payment journal entries to a file using the Automated Clearing House (ACH) standard file format.
-
On the Vendor FastTab, select the appropriate filters.
-
To suggest payments, choose the OK button. The Payment Journal will open, and the fields will be populated ready to export the remittance advice and electronic payment transmittal file. In addition to typical fields required by the Payment Journal, ACH requires:

Recipient Bank Account: Set to the vendor’s receiving bank account record.
Payment Method Code: The payment method code defaults in from the Vendor card. An ACH payment method code should be set up with an account type of Bank Account and the Bank Account Number corresponding to the bank account that will be used for the electronic transaction.
Bank Payment Type: Electronic Payment
Generate and Export the Remittance Advice
The Export Electronic Payments report generates a remittance advice for the electronic payment. The remittance advice can be saved for documentation and sent to the vendor to let them know that an ACH payment is incoming.
-
In the Payment Journal, select Export… from the Navigate ribbon.
-
In the Export Electronic Payments options panel that opens, enter the following information.

Bank Account No.: The account number for the bank account used for outgoing electronic payments.
Print Company Address: Check this box if you wish to print your food bank’s address and logo on the remittance advice.
Output Method: Choose how you want to generate the remittance advice. Email requires SMTP setup detailed in the section below. XML export requires setup from your VAR.
-
Select OK to generate the remittance advice. Generating a remittance advice with an Output Method other than Preview sets the Check Printed and Exported to Payment File flags on the Payment Journal.

Generate and Export the ACH Transfer File
-
In the Payment Journal, choose Generate EFT Files from the Navigate ribbon.

-
The Generate EFT Files page will open.
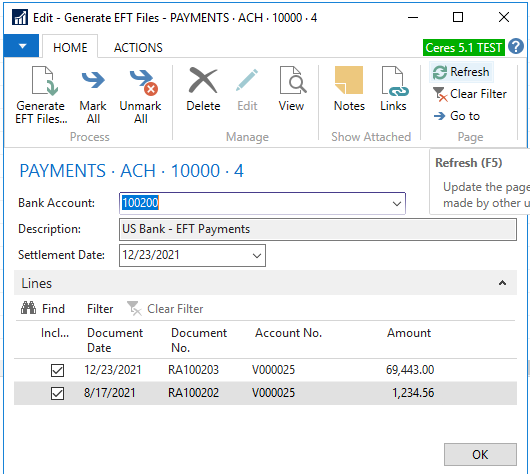
Bank Account: This should be the bank account number that you are using for this transaction.
Settlement Date: The date that these transactions will be posted.
In the Lines section, ensure that any transactions you want included in the ACH transaction have the Included box checked.
-
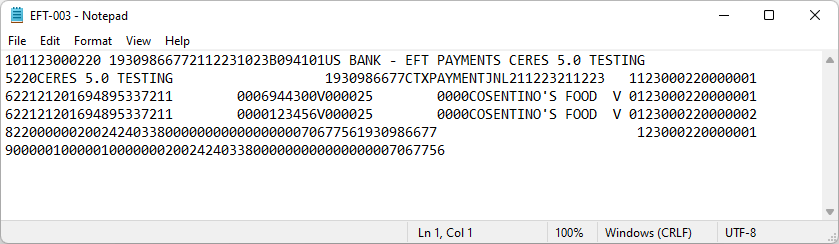
Select Generate EFT Files… from the Home ribbon. In the Browse for Folder window, select the location that you want the EFT file to be saved, and click Save. The file will be generated. Click OK to close the window.
-
In the Payment Journal, choose Post from the Home ribbon to post the journal.
-
Upload the EFT file to your bank using their ACH upload process.
Emailing Remittance Advice Setup (optional)
In the Export Electronic Payments step above, Ceres generates a remittance advice for the electronic payment. If you choose to email the remittance advice, additional SMTP and email setup are required:
-
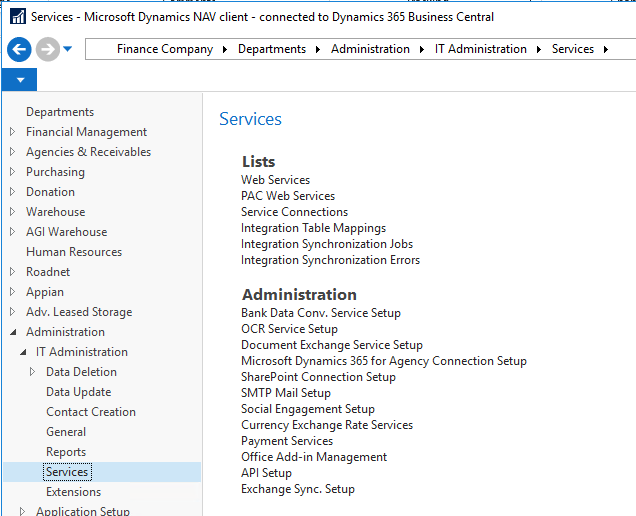
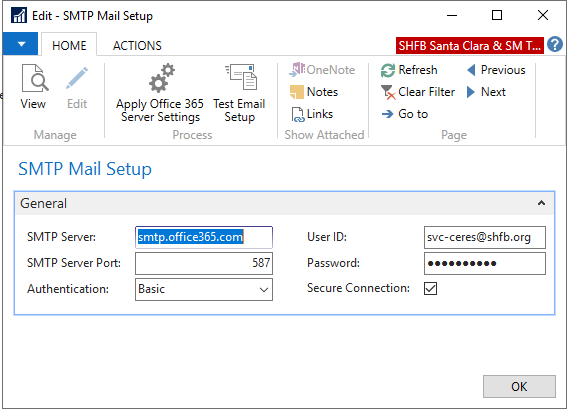
The SMTP Mail Setup page is accessed from Departments ⯈ Administration ⯈ IT Administration ⯈ Services ⯈ SMTP Mail Setup, or by searching for SMTP Mail Setup:
-
You need to work with your technical team to get the setting to support SMTP email.
-
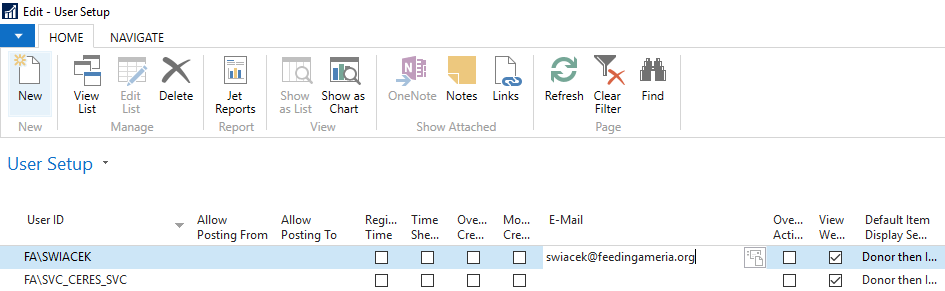
Once SMTP Mail Setup is complete, you will need to enter a valid email address for the user running the export.
-
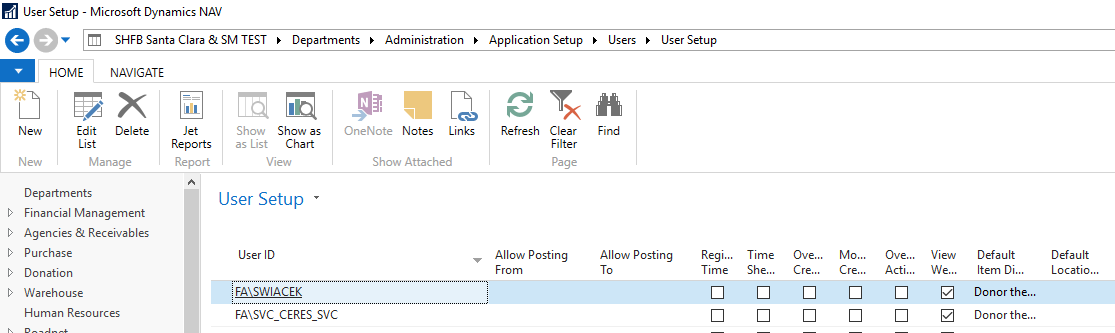
The User Setup page is accessed from Departments ⯈ Administration ⯈ Application Settings ⯈ Users ⯈ User Setup, or by searching for User Setup:
-
Select Edit List.
-
Enter the email for the user who will be running the ACH Export.
-
The Bank Account page is accessed from Departments ⯈ Financial Management ⯈ Cash Management ⯈ Bank Accounts, or by searching for Bank Account:

-
Select the Bank Account and click Edit.
-
Check the eMail Export File checkbox.
-
The process to export the file remains the same. When a user clicks to Export the ACH file, this file is still generated and will be saved on the middle tier server. Additionally, the user will receive a copy of the file in an email.