Mass Emails
This document illustrates the step-by-step process of using the Ceres 5 Mass Email functionality to send emails to the following entities:
- Parent Agencies
- Agencies
- Shoppers
- Vendors
- Donors
- Contacts
Ceres Object release 5.00.00 is required for the functionality described in this document.
Overview
In Ceres, the user can send out mass emails to either all or filtered groups of
- Parent Agencies
- Agencies
- Shoppers
- Vendors
- Donors
- Contacts
The user can type one subject, email body and attach documents to be sent with the email. Mass email is very useful if you want to send out information to a large group of constituents at once, for example announcing an unexpected closure or providing information to a selected Order Group.
The same email body and attachments are sent to all selected entities with an email address in the system. It does not function as a mail merge.
Agency and Donor Document Email Functionality and Agency Express 3 (AE3) email notifications for Shoppers are also available for generating certain types of emails with Document Attachments for Agencies and Shoppers. See the Related Documents Section for more information.
Setting up Mass Email Functionality
In addition to the SMTP mail setup defined here, you may need to work with your Exchange Administrator to allow emails to large numbers of recipients to be processed. Otherwise it may be flagged as junk mail or quarantined by the server. In addition, if you manage your own Ceres server and Exchange Server, you may need to install and register a mail handling DLL to allow emails to bypass the local Outlook client. The AE3 Shopper email and Donor/Agency Email referenced above has similar setup requirements. If you are hosted, talk to the Service Desk about this setup.
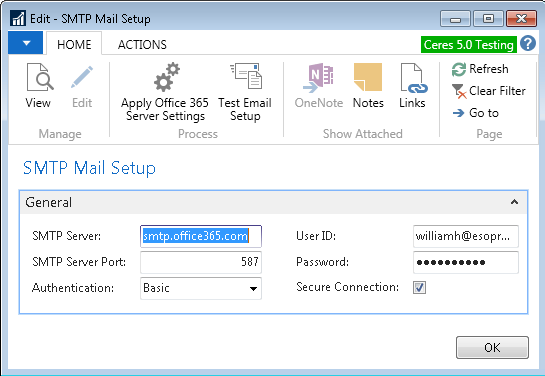
SMTP Setup for Mass Email
-
To send mass emails from within Ceres to your email system, you must set up the SMTP (Simple Mail Transfer Protocol).
noteThis is similar, but different than the email protocol set up for sending automatic email messages to Shoppers for Agency Express.
-
This setup for Mass emails can be accessed from Departments ▸ Administration ▸ IT Administration ▸ Services ▸ Administration ▸ SMTP Mail Setup.

-
Specify the STMP Server settings applicable for your food bank as well as the Authentication preference, and an Administrator User ID and Password if required. Typically your IT person or department will handle this setup. If you are a FA Hosted site, you can log a Service Desk ticket for assistance.
Email Address Setup
The Mass email routine will send to all selected Parent Agencies, Agencies and Shoppers that have a valid email address in the following fields:
Parent Agency - Field titled “E-mail” on the Address & Contact Tab, which typically matches the Contact Name from the General Tab.
Agency - Field titled “E-mail” on the Address & Contact Tab, which typically matches the Contact Name from the General Tab.
Note: This routine does not send to the Invoice Email or Statement Email.
Shopper - Field titled “E-mail Address” on the Shopper record.
Donor - Field titled “E-mail” on the Address & Contact Tab, which typically matches the Contact Name from the General Tab.
Note: This routine does not send to the Receipt Delivery Email.
Vendor - Field titled “E-mail” on the Address & Contact Tab, which typically matches the Contact Name from the General Tab.
Contact - Field titled “E-mail” on the Communication Tab, which typically matches the Contact Name from the General Tab.
If any of these fields contain values other than an email address, the Mass email function may fail. Validate your email information before using this for the first time.
Sending Mass Emails
When you send the emails out, an Agencies email provider may trap it in Junk/Spam. You should send a sample email out and ask the Agencies to mark your source address as a trusted sender in their email client.
-
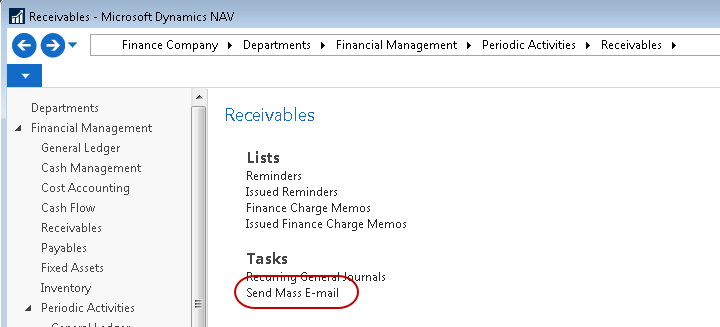
The Mass Email functionality batch routine is located in Financial Management ▸Periodic Activities ▸ Receivables ▸ Send Mass E-mail. You can also add it to your Home Page if desired.
-
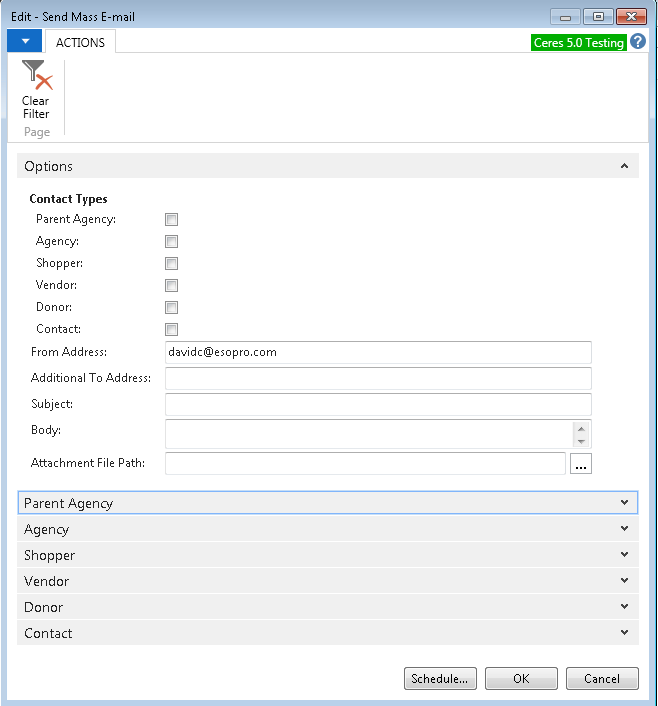
You can select which Contact Type(s) you want to Email by selecting Parent Agency, Agency, Shopper, Vendor, Donor or Contact. Multiple choices are allowed. Ceres will use the email address that is stored on the records as detailed above.
-
The From Address is the Reply-to address that will show in the email.
-
Additional To Address: You can manually enter additional email addresses you want to send this email to. Multiple addresses should be separated by a semicolon.
-
Subject: Enter the email subject. This can be left blank, but that is not recommended or your message may be trapped at the server as a risk.
-
Body: Enter the body of the email you want to send.
noteThe exact same message is sent to all selected entities (all Shoppers with emails for example).
-
Attachment File Path: If you want to include an attachment, browse to the location of the file. The file path will display.
-
If you checked one or more Contact Types in step 2, only those with a valid email address defined will be included, but there can be times where you only want to send an email to a subset of selected entities. This further winnowing of the email list can be accomplished by setting additional filters.
In our example, we will select a subset of Parent Agency contacts. To do so, expand the Parent Agency FastTab at the bottom.
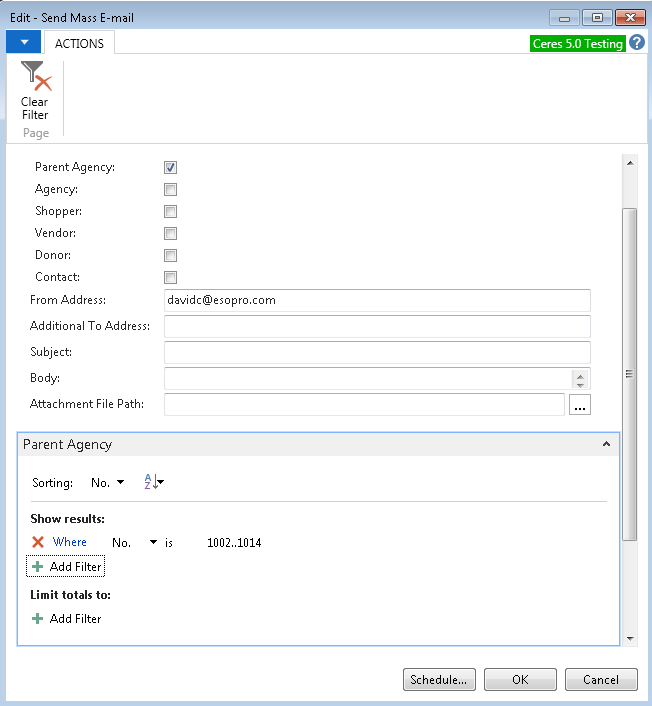
In the above example, only Parent Agency Contacts in the number range of 1002 to 1014 with an email address on the Parent Agency Card will receive the email. You can further refine the recipients of the email by adding additional filters as needed. The fields shown on the Parent Agency, Agency, Shopper, Donor, Vendor and Contact Cards are available for filtering. Any fields that must be accessed via Navigate functions are not available for filtering the email groups.
-
You can set the same filter options for both Agency and Shopper by expanding those FastTabs.
-
Once the email is complete and ready to send, click OK.
-
A status message will pop up when the emails have been sent to the server.