Jet Reports Excel Add-In
The purpose of this document is to explain the process of installing the Jet Reports add-in to Excel from within the Remote Application environment.
Purpose
The purpose of this document is to explain the process of installing the Jet Reports add-in to Excel from within the Remote Application environment. This document will cover the setup of both Jet Basics and Jet Reports.
Logging into Remote Desktop Session
Before we can start working in Jet Reports, we must first log into a Remote Application session.
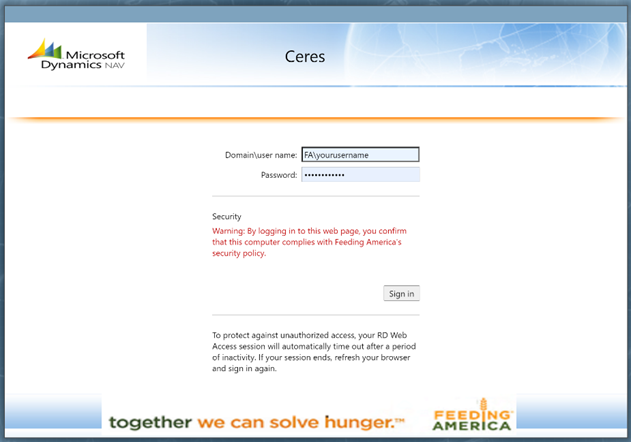
From the Client, open a Web Browser and go to https://ceres.feedingamerica.org. Enter your Feeding America credentials in the following format: FA\Username followed by your FA Domain Password in the Password field.
After logging in successfully, you will see the web portal menu. On this page, you will see any and all Applications that you have access to. See below.
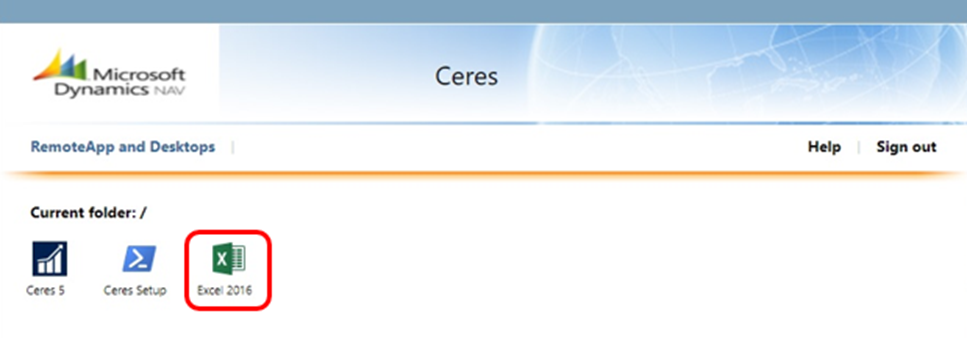
You will only see the specific version(s) of Ceres that your food bank is using in the web portal view above.
Allow Extensions for Known File Types
Click once on Microsoft Excel 2016 applet icon. A window will appear at the bottom asking you what you want to do. Click on “Open”.

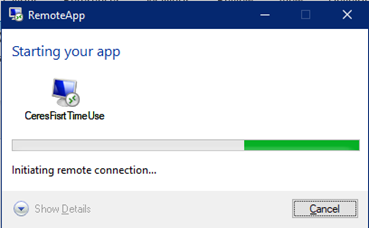
The RemoteApp will start to open Excel 2016.
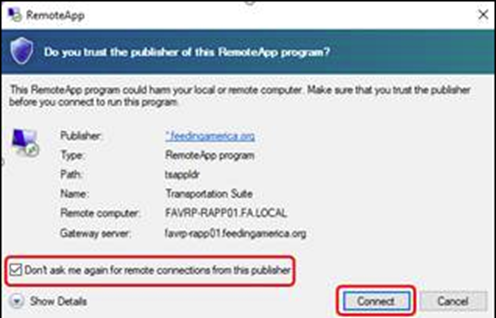
The Remote App may display a connection window. To avoid it in the future, select the checkbox next to “Don’t ask me again for remote connections from this publisher.”
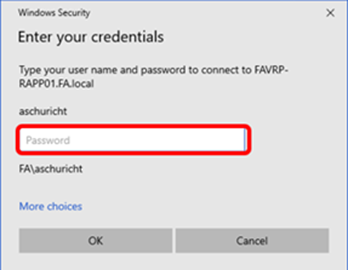
Look for a flashing icon in your System tray or a Windows Security dialog box. You will need to enter your Feeding America credentials once more the same way you did when logging into the Web Portal in previous step. You’re looking for the following dialog box as displayed below.
The RemoteApp setup will start to run.
You will then be prompted for Multi Factor Authentication (MFA) on your mobile device. There are two options: On-screen authentication and phone call authentication. For the on-screen example below, press the Authenticator notification on the screen.

Press Approve to authenticate the sign in.

The RemoteApp setup window will eventually transition to a PowerShell window, which will close automatically after 10 seconds. Please wait for the window to close; do not close it yourself. Once closed, the first-time setup is complete.

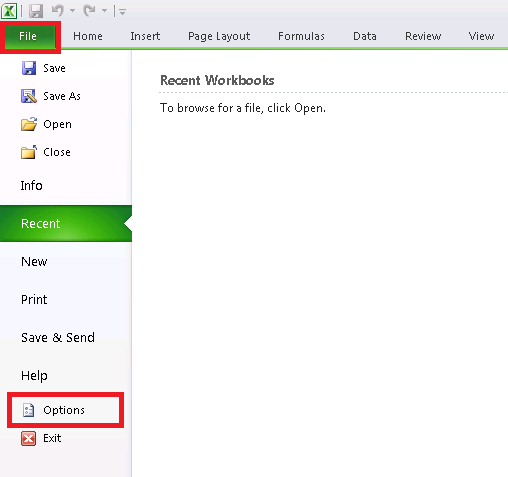
Microsoft Excel 2016 will now open. Click on File 🡪 Options
The Excel Options window will open.
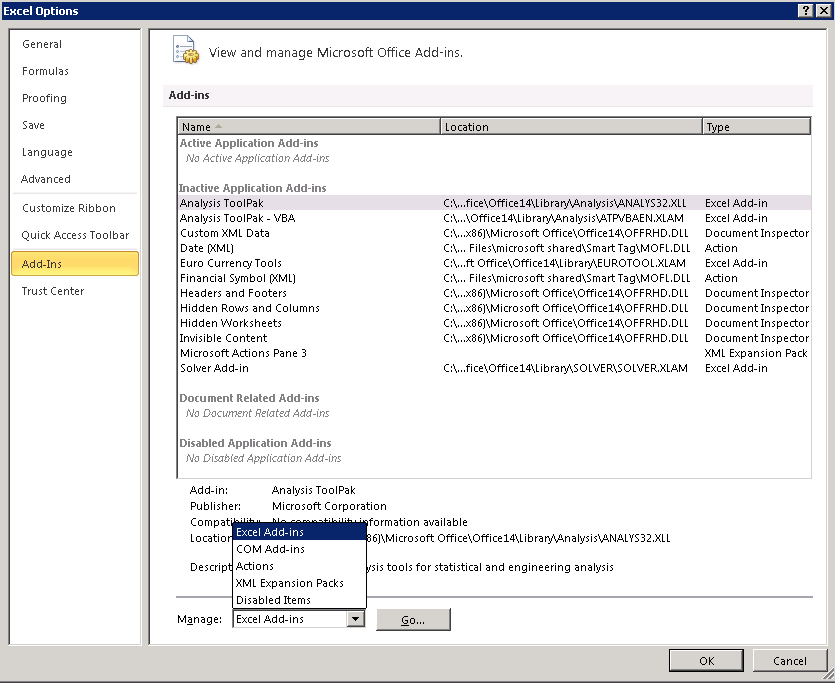
Click on Add-Ins🡪 then the drop-down arrow for Manage: in the lower bottom left of the window. Select Excel Add-ins. Then click Go…
The Add-Ins window will now open
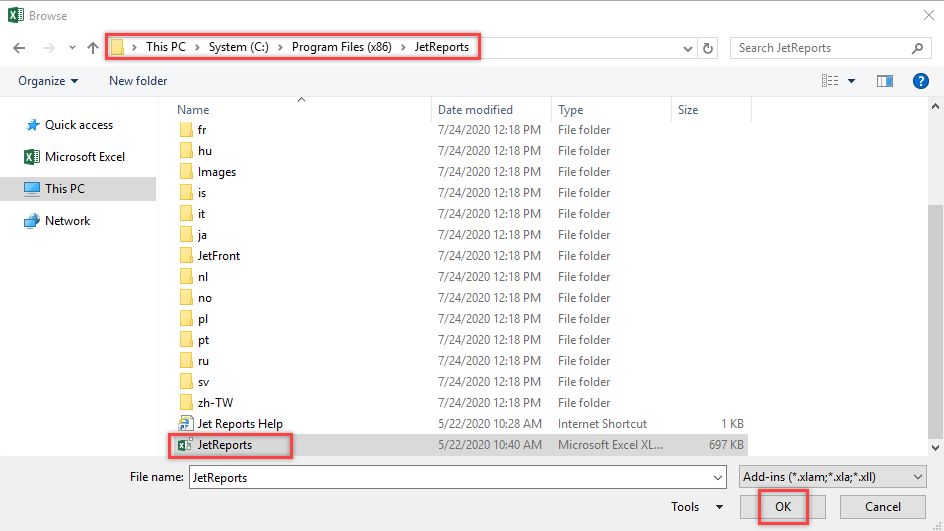
Click on the Browse… button

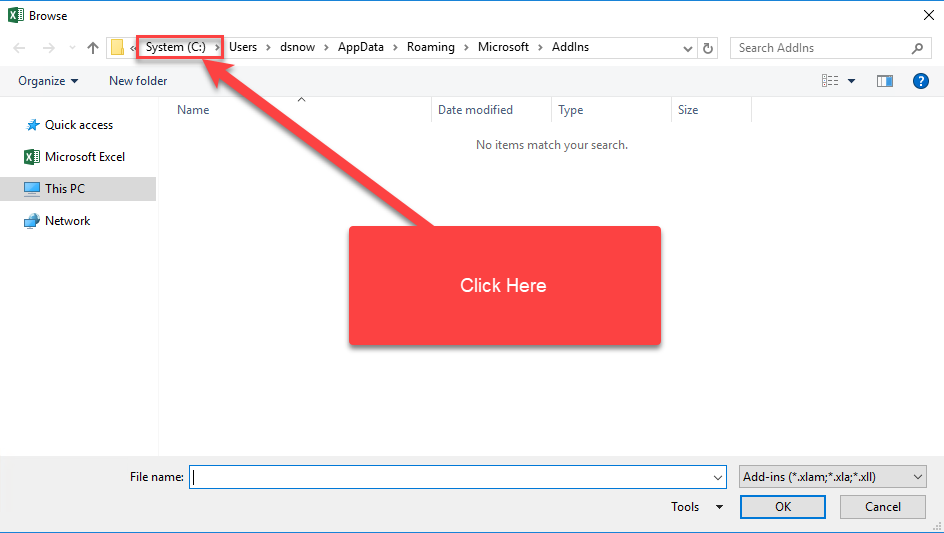
The browse window will open. Click on the “System (C:) at the top in the directory string.
Navigate to This PC🡪 **System (C:)**🡪 Program Files (x86)🡪 Jet Reports 🡪JetReports.xlam - then click OK
You will now see Jet Reports added to the Add-Ins available in Microsoft Excel. Click OK

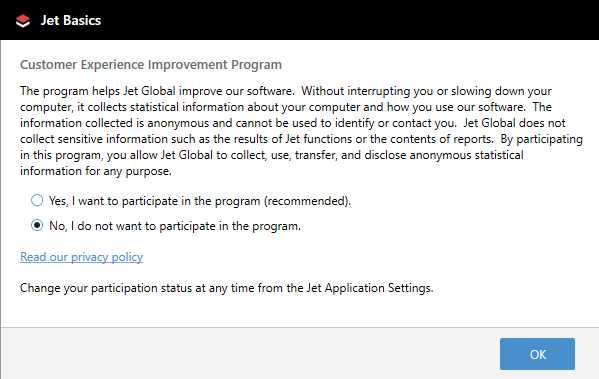
A window will pop about the Jet “Customer Experience Improvement Program”. Click the “No” option, then OK.
You will now see the Jet tab available in the Menu bar in Microsoft Excel 2016

Activating your Jet License
Jet Reports Users Only (Jet Basics users skip to 1.5 Configuring Data Source Connection)
To activate your Jet license follow the steps below:
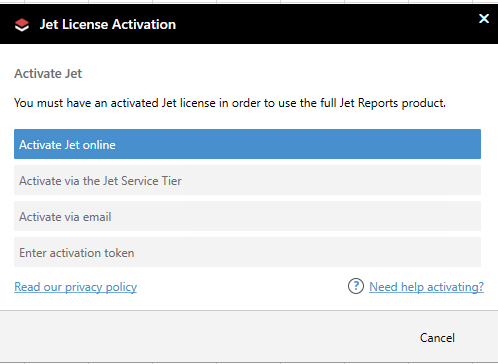
Select the "Activate Jet Reports" button on the Jet ribbon
Select the "Activate online" option
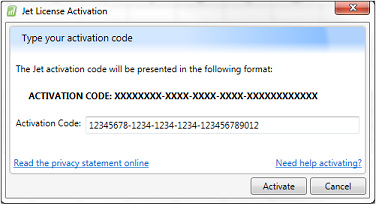
Paste or type your Activation Code into the text box. If you don’t know your activation code, contact your support team.
Click the Activate button
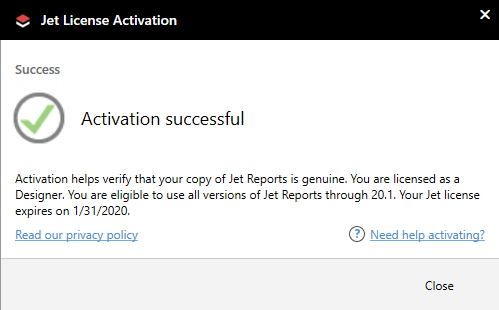
A window will pop saying “Activation successful”. Click the Close button.

Configuring the Jet Report’s Add-In Data Source Connection
Now that we have the Jet Reports Microsoft Excel Add-In in place, the next step is to configure the Data Source Connection.
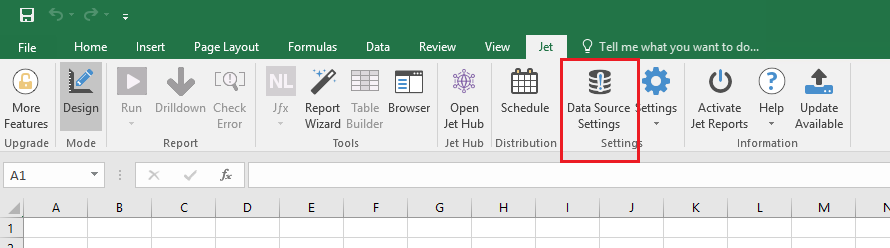
Click on Data Source Settings within the Jet tab in Microsoft Excel 2016
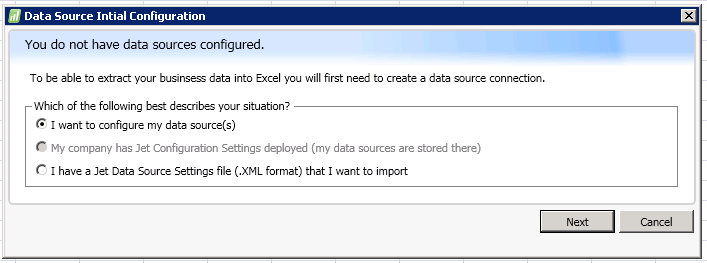
Click on Next to configure my data source(s)
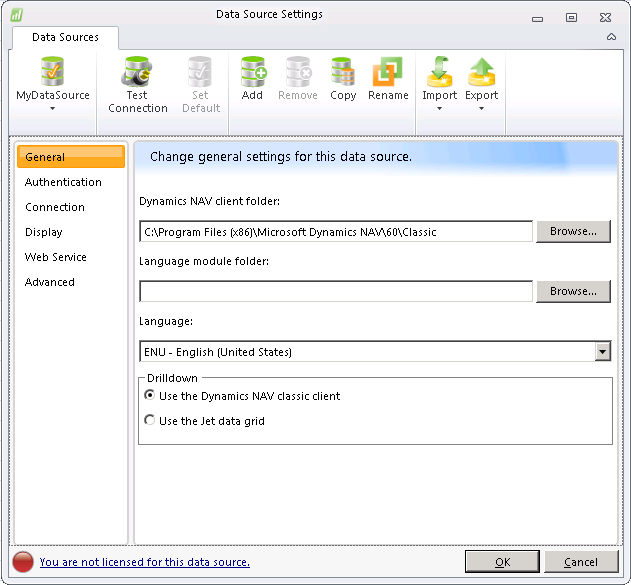
If you are setting up Jet Basic, skip the next step. The new “Add Data Source” will automatically appear. The other thing to note is the ribbon in this window will be different because you can only connect to one database at a time.
Click on Add within the Jet Data Source Settings toolbar
Enter a Name for your Data Source.
Select the Data Source based on the version of Ceres you are running:
-
Ceres2009 – Dynamics NAV 2009 R2 and earlier
-
Ceres 4 or 5 – Dynamics NAV 2013 -2018
Ceres 4 or 5
If you chose Dynamics Nav 2013 - 2018 because you are on Ceres 4 or 5, the Connection Method box will un-gray and you will need to select a connection method. Choose Direct SQL Server

Configuration Settings
Ceres 2009 Users Only (Ceres 4 & 5 skip to Authentication Tab)
General Tab
The first step for Ceres 2009 users is to set the Dynamics NAV client folder. Click the Browse button
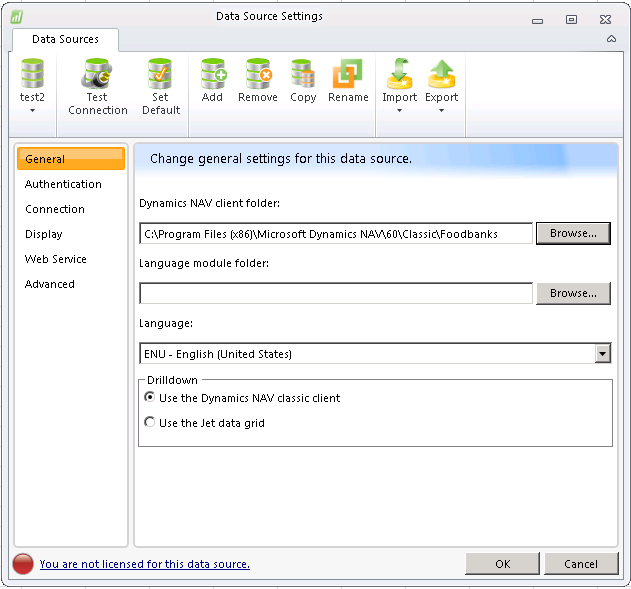
The Browse For Folder window will now open
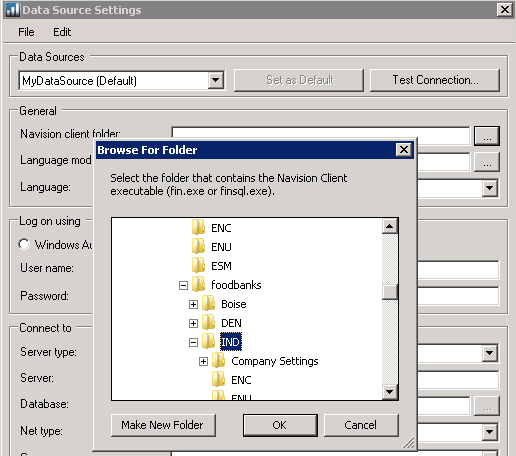
Click Computer🡪 **Local Disk (C:)**🡪 **Program Files (x86)**🡪 Microsoft Dynamics NAV🡪 60🡪 Classic🡪 foodbanks🡪 %yourfoodbank% (**Note: Using IND location as sample site)
Click OK
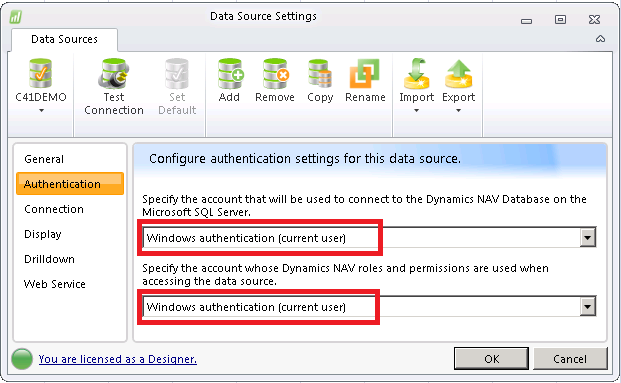
Authentication Tab
(Ceres 4, 5 and 2009 users continue here)
Once you have created a new NAV SQL Server data source, the first thing you must do is specify the account information that will be used to connect directly to the SQL Server. The window looks slightly different if you are connecting Ceres 4 vs 2009 but the answer is the same.
Select Windows Authentication (current user).
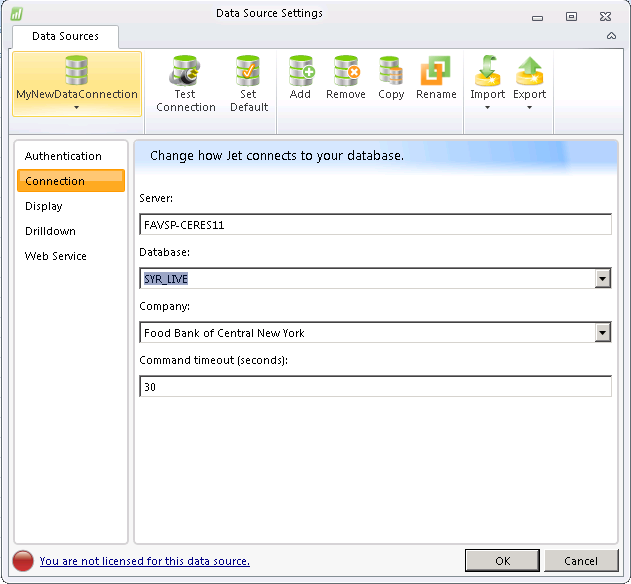
Connection Tab
This tab varies slightly if you are connecting to Ceres 2009 or Ceres 4+. At the end of this section we discuss the two extra options that are required if you are connecting to Ceres 2009.
You will need to provide the name of the SQL Server hosting your NAV database. Your Feeding America Server will be one of the following:
-
FAVSP-CERES13 (Ceres 2009, 4.0, 4.1, & 4.2)
-
FAVSP-CERES17 (Ceres 4.5, 5.0 & 5.1)
Once this information is provided, you can click the "Database" down arrow to select the name of your Ceres database
Click the "Company" down arrow to select the NAV company name (this must be specified even if you have only one company in your NAV database).


Ceres 2009 Users Only (Ceres 4 & 5 skip to Test Connection)
Click the “Server type” down arrow and select the option Microsoft SQL Server.
Click the “Net type:” down arrow and select the option Default.


Test Connection
Click Test Connection to verify your connection is working properly.
You should get a message that your Test Connection Succeeded. Click OK.

Click OK to save your Data Source
You have now successfully installed the Jet Reports add-in for Microsoft Excel 2016 and configured the Data Source connection!!