Document Management - Record Links
This document illustrates how to create, save and link digital documents to records in Ceres 5 using Record Links. Record Links is a Microsoft Dynamics NAV tool that allows users to reference and retrieve documents stored in a central location or establish links to web pages on the internet or intranet.
Record Links allows the food bank to link documents to Agencies, Donors, Vendors, Items, etc. as well as to the transactions generated for each type of entity. One of the benefits of this tool is that the linked document follows the transaction from creation to history (PO to posted PO for example) and is always available for reference.
Ceres Object release 5.00.00 is required for the functionality described in this document.
Setup
Document Locations
In order for documents linked to either a master record or transaction record to be accessible by all Ceres users, it must be stored in a location that is available to all Ceres users. A common file share that is available to all Ceres users is recommended. Additionally, it is recommended that the ability to delete files from the common file share be tightly controlled. To specify the file share location, update the Record Links File Path on the General FastTab of the Company Information Page.

Places where Linked Documents are Supported
A food bank can link digital documents throughout Ceres via Record Links functionality. The record link to the document flows from quotes, to orders, return orders and posted documents. For example, a document linked to an Agency Order, once posted, follows to the posted agency shipment and invoice. Below are places where Record Links are supported:
- Agency – Quote, Order, Invoice, Return Order, and Credit Memo
- Donation – Quote, Order, Invoice, Return Order, and Credit Memo
- Food Drive – Donation Orders
- Purchase – Quote, Order, Invoice, Return Order, and Credit Memo
- Posted Documents
In addition to documents, master records can also have Record Links.
- Agencies & Parent Agencies
- Donors & Parent Donors
- Food Drive Donors
- Vendors & Parent Vendors
- Items
- Bank Accounts
- Contacts
You can link all types of documents including PDF, TIFF, HTML, pictures, Web Pages, etc. Although the record links are stored in the database, the files themselves are stored on a designated document management server or drive.
You can also link documents to certain transactions and have the link flow through to the posted document. The following areas are supported:
- Donation Order to Posted Donation Order (including Donation Receipt)
- Purchase Order to Posted Purchase Order (including Purchase Receipt)
- Purchase Invoice to Posted Purchase Invoice
- Purchase Credit Memo to Posted Purchase Credit Memo
- Agency Order to Posted Agency Order (including Agency Shipment)
- Agency Invoice to Posted Agency Invoice
- Agency Credit Memo to Posted Agency Credit Memo
- Deposits
- AP Checks
- Journal Entries
- General Journal
- Cash Receipt Journals
- Item Journals
- Payment Journals
Linking a Document to a Master Record
The functionality and steps to link documents are identical for all master records. In this example, the Item record will be used.
From the Item Card, click Home ▸ Links.

On the Links page, select the Actions Icon and then select New from the drop-down menu.
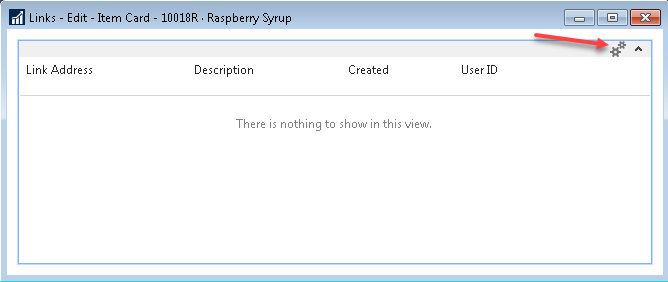
In the Link Address field enter the path and name of the document you want to link.
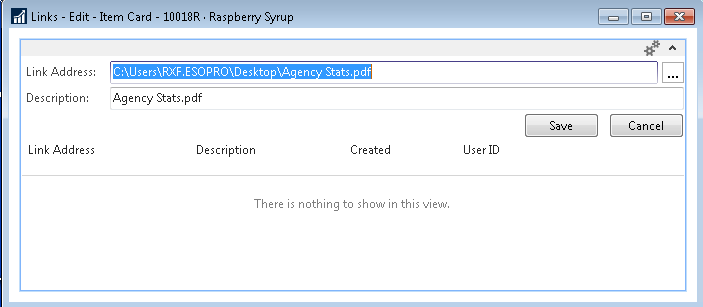
Alternatively, you can click the EditAssist button to locate the file you want to link.

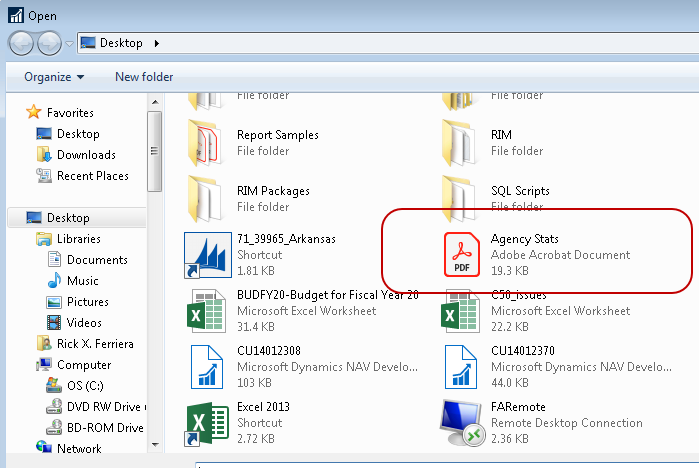
Once the file has been located and “Open” is selected, the Link Address will be filled in with the path and file name selected and the Description will be defaulted to the file name but can be updated to more accurately reflect the Record Link.

Note: The local file will be copied to the shared location specified in the Company Information Page. The Link Address source file will not be deleted.
Once the “Save” button has been selected, the Record Link is saved and the Created date and User ID is populated. Notice that the Link Address now specifies the shared file location from the Company Information record links path.

A Record Link does not have to be a physical file, it can also be a Web Page.

Once saved, to open a Record Link either select the Open Icon to the right of the Link Address or select the Open menu item from Actions Icon.

Note: Links to Web Pages will automatically open the users default web browser and open the web page specified. Links to document files may generate the following dialog box. If a user unchecks the “Always ask before opening this type of file.:” the dialog box should not re-appear.

Once a Record Link has been established, you can select Modify or Delete from the Actions Icon to modify an existing link or delete the link entirely.

Note: Deleting a Record Link does not delete the underlying file. Alternatively, deleting the underlying file does not delete the Record Link and may result in an error when a user attempts to access the Record Link.
Linking a Document to a Transactional Record
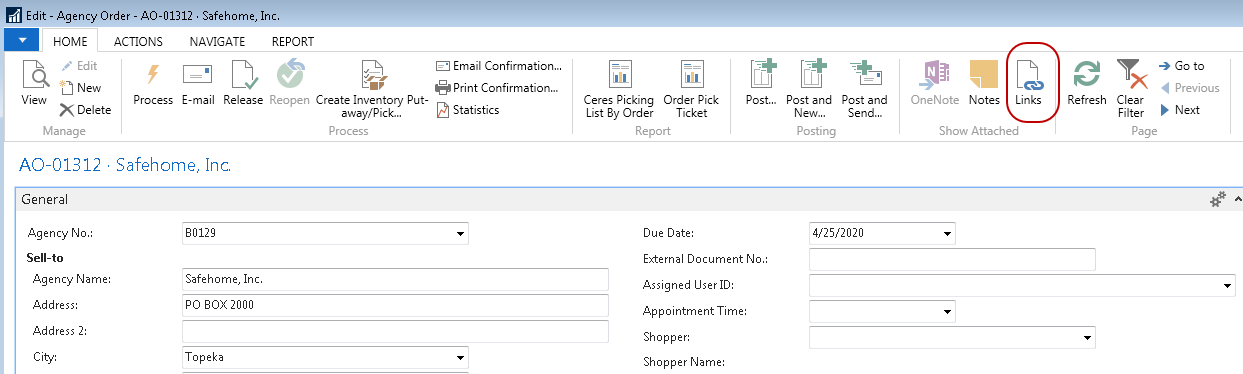
The functionality and steps to link documents is identical for all transactional records except for journals. In the following example, a document is linked to an Agency Order, and then posted through to the Posted Agency Invoice.
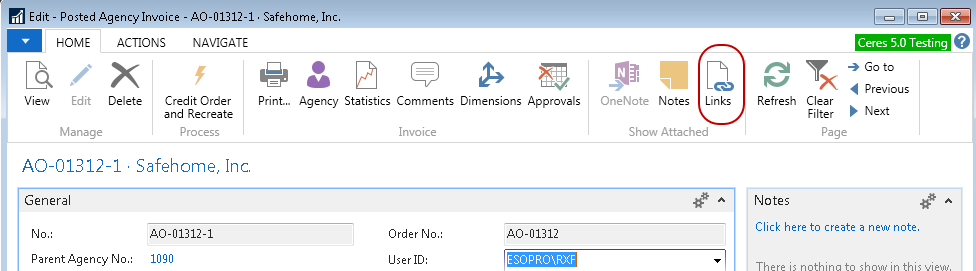
Create the Agency Order and then click on Home ▸ Links.
Browse and link the desired documents. The steps to link documents to transactions are exactly the same as the steps outlined above to link documents to master records.

The documents are now linked to the Agency Order. Process the order through using the business process defined for your food bank.
Once the Agency Order has been picked, shipped and invoiced, go to Agencies & Receivables ▸ Archive ▸ History ▸ Posted Agency Invoices and locate the Invoice.
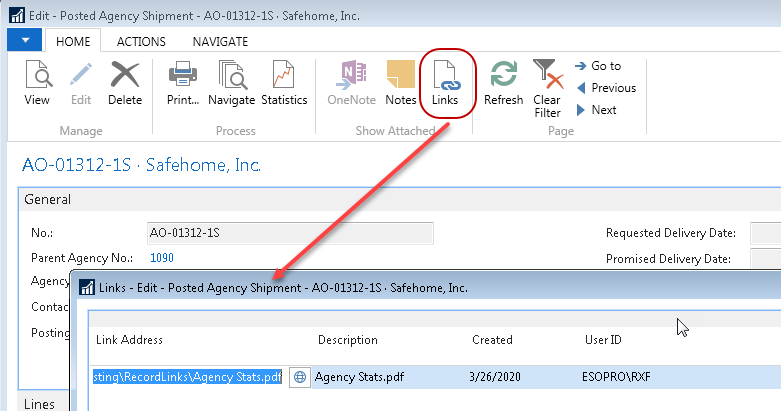
Click Home ▸ Links. The documents linked to the original Agency Order are nowtied to the Posted Agency Invoice.

The same documents are also linked to the Posted Agency Shipment. Go to Agencies & Receivables ▸ Archive ▸ History ▸ Posted Agency Shipments and locate the shipment.
Linking a Document to a Journal Entry
You can link one or more documents to each line in a journal. For this example, the General Journal will be used. Each document will post through to the Ledger Entries and can be reviewed afterwards.
Enter the Journal Lines and then highlight the first line where you want to link a document. In the Links Factbox, select New from the Actions Icon and browse to the location of the document.

Repeat the above step for all lines where you want to link a document. In Journals, Record Links are line specific, so if a Link applies to all lines of a Journal, it is recommended that it be linked to the first journal line.

Post the Journal
Go to the G/L Account Card and drill down on the General Ledger Entries. Highlight the appropriate line and click Home ▸ Links. The document that was linked to the original line is now linked to the Ledger Entry.
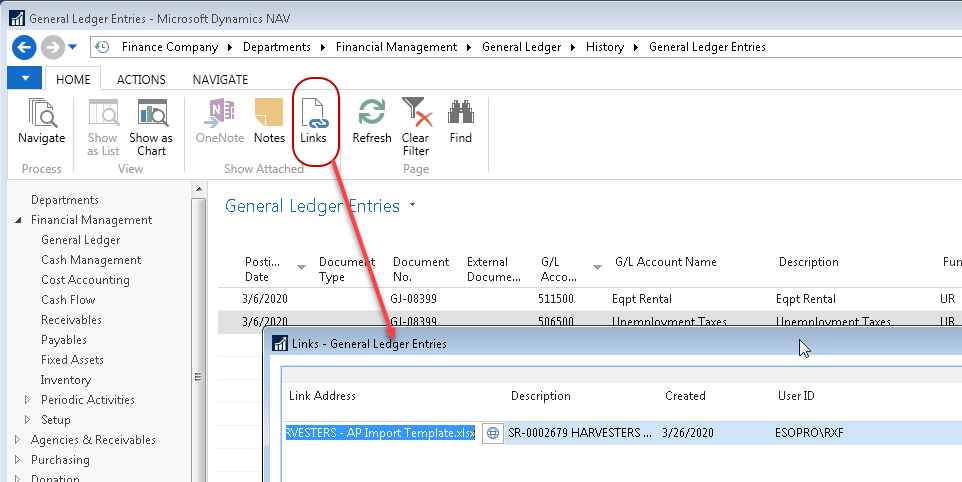
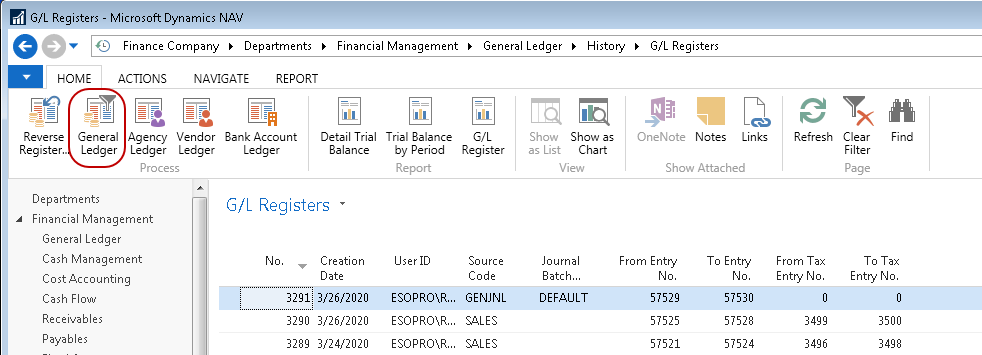
To see the documents linked to all journal lines, select Departments ▸ Financial Management ▸ General Ledger ▸ History ▸ G/L Registers and locate the register that the journal was posted under and then select Home ▸ General Ledger.

On the General Ledger Entries page, the Record linked to each journal line will be displayed in the Links Factbox for the line that is selected.
When using Record Links with a Vendor Payment Journal, Record Links attached to the Vendor Payment portion of the transaction can be accessed from the Vendor Ledger Entry and Record Links attached to the Check portion of the transaction can be accessed from the Check Ledger Entry.
Configuring your Network for RTC File Sharing
The link below provides detailed steps and information about how to configure your network for file sharing in RTC. You will need Domain Administrator privileges and a solid understanding of your network and standard Microsoft tools/technologies such as Active Directory and ADSIEdit to complete this configuration. Contact your Ceres VAR for assistance should you require it.
http://blogs.msdn.com/b/nav/archive/2011/12/22/managing-network-files-in-rtc.aspx